Add MobilityArena as a preferred source on Google
So, to set up cellular service on your iPhone, you need either a physical SIM card or an eSIM. Your SIM (physical or E) is the gateway that connects your smartphone to your carrier so it can use network services like telephone calls, SMS, or mobile internet connectivity.
A physical SIM card is self-explanatory, and most people are familiar with it. An eSIM, on the other hand, is a virtual SIM card; it isn’t physical. But they have the same function – to connect your smartphone to your wireless carrier so you can use their network services.
- Install a physical SIM card to set up cellular connectivity on iPhone
- Activate an eSIM to set up cellular service on your compatible iPhone eSIM Carrier Activation eSIM Quick Transfer Scan a QR Code provided by your carrier Transfer from a different smartphone Activate service through a carrier’s app
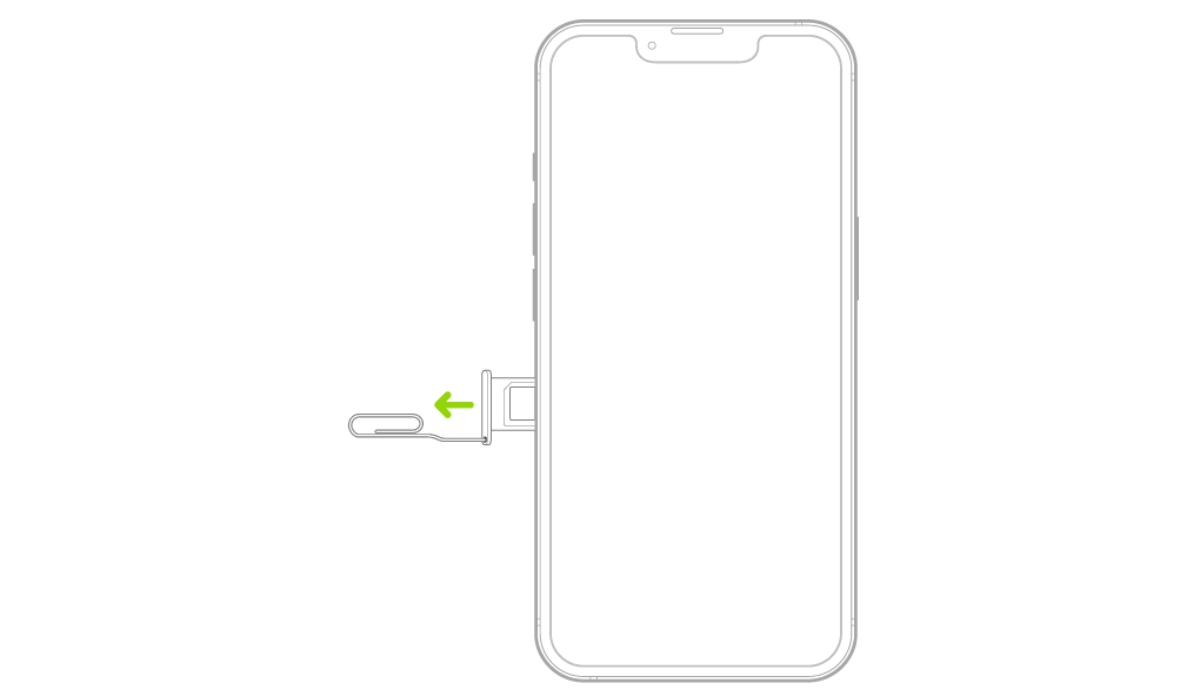
Install a physical SIM card to set up cellular connectivity on iPhone
Once upon a time, all you needed to set up cellular service on your Apple iPhone was a physical SIM card. To do that, you have to use a SIam tray remover to open the SIam card tray and insert your SIM card. Push it back in and on a few moments, your iPhone would connect to your wireless carrier.
That still works today for iPhones that have a physical SIM card slot. However, not all iPhones have a physical SIM slot again. The arrival of eSIM technology has changed that. Some new iPhone models come with both a physical SIM slot and an eSIM. In the United States, all new iPhones sold in the country since the iPhone 14 have eSIM only.
Activate an eSIM to set up cellular service on your compatible iPhone
If you have one of those eSIM iPhones and you are on the US, or you are in any other country where mobile network operators provide eSIM service , detailed below are instructions on how to set up cellular service on your device.
Note that you will need an active Internet connection at any point in time during the process of activating an eSIM. Let’s get started.

eSIM Carrier Activation
If you have never used an eSIM with your mobile number before, an eSIM carrier activation is the main way to set up cellular service on your iPhone.
You need to go to a carrier store or facility to request for an eSIM activation. Your carrier will then assign a new eSIM directly to your iPhone and you will receive a “Finish Setting Up Cellular” notification on your phone, tap it. Cellular service will now be active on your iPhone.
eSIM Quick Transfer
Some carriers support transferring a phone number from your previous iPhone to your new iPhone without needing to contact them. This method requires iOS 16 or later on both the old and the new devices).
On your new iPhone, go to Settings > Cellular, tap Set Up Cellular or Add eSIM, then tap Transfer From Nearby iPhone or choose a phone number. On your previous iPhone, follow the instructions to confirm the transfer.
Note that after your phone number is transferred to your new iPhone, it stops working on your previous iPhone.
Scan a QR Code provided by your carrier
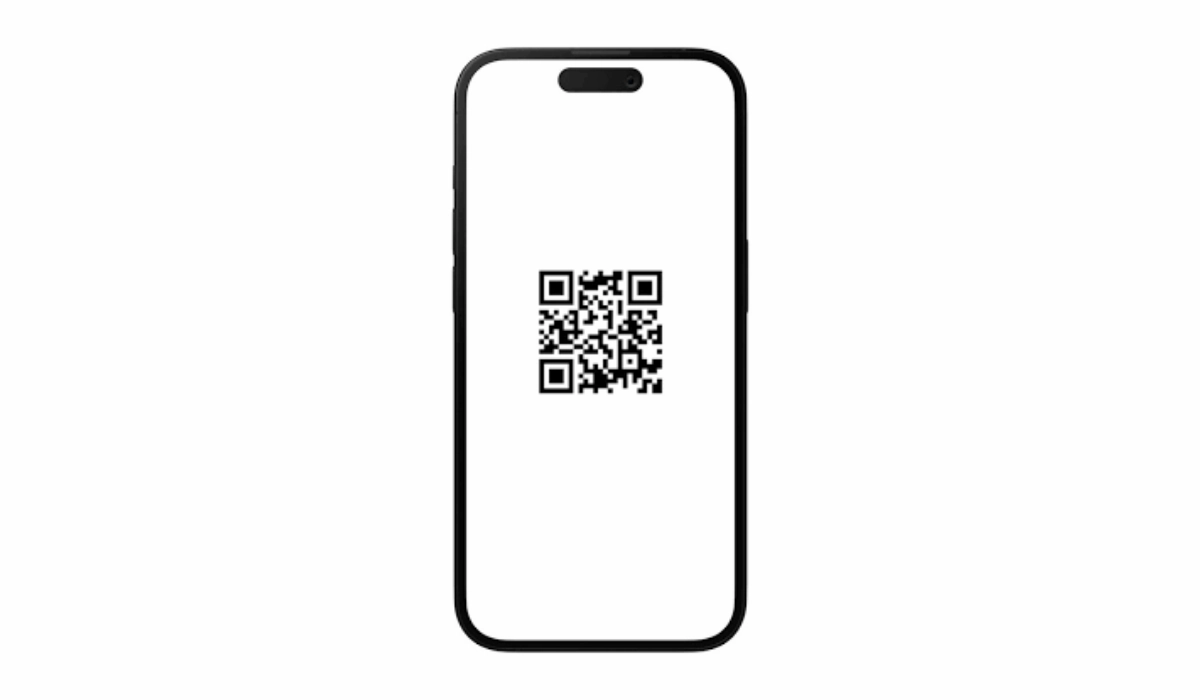
If you have been previously assigned an eSIM by your carrier, usually, you would have been given a QR code that you can use to activate your number on any eSIM smartphone. You can use that QR code to set up cellular service on your new iPhone without having to contact your carrier or mobile network operator.
- On your iPhone, go to Settings > Cellular ,
- tap Set Up Cellular or Add eSIM ,
- tap Use QR Code .
- Position iPhone so the QR code appears in the frame and is automatically scanned by your device.
- You may be asked to enter a confirmation code provided by your carrier.
Transfer from a different smartphone
If your previous phone isn’t an Apple iPhone, contact your carrier to transfer the phone number.
Activate service through a carrier’s app
To set up cellular service using a participating carrier’s app, go to the App Store, download the carrier’s app, then use the app to activate cellular service.
Author:Mister Mobility
Digital Skills and Communication Coach | Mobile Phone Connoisseur since 2001 | Tech Blogging since 2004
Add MobilityArena as a preferred source on Google
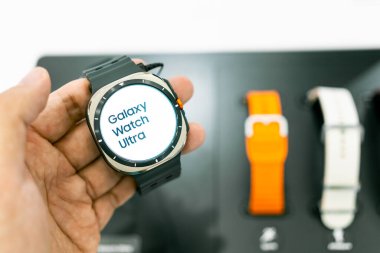
The Samsung Galaxy Watch Ultra is one to reckon with when it comes to the league of smartwatches and it has made waves in the smartwatch market with its impressive features and robust design. However, some users have reported some challenges. From its bulky size and comfort concerns to battery life optimization, health tracking accuracy, and software glitches, the Samsung Galaxy Watch Ultra has its share of user complaints. Despite these challenges, many users appreciate its large, gorgeous display, quick-access buttons for exercise tracking, and comprehensive health features. By understanding these common issues and implementing targeted solutions, users can maximize the potential of this advanced smartwatch. Whether you’re a fitness enthusiast, outdoor adventurer, or tech-savvy individual, the Galaxy Watch Ultra offers a range of capabilities that can be fine-tuned to meet your specific needs and preferences. Read through as I dive into these issues and explore practical solutions to enhance your Galaxy Watch Ultra experience.
- Size and Comfort Concerns
- Battery Life
- Health and Fitness Tracking Accuracy
- Cluttered Samsung Health App
- Water Resistance Confidence
- Conclusion
Size and Comfort Concerns
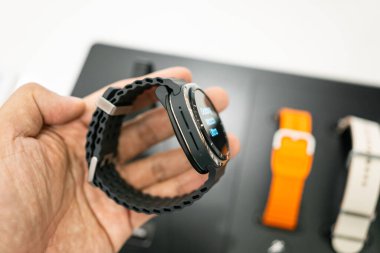
Many users find the Samsung Galaxy Watch Ultra too bulky for comfortable everyday wear. Thankfully there are adjustable solutions to this issue:
- Experiment with different bands: The Marine band can feel loose, so try the Trail band or third-party options for a more secure fit.
- Adjust wearing position: Try wearing the watch slightly higher on your wrist for better comfort and sensor contact.
- Give it time: Some users report getting used to the size after a few weeks of consistent wear.
Battery Life
Although the battery life of the Samsung Galaxy Watch Ultra has improved since launch, some users still desire longer-lasting performance. Follow these steps to optimize the battery life:
- Enable power-saving mode: Use this feature when you don’t need all functions active.
- Adjust screen brightness: Lower the brightness or use auto-brightness to conserve power.
- Limit always-on display usage: Turn this off when not needed.
- Disable unnecessary notifications: Reduce the number of apps sending alerts to your watch.
Health and Fitness Tracking Accuracy
One of the reasons smartwatches are useful is because of the health and fitness tracking system in them. However, some users of Samsung Galaxy Watch Ultra have reported inconsistencies in health metrics and fitness tracking. You can enhance the tracking metrics with the following steps:
- Ensure proper fit: The watch should be snug but not tight for accurate sensor readings.
- Calibrate the watch: Use GPS-assisted workouts to improve distance and pace accuracy.
- Update regularly: Install the latest software updates, which often include improvements to tracking algorithms.
Cluttered Samsung Health App
The abundance of information in the Samsung Health app can be overwhelming. Simply navigate through with these simple steps:
- Customize your view: Use the phone app to reorder and hide sections you don’t use frequently.
- Focus on key metrics: Identify the most important data for your goals and prioritize those in your daily checks.
- Explore third-party apps: Consider alternatives like Google Fit or Strava for a different interface and feature set.
Water Resistance Confidence

While the Samsung Galaxy Watch Ultra is rated for water resistance, some users are concerned about long-term durability. Follow these simples steps to enable adequate durability:
- Rinse after exposure: Always rinse with fresh water and dry thoroughly after swimming or exposure to salt water.
- Avoid extreme pressure: While suitable for swimming, avoid high-impact water sports.
- Regular maintenance: Have the water resistance checked annually at a Samsung service center.
Conclusion
The Samsung Galaxy Watch Ultra is a powerful device with impressive capabilities. While these issues may seem daunting, most can be resolved through simple adjustments or software updates. By implementing these practical solutions, you can significantly enhance your Galaxy Watch Ultra experience. Remember, every advanced technology has a learning curve. With patience and optimization, you can unlock the full potential of your Galaxy Watch Ultra. Embrace its robust features, from the brilliant display to the comprehensive health tracking, and enjoy a smartwatch that’s ready to tackle your active lifestyle with renewed efficiency and reliability.
