Add MobilityArena as a preferred source on Google
I’m constantly changing settings on my Windows PC to fit my mood for the day. 80% of the time, I’m typing away on my computer. And each time I turn it on, it’s either too bright or not bright enough. So, if you’re reading this guide as the person who made it possible to adjust screen brightness settings, you have my thanks forever.
If, unlike me, you don’t know how to adjust screen brightness on Windows PCs, I’m here to save your eyesight (and your life too, you’re welcome!). And if you already know how to do this, you might find an easier and faster alternative among my suggestions. So, here are different proven ways to adjust screen brightness on Windows PCs.
How Can You Adjust Screen Brightness on Windows PCs?
Below, I’ve described seven different methods you can try to adjust screen brightness on Windows PCs.
Use the Keyboard Keys
Using the keyboard’s keys is the fastest way to adjust screen brightness on Windows PCs. Note that it’s possible that you won’t have these keys because not all keyboards are created equal, but it’s still an option worth considering. The F1 through F12 keys are located at the top of your keyboard, and depending on your keyboard, two of these numbers will help you adjust your screen’s brightness easily.
For example, some keyboards feature a brightness option where pressing F5 increases the brightness while pressing F4 decreases it. On mine, I have an F9 key that lowers brightness and an F10 key that increases it.
Use Windows 10/11 Settings
Another way to adjust screen brightness on Windows PCs is through Settings . Here’s how to do it:
- To open Settings , press Windows key + I .
- Click on System > Display .
- You should notice a slider next to “ Brightness and color ” that you can use to adjust brightness as high or low as needed. You’ll see the brightness change in real-time, so just use the Brightness slider till you get the ideal level of brightness.
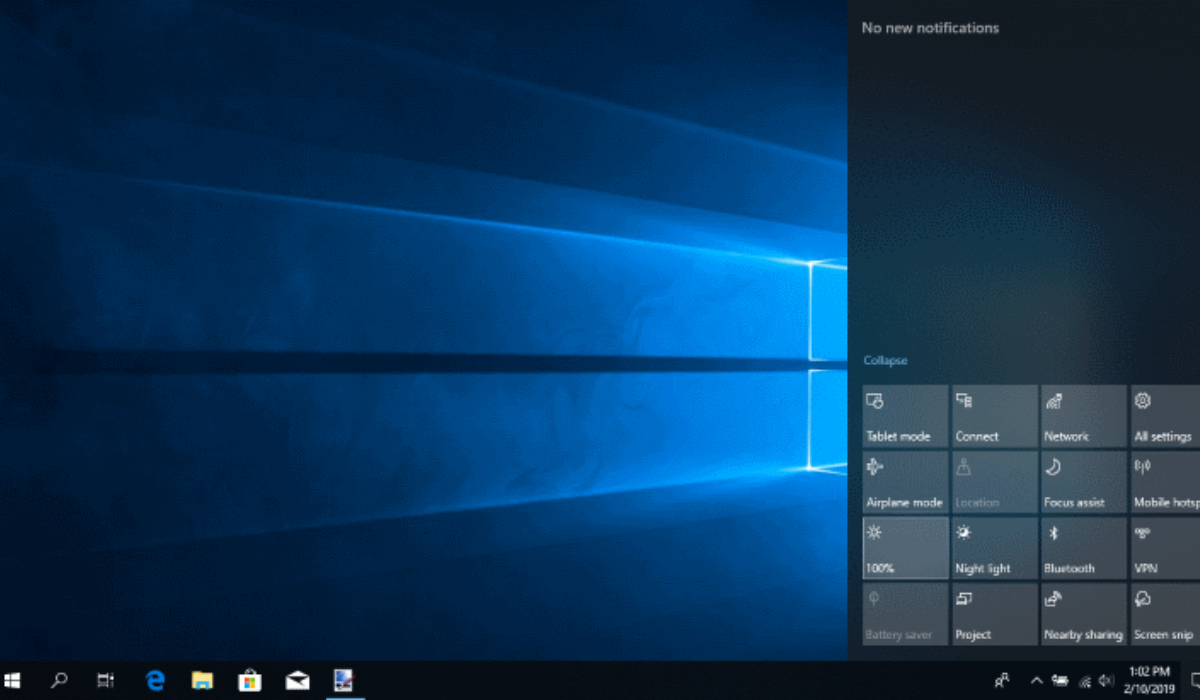
Use the Action Center
Here’s yet another quick and easy way to adjust screen brightness on Windows PCs — the Action Center ! By clicking simultaneously on the Windows + A keys, you can access the Action Center . The first slider up will be the brightness slider. To change your screen’s brightness, use your fingers if your computer has a touchscreen or your mouse.
So far, this is the third suggestion to adjust screen brightness on Windows PCs, and I feel like you should have found one that works great for you by now. However, if you haven’t, keep reading.
Use the Mobility Center on Windows 11
If you still need more alternatives to adjust screen brightness on Windows PCs, you can also check out the Mobility Center. By right-clicking on the Start Menu and selecting Mobility Center at the top, you’ll get to the Mobility Center easily. The first choice on the left will be Display Brightness . Once you’re there, change the brightness with the slider until it suits your preferences.
Use Command Prompt
Even if this method is less intuitive than the others in this guide, it may be all that works for you to adjust screen brightness on Windows PCs. You’ll need to launch the Command Prompt as an Administrator if you must use it to change your screen’s brightness.
To do this, enter Command Prompt in the search bar and select Run as administrator from the list of results that appear. Enter the following command once it is open:
“ PowerShell (Get-WmiObject -Namespace root/WMI -Class WmiMonitorBrightnessMethods).WmiSetBrightness(1, BrightnessValue) ”
Don’t forget to modify the brightness value where it reads so in the command prompt. Here’s what I mean —, the command should be as follows if you want to set your screen’s brightness to 70:
“ PowerShell (Get-WmiObject -Namespace root/WMI -Class WmiMonitorBrightnessMethods).WmiSetBrightness(1, 70) ”
Use Battery Saver
Usually, when my laptop’s battery is running low during a power outage, I make some adjustments to extend its battery life. One of them is turning on battery saver mode, and this effects changes like modifying the screen brightness to conserve battery. You can use this as a way to adjust screen brightness on Windows PCs.
Here’s what you need to do:
- Go to Settings > System > Power and Battery > Battery Saver
- Next, set the percentage for when you’d like the Battery Saver mode to kick in to start by selecting the option that reads “ Lower screen brightness when using Battery Saver ”.
Use Adaptive Brightness in Windows 10/11
It’s ideal for your screen’s brightness to match the ambient lighting so you can prevent eye strain and excessive battery consumption. Setting the brightness to adjust automatically based on the ambient light makes sense in this case, and it’s one way to adjust screen brightness on Windows PCs.
Having a brightness sensor on your smartphone is required for this feature to work. Here’s how to enable it:
- To open Settings , press Windows key + I .
- Activate System > Display . Select Brightness in Windows 11.
- Click the option to “ Change brightness automatically when lighting changes ” if you see it. You’ll know that your PC does not have this sensor if you are unable to see the option.
To summarize , feel free to try any of the recommended options in this guide to adjust screen brightness on Windows PCs. You could also try dedicated third-party apps like Twinkle Tray , or contact Windows Help Center if you need any more help
Author:Joan Agie
Add MobilityArena as a preferred source on Google
Here’s my honest take on laptops that lag often — they suck! I hate nothing more than when my personal computer ruins my day by running slowly. It stretches out already lengthy and stressful tasks, so if you’re currently facing this, I know it can’t be a fun ride for you. Not to worry though, I bring good tidings!
I’ve written this guide and packed it with fire tips to fix lagging on Windows PCs. From today, you can say goodbye to slow running on your PC and get tasks done seamlessly without delays. So, if you’re here, annoyed and desperate for a fix, keep reading to find out the helpful suggestions I’ve included in this article.
- How Can You Fix Lagging in Windows PCs? Check For Apps That Stress Memory, CPU, and Memory Pause Windows Updates Disable Notifications Disable Some Windows Permissions Deactivate Some Third-Party Services
How Can You Fix Lagging in Windows PCs?
Below are my five best suggestions to fix lagging on Windows PCs. Try any of the fixes you can, and keep as many as possible in your mental toolbox for whenever your Windows PC tries to lag or slow you down.
Check For Apps That Stress Memory, CPU, and Memory
When a Windows PC won’t stop lagging, there’s a high chance that certain processes are putting strain on the device. As such, to fix lagging on Windows PCs, you need to find such operations and which components they are putting under the most strain. You can easily check this through the following steps:
- Launch the Task Manager and examine the resource usage of each component, including RAM , CPU , GPU , Disk , and Network .
- If any component shows its resource use percentage to be near 100%, the component is likely stressed and needs to be removed
- To sort the processes using the most resources down, click the column header of that component in Task Manager.
- Remove and end the processes that are stressing out that component. Do this by right-clicking and selecting End task .
Pause Windows Updates
It’s true that systems run more effectively when we allow available Windows updates to install. These updates, nevertheless, can negatively affect system performance if they download in the background or if you don’t apply them in a timely manner.
To fix lagging on Windows PCs, one approach is to pause Windows updates while you are actively working and then allow them to download and install themselves when the workday is over. Doing this means you get to increase your operational efficiency by reducing the bandwidth used for automatic updates.
Follow these steps to pause updates and fix lagging on Windows PCs:
- Launch the Settings app.
- Go to the Windows Update tab by navigating.
- Select the desired timeframe by expanding the dropdown menu next to the word “ Pause updates .”
Disable Notifications
Windows notifies users of new app updates, unresolved problems with installed programs, faulty syncing, etc. on a frequent basis. These notifications use a lot of system resources even if they can be useful occasionally. As such, turning off these notifications for particular apps and services can improve device performance and help fix lagging on Windows PCs.
The steps listed below can be used to disable these notifications easily:
- Go to System > Notifications in the Settings app after opening it.
- To stop receiving any notifications, turn off the toggle next to Notifications .
- In the section labeled “ Notifications from apps and other senders ,” turn off the toggle next to each individual app.
Disable Some Windows Permissions
Some Windows permissions don’t significantly enhance user experience. Note that turning them off won’t have a big impact on how you use your computer, but it may improve performance enough to fix lagging on Windows PCs. Follow the steps below:
- Navigate to the Windows Settings app.
- Click on Privacy & Security
- Examine every setting under “ Windows permissions ” and turn off those you think won’t have an impact on any Windows capabilities you might require.
Deactivate Some Third-Party Services
When you install third-party programs, their services typically start up. These services keep the app current and functional in their own way. However, they could also overtax your system’s resources, especially if they build up over time. You can enhance system performance and fix lagging on Windows PCs by deactivating these third-party apps
Follow these steps to do so:
- Open the System Configuration window by typing “ System Configuration ” into Windows Search .
- Check the box next to Hide all Microsoft services on the Services tab.
- From the remaining services, check the boxes next to the ones you don’t use frequently.
- Select OK after clicking Disable all .
All in all , it’s really great when you get to fix lagging on Windows PCs. You’ll enjoy the renewed ease with which your work will flow and experience fewer frustrations. I therefore hope that this guide has helped you fix lagging in Windows PCs. Consider visiting the Windows Help Center or a repair professional if none of the fixes work, or if you’re dealing with something more technical than you can handle.
