Add MobilityArena as a preferred source on Google
AirDrop is one of Apple’s most helpful and convenient features. I’m a big fan of how it helps me share media, links, and documents easily through Bluetooth or Wi-Fi to other Apple devices. However, one serious issue that most Apple users suffer is when Airdrop doesn’t work due to whatever reason.
So, in this article, I’ll show you how to fix Airdrop not working on your Apple device. With these tips, you can resume Airdrop use without hitches or interruption.
- How Can You Fix Airdrop Not Working on Your Apple Device? Update your Operating System Restart Both Devices Disable AirDrop Restrictions Turn off Personal Hotspot on your iPhone Disable Do Not Disturb Mode Restart Wi-Fi and Bluetooth on Both Devices Change the AirDrop Visibility Settings Set Up Both Devices to Accept an AirDrop Request Disable Your Mac’s Firewall Sign Out and Back In to Your Apple ID Account Reset Your Apple’s Network Settings
How Can You Fix Airdrop Not Working on Your Apple Device?
Airdrop is one of the most safe and convenient ways to send and receive files . If you are having issues with AirDrop on any Apple device, the first step to fix Airdrop not working on your Apple device is to check if your device is truly compatible with AirDrop. Apple’s requirements change from time to time, but as of now, you can use AirDrop with the following devices:
- iOS 7 or later versions of the iPhone, iPad, and iPod touch
- Any Mac released after 2011 (with the exception of the 2012 Mac Pro) that runs OS X Yosemite or later
Make sure you understand how to use AirDrop once you’ve established that your device is compatible. If it still doesn’t work, try the troubleshooting steps I’ve described below to fix Airdrop not working on your Apple device.
Update your Operating System
iOS, iPadOS, and macOS all receive regular updates from Apple that are intended to fix software flaws. So it makes sense to install the most recent updates if you want to fix Airdrop not working on your Apple device.
Go to Settings > General > Software Update on an iPhone or iPad. Open the Apple menu on a Mac, then select System Settings > General > Software Update .
Restart Both Devices
Due to its effectiveness, this method of troubleshooting is well-known. You might only need to restart your iPhone, iPad, or Mac to get AirDrop back in operation. It only takes a few seconds to give it a try, so do it to see if it helps fix Airdrop not working on your Apple device.
Disable AirDrop Restrictions
Perhaps you’ve blocked AirDrop in your Content & Privacy Restrictions if you don’t see the option at all. In this case, to fix Airdrop not working on your Apple device, go to Settings > Screen Time > Content & Privacy Restrictions > Allowed Apps on an iPhone or iPad.
On a Mac, navigate to the App Restrictions area by selecting System Settings > Screen Time > Content & Privacy . Ensure that each device has AirDrop enabled. To make changes, you might have to enter a Screen Time passcode.
Turn off Personal Hotspot on your iPhone
It’s impossible to use AirDrop and Personal Hotspot simultaneously because they both use Bluetooth and Wi-Fi connections. So to fix Airdrop not working on your Apple device, try turning off Personal Hotspot by going to Settings > Personal Hotspot . When this is done, try using AirDrop once more.
Disable Do Not Disturb Mode
If Do Not Disturb or any other Focus mode is enabled on your device, it may not receive transfer requests from AirDrop. Consider turning it off to fix Airdrop not working on your Apple device — open the Control Center and tap the moon or Focus icon to do so.
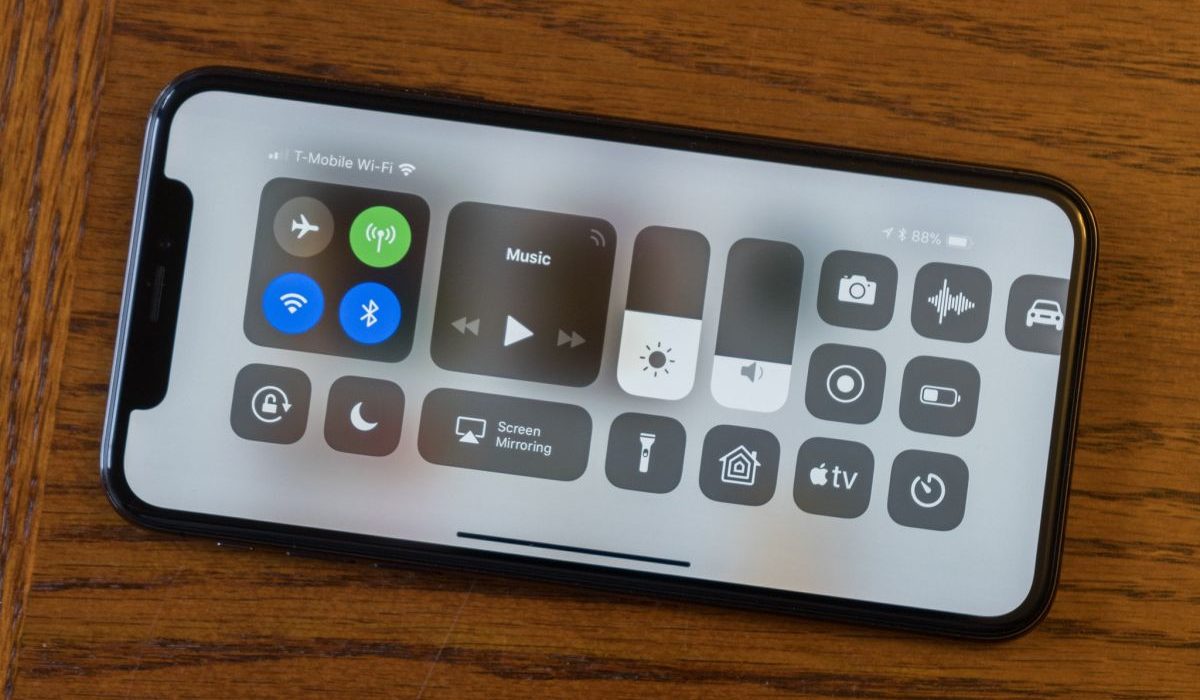
Restart Wi-Fi and Bluetooth on Both Devices
Disabling and re-enabling Wi-Fi and Bluetooth is a very beneficial solution to fix Airdrop not working on your Apple device. To do this, launch the Control Center on your iPhone, iPad, or Mac, tap the Wi-Fi and Bluetooth icons to toggle them off, then tap them once more to toggle them back on.
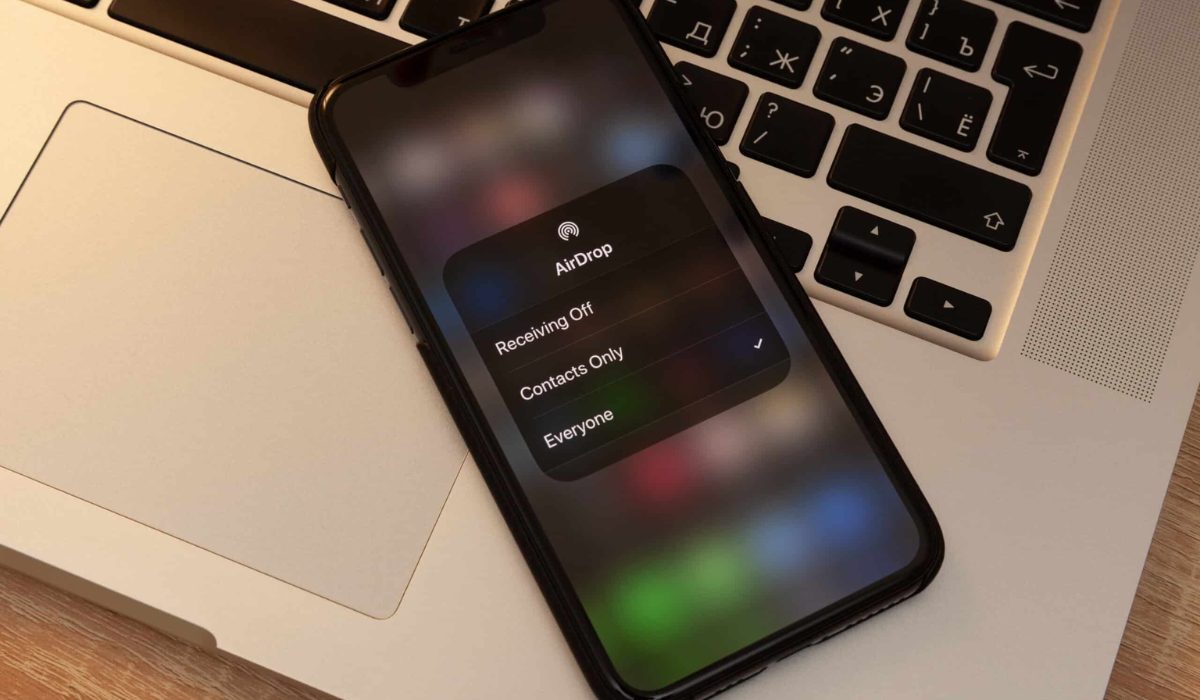
Change the AirDrop Visibility Settings
Everyone , Contacts Only , and Receiving Off are the three visibility options provided by AirDrop. Try switching to each of these options to see if any of them help you fix Airdrop not working on your Apple device. This could be especially useful if your device isn’t appearing in AirDrop.
Follow these steps according to your Apple device:
- Open the Control Center on an iPhone or iPad, then tap and hold in the top-left section to display an AirDrop button and select another option.
- Open Control Center on a Mac and select AirDrop from the top-left menu. Select Contacts Only or Everyone in the popup that appears.
Set Up Both Devices to Accept an AirDrop Request
The chance that an AirDrop transfer will appear on another device can increase when you set up your device for incoming transfers. Ensure to unlock your iPhone or iPad, and prepare it by leaving it on the Home Screen. On a Mac, launch a new Finder window and select Go > AirDrop from the menu.
Disable Your Mac’s Firewall
Your Mac’s firewall may be configured to prevent any incoming connections, which sometimes includes new AirDrop transfers. So if you can’t get AirDrop to work, remove these restrictions from the System Settings to fix Airdrop not working on your Apple device.
Navigate to System Settings > Network > Firewall . To disable the Firewall, click the toggle; you might need to provide your administrator password to do so.
Sign Out and Back In to Your Apple ID Account
On your iPhone or Mac, go to Settings or System Settings , pick [ Your Name ] at the top of the Settings , and then select Sign Out . Select the data you wish to keep on your device, then confirm that you want to Sign Out .
Go back to Settings afterward to sign in to your Apple ID once more, then check if this helped to fix Airdrop not working on your Apple device.
Reset Your Apple’s Network Settings
You can reset the network settings on an iPhone or iPad to fix a number of Wi-Fi or Bluetooth difficulties, including problems with AirDrop. Your device will lose any saved Wi-Fi passwords when you reset these settings, so you’ll need to reconnect to reliable networks once more.
If you decide to proceed with this option to fix Airdrop not working on your Apple device, navigate to Settings > General > Transfer or Reset [Device] > Reset , then press Reset Network Settings . To reset network settings, enter your passcode and then confirm your decision.
With the suggestions above, you can easily fix Airdrop not working on your Apple device. Make sure to contact Apple’s Help center if the tips above are not sufficient to fix the issue
Author:Joan Agie
Add MobilityArena as a preferred source on Google
It’s quite convenient to rotate the iPhone’s screen, especially when watching videos, playing games, or reading. However, occasionally your iPhone’s screen may refuse to rotate to landscape mode. There are a number of causes for this, but how to fix the issue is more important.
In this article, I’ll describe several ways to fix iPhone not rotating to landscape mode. So, if you’re turning your iPhone but it’s not rotating to landscape mode, try one or more of these fixes.
- How Can You Fix iPhone Not Rotating to Landscape Mode? Examine the Portrait Orientation Lock Disable Display Zoom Restart Your iPhone Use Assistive Touch to Force Landscape Mode
How Can You Fix iPhone Not Rotating to Landscape Mode?
Depending on how you’re holding the iPhone, the screen rotation to landscape mode should be flawless. But here are some troubleshooting suggestions that can fix iPhone not rotating to Landscape mode. If you’re experiencing issues with auto-rotate on Android, check out this guide .
Examine the Portrait Orientation Lock
Check that you haven’t mistakenly turned on the Portrait Orientation Lock. This toggle is in the Control Center , and many iPhone owners enable it by accident only to find that it has caused landscape mode to stop working.
To access it on an iPhone with a Home button, swipe up from the screen’s bottom. Swipe down from the top-right corner of the screen if you own an iPhone without a Home button.
Here, toggle the Portrait Orientation Lock on or off (it’s represented by a circular arrow) to fix iPhone not rotating to Landscape mode.
Disable Display Zoom
The ability to rotate the Home Screen is available to users of the iPhone 6 Plus, 6S Plus, 7 Plus, or 8 Plus. Consider investigating the Display Zoom feature if you have one of these models and it doesn’t rotate to Landscape mode. Follow these instructions to turn off Display Zoom and fix iPhone not rotating to Landscape mode:
- Access the Settings app.
- Navigate to Display and Brightness .
- Scroll down to Display Zoom .
- Navigate to View > Default .
Restart Your iPhone
Restarting your iPhone is one of the most popular and effective ways to resolve common software issues. This usually clears any issues and quits all apps, giving your iPhone a clean slate.
Follow these restart instructions (specific to your device) to fix iPhone not rotating to Landscape mode:
- To display the Slide to Power Off option and restart an iPhone X or later device, press and hold the Side button and one of the Volume keys simultaneously.
- For the power off slider to appear on older devices, press and hold the Sleep/Wake button. Slide the slider from left to right to turn off the iPhone.
Allow your device to totally shut down. Then, press and hold the Sleep/Wake button until the Apple logo shows on the screen.
Use Assistive Touch to Force Landscape Mode
Even when your iPhone is in portrait mode, you can force the screen to rotate into landscape mode by using Assistive Touch. This is an iOS feature that is useful if your iPhone Home button isn’t functioning. You can use this built-in feature to rotate your iPhone screen by force.
Before using AssistiveTouch in this manner to fix an iPhone not rotating to Landscape mode, you must enable it in your iPhone’s settings:
- Launch the Settings app.
- Navigate to Accessibility > Touch > AssistiveTouch .
- Ensure that the toggle at the top of the screen is set to “ On .”
- Set it to Open Menu by tapping one of the four options ( Single Tap, Double Tap, Long Press, or 3D Touch ).
- Go back to the Home Screen on your iPhone.
- On the screen, you will now notice a new floating home button. Go to Device > Rotate Screen after performing whichever action you set to Open Menu in the steps above.
Don’t worry about the new onscreen icon being distracting. When not in use, it will fade, and you may tap and drag it to move it around the screen.
Unfortunately, the landscape setting gets overridden if you move your device after forcing it into landscape mode with the instructions above. So, each time it resets, you have to force it into landscape mode again.
It’s important to remember that apps that don’t support landscape view will also not support the force rotation capability. The iOS Home Screen can only be rotated on the iPhone 6 Plus, 6S Plus, 7 Plus, and 8 Plus models. As a result, the iPhone X and later models cannot have a landscape home screen, most likely because of the position of the Face ID camera.
To conclude, you can quickly fix iPhone not rotating to Landscape mode through the steps I’ve outlined in this guide. However if you’ve tried all of the suggestions above and nothing works, your iPhone’s accelerometer may be faulty.
In this case, schedule an appointment at an Apple Store or take your device to an Apple Authorized Service Provider. You’ll be able to fix the accelerometer and therefore fix iPhone not rotating to Landscape mode.
