Add MobilityArena as a preferred source on Google
Windows provides simple options to change your username if you need to for any reason. These options come in handy if your account’s username was chosen at random when you first created it, but you now want to add something special, or you’ve grown weary of using the same username over and over again.
How Can You Change Your Windows 11 Username?
The need to change your Windows 11 username could arise due to several reasons. Perhaps there was a typo during setup, or the name needs to be changed for security reasons. To rename your Local user account or Microsoft account , you’ll only need to follow a few simple steps.
How to Change Your Windows 11 Username on the Local User Account
Local user accounts are the most common form of accounts used to access Windows operating systems. The account grants users access to all major resources and allows them to change settings and install programs.
You can change your Windows 11 username through the local user account by using any one of the approaches described below.
Change Your Windows 11 Username Using the Control Panel
The Control Panel is the center of the Windows operating system. The Control Panel allows you to customize the entire operating system, from changing the appearance of the operating system to setting the connected hardware. You can use it to change your username and manage your user account, among other things.
Follow these steps to change your Windows 11 username through the Control Panel:
- Enter “ Control Panel ” into Windows Search to launch the Control Panel app
- If it isn’t already chosen, select Large icons from the View by dropdown option
- Navigate to User Accounts , here select Change your account name
- Select Yes in the User Account Control (UAC) window.
- Enter your new username in the section marked “ New account name .”
- Click on Change Name after that.
- You must now sign out of your account and sign back in for the changes to take effect.
Change Your Windows 11 Username Using the Run Command
You can access the User Account settings through a simple command, “ netplwiz ,” which takes you to the account management page. It’s easy to change your Windows 11 username from there.
Follow these steps to change your Windows 11 username using the Run command:
- To access the Run command , press Win + R .
- In the Run command field, type “ netplwiz ” and hit Enter
- In the User Account Control (UAC) dialog box, select Yes .
- Choose the user account where the username has to be changed from the User Accounts window, then select Properties .
- You’ll see the current username in the General tab. After deleting it, rename it as you see fit.
- After adding the new username, select OK and then click Apply .
Finally, log out of your account, and when you sign back in, you’ll see your new username on the sign-in screen.
Change Your Windows 11 Username in the Local User and Group Management Tool
Another way you can change your Windows 11 username is with the local user and group management tool. This is the simplest way to change your Windows username because it allows you to rename your username directly, just like with any folder.
Follow these steps to change your Windows 11 username through the local user and group management tool:
- To open the Run command , press Win + R
- Enter “ lusrmgr.msc ” into the search box
- In the User Account Control (UAC) dialog box, select Yes
- In the left sidebar, choose the Users tab
- In the right pane, locate your account
- Rename the username by right-clicking it.
Then, close the local user and group management tool, sign out of your account, and your new username should appear on the sign-in screen.
Change Your Windows 11 Username Using Windows PowerShell
Windows Powershell was specifically created for IT managers to automate processes. Even so, its simplicity and usefulness make it worthwhile for non-programmers.
You can make any adjustments to your Windows device that you typically make using GUI-based applications and settings using its built-in cmdlets or by building your own custom scripts. You can also modify your username through this useful tool.
Follow these steps to change your Windows 11 username with Windows PowerShell:
- Open the Windows PowerShell app by typing “ Windows PowerShell ” into Windows Search.
- To find your current username, type the following command and hit Enter : “ Get-LocalUser ”
- After you’ve entered your current username and the one you want to switch to, type the following command: Rename-LocalUser -Name “Enter your current username” “Enter the new username”
- After entering the above command, press Enter .
- Finally, log out and log back into your account to see the changes you’ve made
How to Change Your Windows 11 Username on the Microsoft Website
It’s easy to change your Windows 11 username on the Microsoft website if you use a Microsoft account on your computer. To change your Microsoft website username, follow these steps:
- On the Microsoft website, navigate to your account page.
- If you haven’t already, sign in to your account.
- After logging in, go to the Your info menu.
- Select the Edit name option.
- Remove your current username and replace it with the one you want to use.
- Then click the Save button.
Please note that changing the username linked to your Microsoft account may require some time to take effect. You may not notice the new username after logging out of your account once, as with the previously described methods. To avoid this, I recommend rebooting your device rather than simply signing out.
To summarize, your username doesn’t have to be the same forever. You can use this guide’s instructions to change your Windows 11 username as you wish. I hope you find the different techniques in this guide useful to achieve this.
Author:Joan Agie
Add MobilityArena as a preferred source on Google
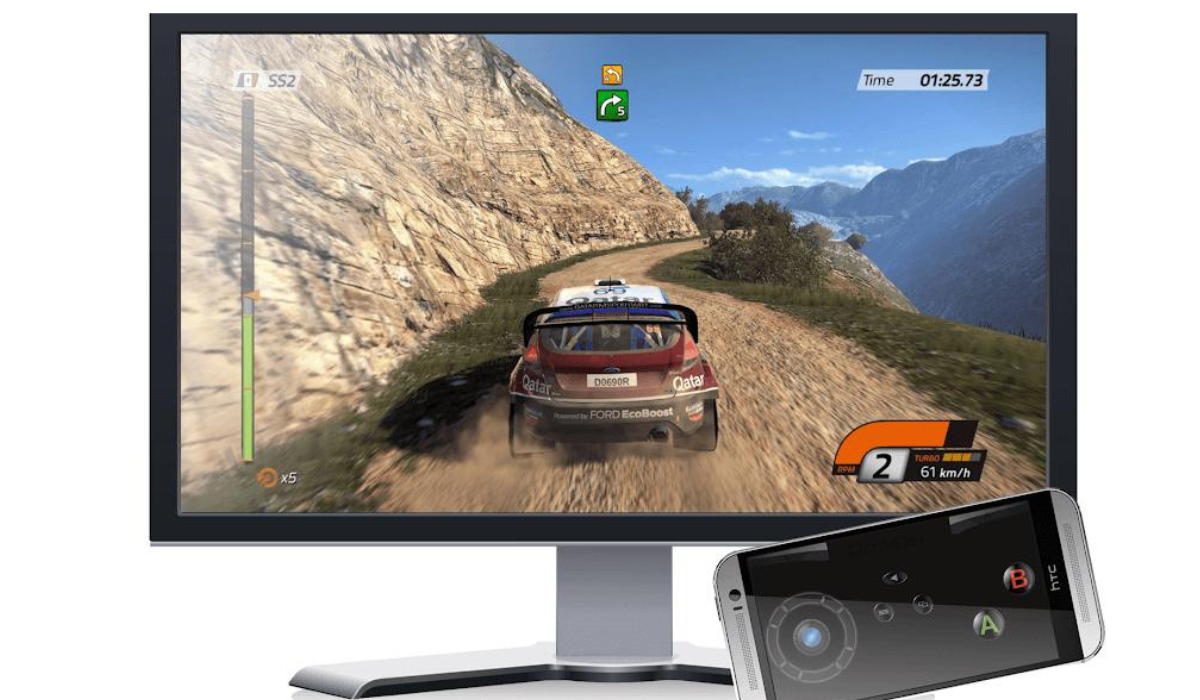
Playing video games with a good control system will always improve your gaming experience. While a keyboard and mouse are the standard controls for PC gaming, some games are best played with a gamepad.
In this article, I’ll demonstrate how to use Android as a gamepad for PC gaming. So don’t be concerned if you lack a dedicated controller, the instructions in this guide will devise you find a useful alternative.
Advantages to Expect When You Use Android As A Gamepad For PC Gaming
Your gaming experience improves greatly when you use an Android as a gamepad for PC gaming. Here are major advantages you’ll enjoy:
- As you won’t need to acquire new equipment, using your Android saves you money
- An Android allows for touch control, providing a more tactile experience than a keyboard and mouse.
- Androids enable the use of sensors such as a gyroscope and accelerometer for improved control—you can play games simply by tilting your phone.
- An Android provides complete control customization, allowing you to configure your virtual gamepad however you see fit.
- Bluetooth, Wi-Fi, USB, and QR code are the four pairing modes available. You can also use a Bluetooth or Wi-Fi connection to play.
How I Use Android as a Gamepad for PC Gaming
You must first connect your Android phone to your PC in order to use it as a gamepad. You’ll need two apps for this purpose — the PC Remote Receiver app for your Windows computer and the Android app PC Remote . Both apps are free, but you’ll have to pay to get rid of ads, unlock higher-quality broadcasts, and access more features.
After installation, open the programs, and confirm that both devices are linked to the same Wi-Fi network. Now, on your phone, perform the following actions to use Android as a gamepad for PC gaming:
- Press the Connect button on the home screen.
- If your desktop and mobile are on the same network, you should see your device under the Local PC area.
- Select your PC’s name to connect the two devices.
If you’re experiencing problems connecting to Wi-Fi, there are a few alternatives to try.
How to Setup and Use Android as a Gamepad Using Bluetooth
Bluetooth is the another option available to set up and use Android as a gamepad for PC gaming. Follow these steps:
- Turn on Bluetooth on both your PC and phone, and then launch the apps on both.
- Tap the Connect button in the mobile app and select Bluetooth mode .
- The phone will now display a list of available devices. When you click your PC’s name, the phone becomes available for use as a controller.
How to Setup and Use Android as a Gamepad Using a USB Cable
If you have a USB cable, the steps to set up and use Android as a gamepad for PC gaming are quick and simple:
- Start the app on both devices and connect your phone to the PC using the USB cord.
- Open the app on your phone and press the Connect button.
- When you tap on the USB icon, you will be prompted to Enable USB tethering .
- Enable USB tethering in the phone’s settings to successfully connect the two devices
How to Setup and Use Android as a Gamepad Using a QR Code
If none of the above work, you can connect and use Android as a gamepad for PC gaming by scanning a QR code.
- Open the app on your computer and, on the home screen, select the Generate QR Code option.
- When the QR code appears on your device, go to the mobile app and select the Connect option.
- Tap Connect to PC in the pairing selection option, and then open the QR scanner in the app.
- Then, scan the QR code, and the connection between phone and computer should become complete.
How to Select a Controller Layout
You’re now prepared to use Android as a gamepad for PC gaming after successfully connecting your Android phone and computer. Now click the game you wish to play to access the layouts section of the Android app and select your preferred gamepad layout. After making your selection, start the game on your desktop.
The Xbox 360 controller layout can be used instead if there isn’t a layout specifically for the game you’re playing. This works because it is compatible with the most video games. Touch the gamepad icons in the top left of the layout menu to further customize your controller.
Summarily, I hope you can now enjoy full control on racing or driving games, simply by following the tips above to use Android as a gamepad for PC gaming.
