Add MobilityArena as a preferred source on Google
When a need arises to go back and look up stuff you searched online previously, it can be helpful to keep a record of everything you’ve searched for on Google. However, it may also become necessary to delete previous Google searches from history. This can help protect your privacy or just reduce the information Google has on you.
This article will demonstrate useful tips to delete previous Google searches from history. This includes your account’s Google search history as well as browser history, and anything else that keeps your search history from prying eyes.

How to Delete Previous Google Searches from Your Account
When you are logged into your Google account on any device, Google by default keeps track of all the searches you conduct. You can skip to the section that discusses deleting your browser’s history if you weren’t logged into Google when you conducted the searches you wish to remove.
Here’s all you need to know when you’re trying to delete previous Google searches from history:
On the Google site, simply press inside the search bar to bring up a list of prior searches that can be deleted one at a time. To delete a recent search, select Remove next to it.
If you want to quickly delete a few recent Google searches, the instruction above is effective. However, if you want to quickly delete all previous Google searches, it’ll be too slow. To do so, go to Google and select Manage your Google Account from the top-right corner of the screen.
On the left sidebar, click Data & privacy . Open the Web & App Activity section in the History settings box. Then to see a running record of everything you’ve recently done with Google services, click Manage all Web & App Activity .
Then, to delete an item, click the X button in the top-right corner next to every block labeled Search . Click Filter by date & product at the top and check the Only Search box to make it simpler to view only your Google Search history.
You can remove a term by searching for it at the top of the list. To delete recent Google searches from predetermined time frames, such as the last hour, day, or since a specific date, use the Delete activit y by button on the left sidebar.
To set a schedule to routinely delete your Google search history, click the Auto-delete option at the top of the list. This allows you to delete previous Google searches from history every three months, every 18 months, or every three years. And of course, you can still delete history manually at any time.
How Can I Delete Previous Google Searches From My Browser History?
As you are probably aware, your browser saves a history of every page you visit. You will thus need to delete any previous Google searches from your browsing history. We’ll show you how to do it in Chrome, follow these steps.
- To access the interface, open the three-dot menu at the top-right and select History > History. This can also be accessed via the keyboard shortcuts Ctrl + H (Windows) or Cmd + Y (Mac) .
- Check the boxes next to each history entry you want to delete on the page that comes up next. After you’ve selected all of them, press the Delete button at the top of the page to remove them from your history. Use the search box at the top to show only Google.com results if the searches you want to delete are scattered.
- You can use the Clear browsing data tool on the left side of the History page to quickly erase browsing history instead of deleting items manually. Open this from anywhere in Chrome by pressing Ctrl + Shift + Del.
- You can remove browsing history, as well as other types of history such as cookies and cached data, by using the Basic or Advanced tabs. Chrome allows you to select a time period from which to delete history; when finished, click Clear data .
How to Edit Google History on an iPhone or an Android
On your mobile device, open the Google app and tap your profile image in the upper-right corner to access the same interface and delete previous Google searches from history while on the move.
Select Manage your Google Account to access a mobile version of this page. Under Privacy & personalization > Web & App Activity > Manage all Web & App Activity , you can make the same modifications as above.
You can also go straight to this panel by tapping Search history . If you need to delete recent searches, the Delete last 15 min shortcut can be useful.
I think you’ll find it pretty easy to delete previous Google searches from history and safeguard your privacy. Simply follow the steps outlined in this easy guide.
Author:Joan Agie
Add MobilityArena as a preferred source on Google
First introduced in iOS 15, mic mode voice isolation is a feature that improves the call quality on iPhones. Its first iteration was available for only with FaceTime calls and a limited number of third-party apps. However, it is now available for regular cellular calls from iOS 16.4.
How does this feature work? When on a phone call, it uses an iPhone’s microphone to block out ambient sound and noise so as to deliver better in-call audio. The microphone focuses on your voice and isolates it from any background or ambient sounds, so your words come through clearer than ever.
- What does Mic Mode Voice Isolation do on iPhone and what are the benefits?
- Is it good?
- How to enable Mic Mode Voice Call Isolation for Cellular Phone Calls
- Update Your iPhone to iOS 16.4 To Get It
- Use Mic Mode Voice Isolation to make your calls clearer
What does Mic Mode Voice Isolation do on iPhone and what are the benefits?
The benefit of using the mic mode voice isolation feature is clear – better audio quality during normal telephone calls. You use it when you want your voice to be even clearer during a FaceTime or phone call. Turning on Mic Mode Voice Isolation prioritizes your voice and blocks ambient noises so your voice is clearer. Everyone wants that and your callers will appreciate the better voice quality and clarity.
Is it good?
Quite a number of people who have used it and given feedback say that mic mode voice isolation works remarkably well at cutting out background noises and isolating your voice in a phone call. You should use it.
How to enable Mic Mode Voice Call Isolation for Cellular Phone Calls
To enable the feature, you need to answer or initiate a phone call first, and it does not come on automatically. I wonder why. Anyway, the following steps show you how to use mic mode voice isolation when on a regular phone call on an iPhone running iOS 16.4 and newer.
- Open the Phone app and start a regular audio phone call with someone.
- Once the other person answers the call, swipe up from the bottom of the screen to access your iPhone’s Control Center. You can also swipe down diagonally from the top-right corner of the screen.
- In top-right corner, you will see “ Mic Mode ” labelled “ Standard “.
- Tap the Mic Mode button and select the Voice Isolation option.
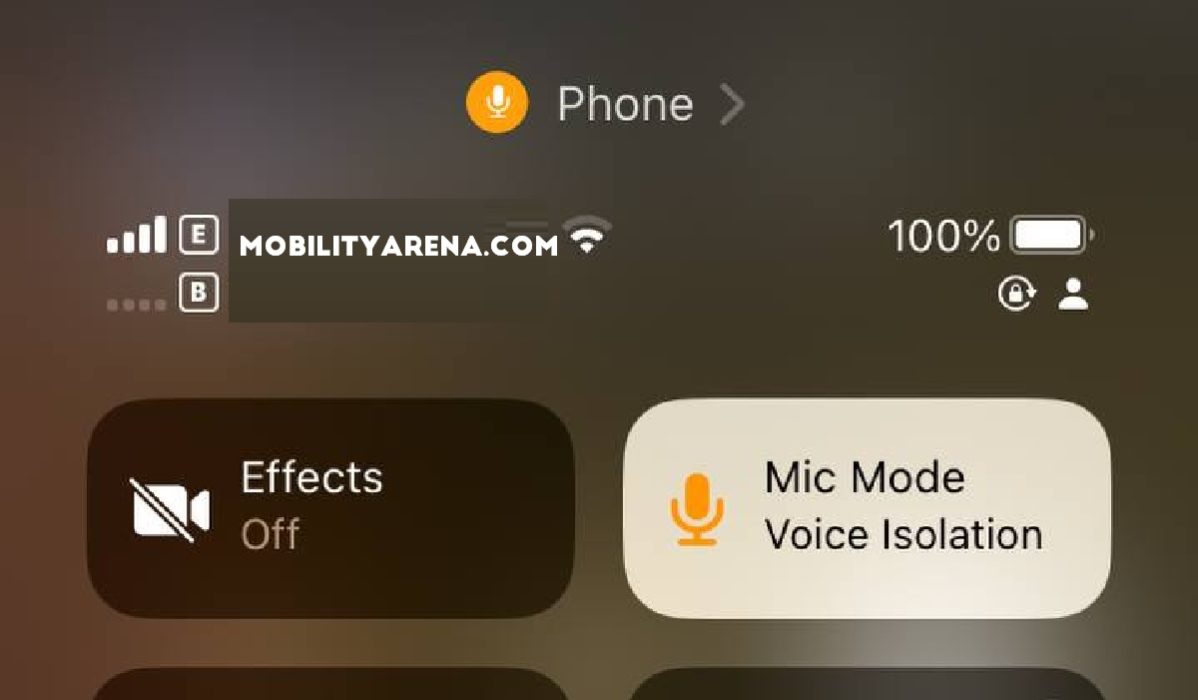
It is now activated for that call. You can turn it off at any time simply by accessing the Control Center again and selecting Standard instead. It would have been nice if Apple had made things easier for us by making the Mic Mode menu pops up automatically every time a telephone conversation is initiated. Or perhaps even have the feature come on automatically by default. I find it tedious to have to manually access the Control Center in order to enable it.
Update Your iPhone to iOS 16.4 To Get It
If you have an iPhone 8 and newer ( iPhone X series , iPhone 11 , iPhone SE 2020 , iPhone 12 , iPhone 13 , iPhone 14 , and iPhone SE 2022 ), your device is eligible for the iOS 16.4 software update, so go get it. the update is about 1.68 GB to 1.9 GB in size (if you are a Public Beta user like I am, it can get as large as 5.12 GB in size). Anyway, dive into your iPhone Settings > General > Software Update to get it and update your phone.
Use Mic Mode Voice Isolation to make your calls clearer
When you want your voice to be even clearer during a FaceTime or phone call, turn on Voice Isolation. During calls, it will prioritize your voice and block ambient noises, so your voice comes out better.
Author:Mister Mobility
Digital Skills and Communication Coach | Mobile Phone Connoisseur since 2001 | Tech Blogging since 2004
