Add MobilityArena as a preferred source on Google
Macs are typically fast machines, but it’s not uncommon to run into strange problems when using your MacBook’s keyboard. These could be software or hardware-related issues, a bug causing keyboard issues or some incorrectly changed setting. Furthermore, keyboard problems for MacBooks with a Butterfly keyboard could mean that dust or dirt particles are obstructing the keys’ travel path.
No matter the cause, there are some ways to troubleshoot and fix a malfunctioning keyboard on a MacBook. In this article, I’ll walk you through several possible solutions, so you can take advantage of any recommended option below to fix a malfunctioning keyboard on a MacBook.

How Can You Fix A Malfunctioning Keyboard on A MacBook?
There are typically different troubles to expect with a malfunctioning keyboard. Sometimes, a key may stop responding, or all the keys could stop working at once. Also, when you press a key, a different letter or symbol could appear on the screen.
Whatever the issue you’re facing, below are some useful troubleshooting steps you can follow to fix a malfunctioning keyboard on a MacBook.
Clean Your Keyboard
This may appear like an overly simple way to fix a malfunctioning keyboard on a Mac, but many times, it does work! Dust and debris can become trapped beneath these keys, so if there’s a lot of them in the spaces between keys, one or two keys may not function well or just feel generally sticky.
So, it’s a good idea to clean your keyboard. When doing this, take extra care so as not to damage your MacBook any further. Apple recommends following these steps to clean a MacBook:
- Position the MacBook such that its base is angled to the ground or a table at a 75-degree angle.
- Blow between the MacBook’s keys in patterns (left-to-right, then top-to-bottom). Do this with compressed air and a straw to direct the pressurized air.
- Turn the MacBook around so that its right side is downward-facing and remains positioned at about a 75-degree angle.
- Use the same top-to-bottom and left-to-right blowing patterns as before.
- Turn the MacBook over one more time, this time with the left side still facing down and at a 75-degree angle.
- Go through the same blowing pattern as before.
Check the keyboard afterwards to see if it works fine again.
Update macOS
Apple releases macOS updates for a reason: to fix bugs and introduce new, cool features. If you’re using an older macOS version, it’s possible that it’s linked to the keyboard issues you’re experiencing.
As such, updating the software on your MacBook could be just what you need to fix a malfunctioning keyboard on a MacBook. So try this and see if it gets your keyboard working properly again.
Disable Mouse Keys
If the keyboard issue still remains even after updating your macOS and cleaning your keyboard, it might be necessary to adjust some well-known settings on your MacBook. Enabling “ Mouse Keys ” modifies your keyboard so that certain keys move your pointer instead of displaying the relevant text.
Here’s how to turn off the Mouse Keys in order to fix a malfunctioning keyboard on a MacBook:
- Select System Settings after clicking the Apple logo in the menu bar.
- From the left pane, select Accessibility , then scroll down and click on Pointer Control on the right.
- Toggle Mouse Keys off in this menu, then click the Info i button to further configure your Mouse Keys settings.
- Toggle off the following two options: toggle between Mouse Keys and Ignore built-in trackpad by pressing the Option key five times while Mouse Keys is enabled. This prevents you from enabling Mouse Keys by accident in the future.
- To save your changes, click OK at the end.
Disable Slow Keys
If the above fix still doesn’t solve the problem, “ Slow Keys ” could be the cause. If your MacBook has this option turned on, none of the keys will work unless you press and hold them down for a long time.
Do the following to disable Slow Keys and thus fix a malfunctioning keyboard on a MacBook:
- Navigate to the Apple menu and then choose System Settings from the dropdown menu.
- Select Accessibility from the sidebar, then Keyboard from the right-hand menu.
- Toggle the Slow Keys option off in this menu.
Examine the Keyboard Layout
If disabling Slow keys and Mouse keys does not appear to produce the desired result, there may be an issue with your keyboard layout. Here’s how you can find out and therefore fix a malfunctioning keyboard on a MacBook:
- Go to the Apple menu and select System Settings .
- From the left pane, select Keyboard , then scroll down to Text Input and click the Edit button next to Input Sources .
- On the left side of Input Sources , you’ll see a list of keyboard layouts. Select the strange keyboard layout and remove it from the list by clicking the minus (-) button in the bottom-left corner.
- If a language other than English has been added, it will be listed here as well. You can remove it from your list of keyboards using the same procedure.
Reset the NVRAM and SMC
If you have an older Intel-based MacBook, you may need to reset the SMC (system management controller), NVRAM (non-volatile random access memory), and PRAM (parameter random access memory) components on your Mac.
All of this is unnecessary if you use a modern Apple silicon MacBook. Instead, you can just restart to fix a malfunctioning keyboard on a MacBook device.
Remove Recently Installed Apps
It’s generally recommended that you install and download apps with extreme caution. So if your MacBook starts acting strangely soon after installing a third-party app, you should uninstall the app immediately. Even though the app might not be harmful, it won’t harm to uninstall it to see if that helps to fix a malfunctioning keyboard on a MacBook.
I hope the above troubleshooting techniques help you successfully fix a malfunctioning keyboard on a MacBook. However, if none of them work, consider purchasing an external keyboard or scheduling an Apple in-store visit to have a skilled professional examine your MacBook.
Author:Joan Agie
Add MobilityArena as a preferred source on Google
It may not happen often, but we may at some point need to share our phones with other people. It could be for them to make a quick phone call or check the internet for urgent information. It could also be a child trying to use your phone to play games or watch videos.
In such cases, you can use app pinning on Android, a setting that allows you to grant limited access to a third party. So, in this article, I’ll describe what app pinning entails, as well as how to enable and use app pinning on Android phones to pin and unpin specific apps.
What Is App Pinning ?
App Pinning refers to a process through which you can limit the functionality of your Android device to a single app, thereby preventing access to any other apps or features until you unlock your phone. For instance, if your child wants to play a particular game on your phone, you can pin that particular game to prevent them from accessing other things like your phone’s settings or other apps.
You can use app pinning on Android phones for several reasons, especially to protect your smartphone privacy from getting into unwanted hands.
How to Turn on and Use App Pinning on Android
You must first enable the feature in order to use app pinning on Android. This option may be available at slightly different locations for different phone manufacturers. However, the following instructions typically work on almost all modern Android phones.
- Open the Settings app on your phone.
- Navigate to Security or Security & Location > Advanced > App Pinning
- If you can’t find it, use the search bar to find the feature by using search words like “ pin ” or “ pinning ”. You could also contact your device’s manufacturer for assistance on how to locate the feature.
- Toggle App Pinning or Pin Windows (on some Android devices) on once you’ve found it.
- When app pinning is enabled, you’ll need to enter your PIN, pattern, or password which you will need when you wish to unpin the app.
How Can I Pin Apps on an Android Phone?
Following the instructions below, you can use app pinning on Android to pin and unpin apps after you’ve enabled the feature:
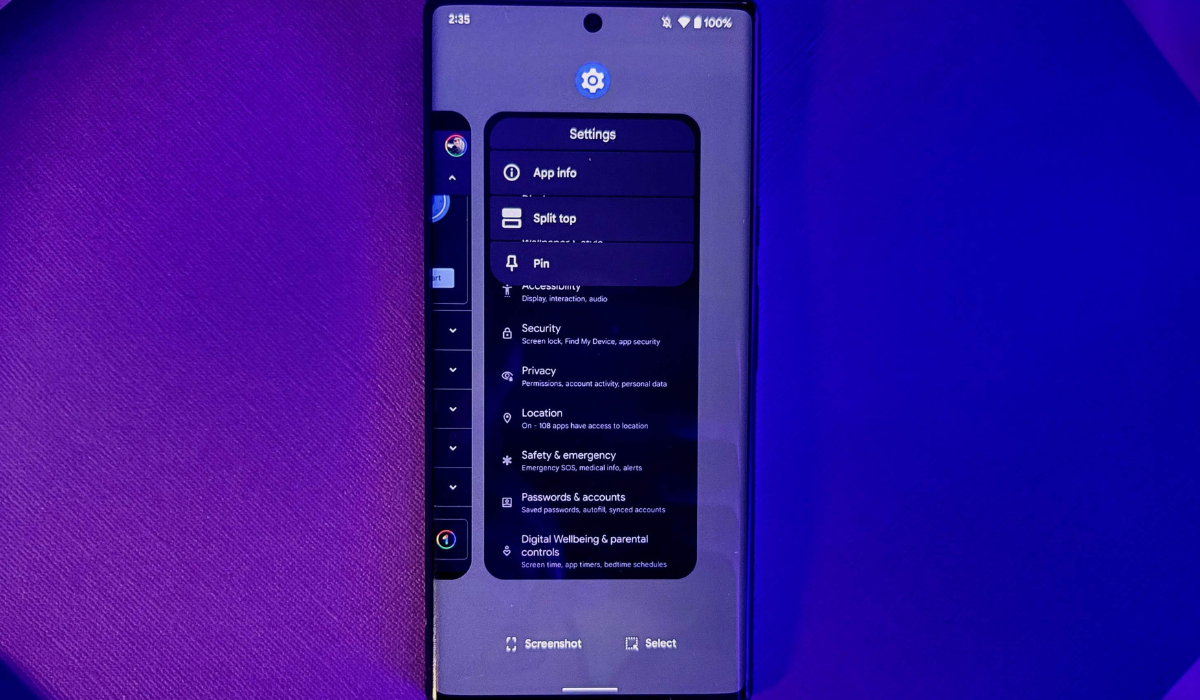
- Tap on the Square system navigation button at the bottom of your screen to go to Recent Apps . Swipe up from the bottom of your screen and hold to access that screen if gesture navigation is enabled.
- Swipe left or right to locate the app you want to pin. If you can’t find it, go back and open it quickly; it will show on that list.
- Then, at the app’s top, hit the app icon and choose Pin . At this point, you’ve succeeded in pinning the desired app.
How can I Unpin Apps on an Android Phone?
You can also use app pinning on Android to unpin any apps you’ve previously pinned. Follow any of the procedures below to unpin apps on Android devices, depending on the available settings:
- On Android versions 9 and later, swipe up from the bottom of the screen while holding it, as if you’re trying to view recent apps.
- To remove the pinned app, your device will prompt you for your PIN or another unlock method (such as fingerprint).
- Hold down the back and recent apps navigation buttons on Android devices running version 8 or earlier (and Android 9+ devices with 3-button navigation). If you’ve enabled this feature, your device will then prompt you for your unlock code before removing the pinned app.
Limitations and Security Flaws to App Pinning on Android
If you’re looking for a way to keep your data safe, it’s smart to use app pinning on Android. However, it lacks the privacy and data protection features required for devices in many commercial or enterprise environments, such as point-of-sale, kiosk, and other dedicated Android tablet applications.
Here are some of the most notable limitations to take note of if you want to use app pinning on Android:
Android screen pinning does not protect any of the device’s files or data. Anyone you give your phone to when you use app pinning on Android could find photos taken with your camera (this is possible with Android’s “share” intent) and upload them to the web, or send them over USB to their own device.
Permissions are not controlled by Android screen pinning. If an app has permission to do something, so does your user. If you give a user access to a web browser app, for example, to fill out a form, they may easily navigate away from the pinned page. Even worse, they might download a harmful file.
Android screen pinning cannot prevent the user from turning off or muting the device. Android screen pinning gives you no control over your device’s physical hardware or power buttons.
Android screen pinning cannot disable the touchscreen on your smartphone. Unlike the Guided Access feature on the iPhone and iPad, Android screen pinning does not allow you to disable or ignore any of the touchscreen areas.
Screen pinning on Android does not allow you to set a separate unlock password, which means that if someone knows your screen pinning “code,” they also know the code for the entire device.
However, regardless of the above limitations, if you choose to use app pinning on Android, you’ll find it to be a very useful feature that helps you achieve some semblance of privacy protection.
Using this simple guide, I believe you should find it easier to use app pinning on Android. Make sure to note the instructions and suggestions carefully to achieve the best possible results.
