Add MobilityArena as a preferred source on Google
One of the most common problems that many users face is the Windows start menu button not working or opening. When you click the start menu button, it can sometimes crash and not respond, and other times it might not open at all. Considering that it’s included in practically every Windows version, it can be a bother when it stops working.
Fortunately, there are several troubleshooting techniques to fix Windows Start button not working. In this article, I will discuss some of these methods, so pay attention to learn how to resolve this common problem.
How Can You Fix Windows Start Button Not Working?
The Windows start button may not function for several reasons, such as corrupted hardware, malware, some problems with Windows Explorer, and Windows update issues. Follow the helpful troubleshooting steps described below to fix Windows start button not working.
Restart Your Computer
Restarting the system can sometimes fix basic issues because it reloads all of the settings in memory on boot up and gives the system a new start.
When you can’t access Start , hit Ctrl + Alt + Delete , then select Power , then Restart . You can also manually turn off your device by pushing and holding the power button. This may be the solution you need to fix Windows Start button not working.
Update Windows
If something isn’t working properly, your first instinct should be to check for and install a Windows update. Updating Windows is one of the simplest ways to fix problems with it. Microsoft releases patches, improvements, and new Windows features on a regular basis, with major updates every year and minor security updates from time to time.
So check for updates – press the Windows key , type “ Updates ,” and then select Check for updates from the menu. Allow the system to check for and download updates if any are available.
Finally, restart your computer to complete the update and check if it helps to fix Windows Start button not working.
Sign Out of Your Account
Following a Windows update, sign out and back in to your user account. This is another quick way to fix Windows Start button not working, so follow these steps.
- To sign out of your computer, press Win + X to open the Windows Power User Menu.
- Select Sign out from the menu.
- After signing out, wait a few seconds before signing in again.
Restart Windows Explorer
Explorer allows you to view, interact with, and modify files on your computer as the default file manager for Windows. Sometimes, problems with Windows Explorer cause the Start Menu button to stop functioning. In some cases, the entire Windows operating system may become unresponsive.
In such cases, simply restarting Explorer can help to fix Windows Start button not working, as well as other problems with the Start Menu and Taskbar. To restart Explorer, follow these steps:
- To open Task Manager , press Ctrl + Shift + Esc .
- Right-click Windows Explorer and select Restart from the Processes tab.
- Allow the Explorer to start up.
The graphical user interface (GUI) on top of the file system will momentarily vanish when you restart Windows Explorer because the Explorer application will shut down. So don’t be alarmed if everything goes black for a second.
Run the System File Checker Scan
Corrupt system files causing unanticipated problems can also have an impact on the Start Menu and cause it to malfunction. Windows, however, includes file repair tools that can resolve most issues associated with corrupt system files. The System File Checker (SFC) is one such utility, and it can also help fix Windows Start button not working.
Start the Command Prompt as an administrator. To accomplish this:
- Press Win+S , type “ Command ,” right-click on Command Prompt , and select Run as administrator .
- In the Command Prompt window, type “ SFC /scannow ” and hit Enter .
- Allow the utility to do a scan.
If Windows does not detect any integrity violations, the files are fine. However, if Windows discovers problems but is unable to resolve them, you may need to run additional scans.
Re-register the Built-in Windows App Using Powershell
Reregistering the app using Windows PowerShell is a temporary way to fix Windows Start button not working. However, keep in mind that if the issue recurs in the future, you might need to repeat the procedure before you pull the trigger.
- To open the search bar, press Win + S and type “ Powershell .”
- Run Windows PowerShell as administrator by right-clicking on it.
- Paste the following command into Powershell, then hit Enter : Get-AppXPackage -AllUsers | Foreach {Add-AppxPackage -DisableDevelopmentMode -Register “$($_.InstallLocation)AppXManifest.xml”}
Deactivate Temporary Cortana files Using the Command Prompt
Windows Explorer can function improperly sometimes due to Cortana. Deleting and recreating temporary Cortana files can help in this case to fix Windows Start button not working, as well as similar Explorer issues.
Follow these steps:
- Enter “ Command Prompt ” by pressing Win + S.
- Right-click Command Prompt and choose the option to run it as an administrator from the menu.
Once Command Prompt is launched, perform the following commands in the following order:
- CD/d “%LOCALAPPDATA%PackagesMicrosoft.Windows.Cortana_cw5n1h2txyewy”
- Taskkill /F /IM SearchUI.exe
- RD/S/Q Settings
If these commands don’t work, you have a few more options to fix Windows Start button not working, so keep reading.
Boot into Safe Mode
Booting into Safe Mode can be a great way to fix Windows Start button not working if you don’t mind giving up access to third-party programs. Safe mode is a feature of Windows that disables pointless drivers and programs to start the computer with just the essential programs.
Users can troubleshoot problems in such a minimal setting by concentrating on the underlying causes without worrying about user applications interfering with the system. So, boot into Safe Mode and see if that fixes the Start Menu button.
Run a System Restore or Factory Reset
If none of the above suggestions work to fix Windows Start button not working, it would indicate that the Start Menu’s misbehavior is being caused by one of Windows’ core precepts. If so, you might have to restore or reset Windows to its factory settings in order to get it working again.
Ultimately, issues with the Windows Start button can be particularly inconvenient since it contains all of the apps, settings, and other things you might need. Hopefully, the methods mentioned above will help you fix Windows Start button not working.
Remember, if you’re going to do a full PC reset to fix the problem, make a backup of your computer so you can restore everything once you’re done.
Author:Joan Agie
Add MobilityArena as a preferred source on Google
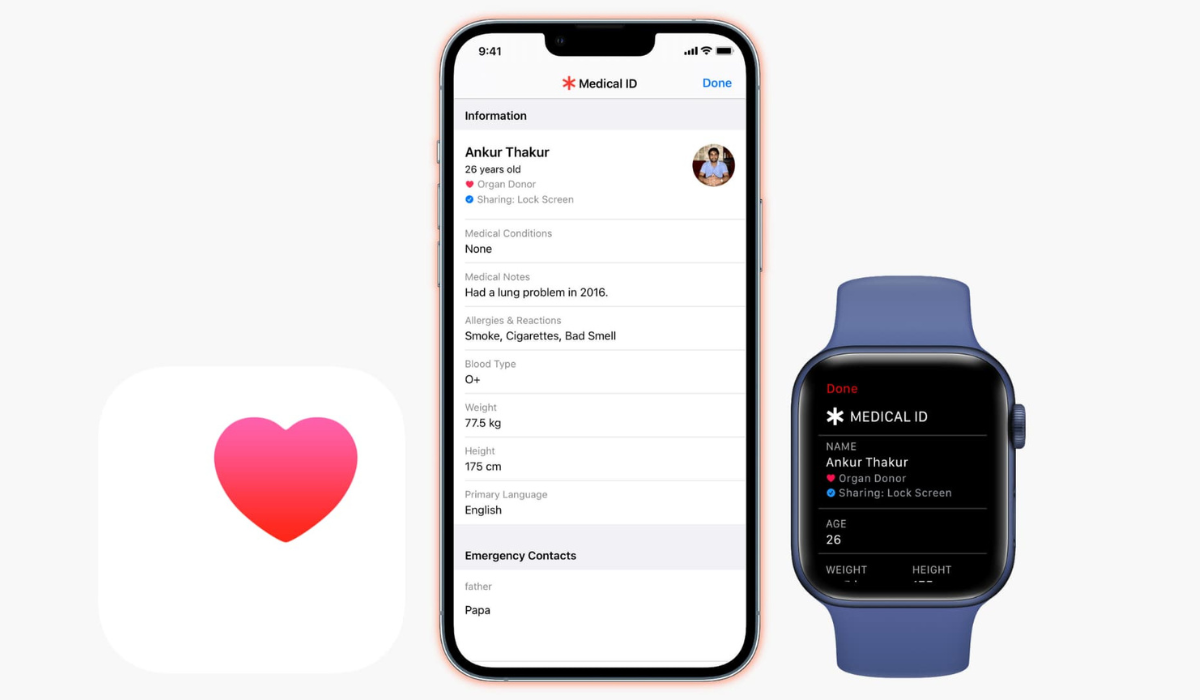
Apple Watches and iPhones have a medical ID feature that provides useful details about you and your health. Anyone who has physical access to any of these devices can quickly learn about your medical conditions and will be able to reach your emergency contacts if necessary.
However, this is only possible if you’ve already set up a medical ID on your device, and set it to appear on your device’s lock screen. So, if you don’t already know how to set up a medical ID, I’ll show you how to do so on your iPhone or Apple Watch device.
- What is the Medical ID Feature?
- How Can You Set Up A Medical ID on iPhone or Apple Watch? How to Set Up A Medical ID on your iPhone How to Set Up A Medical ID on Your Apple Watch
What is the Medical ID Feature?
The Medical ID feature on your iPhone or Apple Watch is a safety feature that provides vital medical information about you in the event of an emergency. When you set up a medical ID on your device, the following are the details you can include:
- Name, age, and picture
- Any existing health issues like heart problems, asthma, or diabetes
- Medical notes, such as indication of pacemaker or other prosthetic use.
- Allergies and adverse reactions
- Current medications
- Donor status and blood type
- Body mass index and height
- Your first language
- Emergency contacts
All these information bits are useful in an emergency, and can mean the difference between life and death. So, you’ll agree that it’s a smart idea to set up a medical ID if you have an iPhone or Apple Watch.
How Can You Set Up A Medical ID on iPhone or Apple Watch?
Here’s everything you need to know to set up a medical ID that contains all of the information that someone might require to help you in a medical emergency
How to Set Up A Medical ID on your iPhone
Take note of these steps to set up a medical ID on your iPhone device:
- Find the Health app and launch it.
- At the bottom of the screen, click the Summary tab.
- In the top-right corner, tap the profile icon, then choose Medical ID .
- Select Get Started , go through the list, and enter any details you want to.
- Make sure to include at least one emergency contact. If you use the Emergency SOS feature, this person will receive a message with your location.
- Turn on Show When Locked at the bottom by scrolling down. This is necessary if you want emergency personnel to be able to find and view your medical ID without having to unlock your device. If you’d like your medical ID to be automatically shared with emergency services when you call them, you can also enable Share During Emergency Call .
Please ensure that all of the information you enter on your medical ID is correct. Also, keep in mind that anyone with access to your iPhone can see any data you include, so don’t include anything too personal.
How to Set Up A Medical ID on Your Apple Watch
The medical ID on your Apple Watch is linked to the details on your iPhone, so make sure you first set up a medical ID on your iPhone. After that, do the following:
- On your iPhone, launch the Apple Watch app and navigate to the My Watch tab.
- Scroll down and select the Health app, followed by Medical ID .
- Check that all of the information is correct, then select Edit to make any necessary changes, including those to the Show When Locked and Share During Emergency Call options.
Please keep in mind that getting this right is critical because many emergency professionals are trained to look for medical bracelets while treating patients, making the Apple Watch’s Medical ID more useful in an emergency than the iPhone’s.
How to Add or Edit Emergency Contacts on your iPhone
Apart from being able to set up a medical ID, a need may arise to add, remove, or change an emergency contact. In that case, follow these steps:
- Go to the Summary tab in the Health app on your iPhone.
- Tap your profile photo in the upper right corner, then select Medical ID .
- Select Add Emergency Contact .
- Select the contact and their relationship to you from the list.
- Tap the red minus sign to remove a contact from your emergency list.
- Then, to confirm, tap Delete .
Ultimately, you’ll agree that the right information can increase your chances of survival in an emergency, so it’s smart to set up a medical ID on your Apple devices. I hope you’ve found this guide helpful to do just that.
