Add MobilityArena as a preferred source on Google
If there’s anything that all smartphone users can agree on, it’s the fact that mobile data is pretty expensive. The amount of gigabytes that can be downloaded via the internet as part of your cell phone plan is often capped at a particular amount each month, after which you run the danger of being charged exorbitant overage costs.
Fortunately, your smartphone has a built-in capability to help you control data usage. There is a built-in monitor for mobile data in the Android operating system which can be configured to alert you when your monthly data use limit is approaching. This monitor can even help you to stop your smartphone from using any more data.
You can control data usage on your Android smartphone
In order to help you modify these settings on your smartphone if you’ve been having trouble with managing your cellular data limit, we’ve created this guide for you. So, pay attention to the instructions we’ve outlined below.
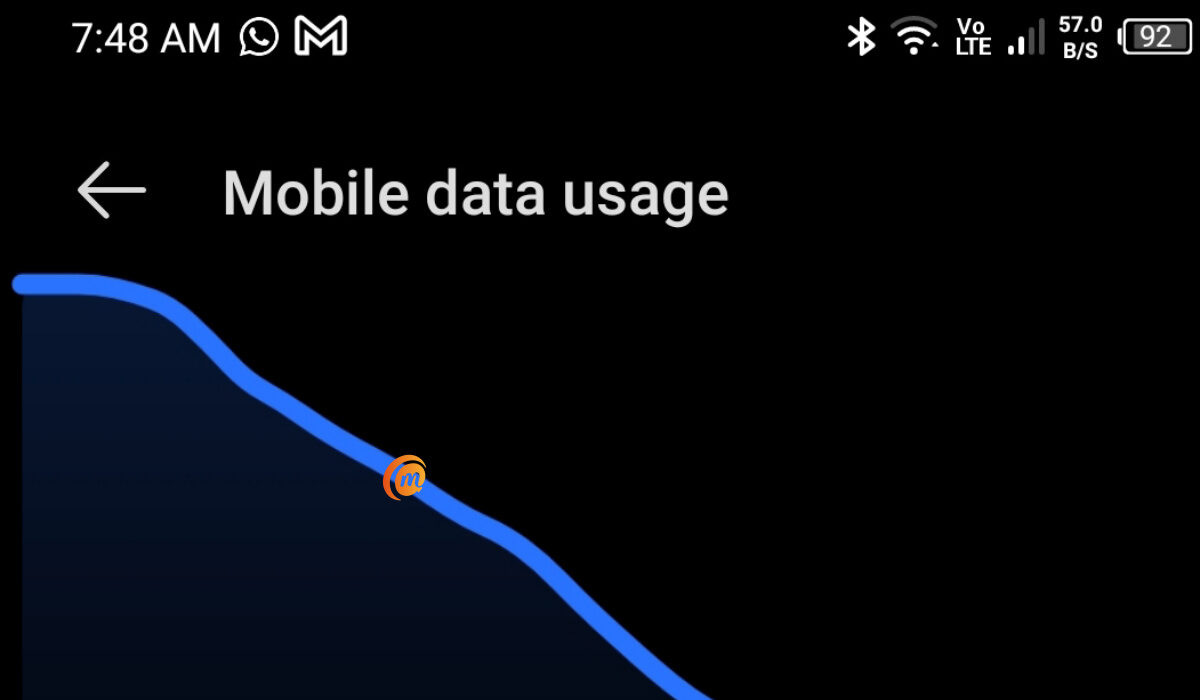
Control Data Usage:Set an Alert for Data Usage Level
Go to the general Settings menu and choose the “Data use” option if you want your phone to notify you when your monthly data limit is about to be reached. On the screen that follows, you’ll see a graph with a line above it; drag this line up or down to adjust the warning level. Setting it to about 75% of your monthly data allotment is what we’d advise. Visit the website of your carrier if you are unsure of your data allotment for the month.
Ensure that “Cellular data” (or “Mobile data” on earlier Android versions) is toggled on if you don’t see a line in the graph.
You should then change the billing cycle so that the data usage counter on your phone resets on the day your bill is due. Choose “Change cycle” and the day of the month when your bill is typically due by tapping the date field on this menu. Your phone will now be able to alert you more precisely when your data allotment is will soon be reached.
However, it should be noted that the data use figures shown in this menu could be different from those provided by your carrier. In general, it’s okay to use this as an approximate estimation, but you should verify with your carrier’s website to be particularly careful when you start to approach your monthly data limit really closely.
Control Data Usage:Set a Limit on Data Usage
Your apps may sync in the background even while you’re not actually using your phone to search the internet or stream media, and this process will still consume data. This implies that your apps may discreetly and automatically charge you overage fees when you are really close to reaching your monthly data limit.
Putting a strict limit on your data might help you avoid this. To get this done, select the “Set cellular data limit” option in the same settings menu (it’ll be named “Set mobile data limit” on older Android devices), then move the orange slider to a value slightly below your monthly data cap.
The apps on your smartphone won’t be able to sync data in the background until your next billing cycle if this setting is enabled. This is because your phone will automatically block all data traffic when you reach this threshold you’ve set.
Control Data Usage: How Do I Disable Data Usage Limits?
Let’s assume you have unlimited data to use on your smartphone, and are therefore not concerned about overage charges. The data consumption limit and notice in this situation would merely be an inconvenience, so if you already have it enabled, you’d need to disable it.
To do this, return to the “Data usage” menu to turn off either of these options. From this point on, disable “Set cellular data limit” to stop your phone from obstructing data flow. Since there is no real method to turn off the data warning feature, your best bet would be to just move the slider up to a very high value that you won’t likely reach.
Control Data Usage: Summary
In summary , you can control the amount of money you have to spend on data monthly simply by adjusting relevant settings on your smartphone. If you didn’t already know how to get this done, this gude has provided the information you’ll need.
As always, feel free to recommend this guide to any other smartphone users you know that are trying to control their data usage.
- Don’t miss our mobile phone reviews .
- Follow our news on Google News .
- Join our WhatsApp Group , to be notified of the most important articles and deals,
- Follow us on Instagram , Facebook , Twitter , and YouTube .
Author:Joan Agie
Add MobilityArena as a preferred source on Google
Google Play Music is among the top streaming services available for both iOS and Android devices. The ability to stream your music library for free to any device while uploading up to 50,000 of your personal songs to Google’s servers may be its best feature.
Exporting your music library is the step to take first, not minding whether you choose the free or paid edition of Google Play Music. This is why in this guide, we’ll demonstrate how to transfer MP3s and other music files from your PC. We’ll also walk you through migrating to Google Play Music from Apple Music or Spotify.

Even though it may initially appear difficult, we’re sure you’ll find the process incredibly simple if you just follow this guide step by step.
How Does Google Play Music Work?
You’ll typically be able to upload up to 50,000 of your own music collection to Google’s servers with Google Play Music, then stream your collection for free on any device.
If you wanted to go all out, you could also merge your collection with Google’s enormous music database of millions of songs by subscribing to Google Play Music Unlimited. By doing this, Google will provide you with YouTube Red at no additional cost, and Play Music will use the music you submit as a reference when recommending other tunes from its streaming radio service.
How Do I Transfer My Music Files to Google Play Music?
This process is easy, we’ve provided the instructions you’ll need below. Note that you must have a Google Account in order to use Google Play Music. If you have an existing one, you can skip the first step, but for those who don’t, let’s go over it quickly.
Step 1: Go to this page to get started. From there, select “create your Google Account” from the header that reads “Make a new account,” then you’ll need to complete the form on the following page. These specifics will be verified on the page bottom.
After you’ve taken care of that, you might want to think about subscribing to Google Play Music Unlimited. If you only want to stream your current collection of music from the cloud, you don’t need this service. However, if you want to “mix in” unlimited streaming radio with your own music, you should create an Unlimited account.
Step 2 : Google has provided a number of ways for you to upload your current music to Google Play Music because they are aware that not everyone manages their music collection in the same manner. You can upload your library through one of the methods we’ve described below.
Use Music Manager
If all of your music is now kept on your Mac or Windows PC, the first option is your best bet. Start by downloading Google’s useful Music Manager program, with which you’ll be able to automatically transfer up to 50,000 of your own tunes.
Once you’ve downloaded Music Manager, launch the EXE (for Windows devices) or DMG (for Mac) file to launch the installer, then sign in with the Google account you made in Step 1 after downloading Music Manager. When you arrive at the page that asks “Where do you save your music collection?”, you’ll need to inform Music Manager about where to find your music files. You’ll be able to do this by adhering to the installer’s “Upload songs to Google Play” instructions.
Choose “My Music folder” (if you’re using Windows) or “Music folder” (on Mac) if your computer’s default location for your music collection is at that location. Choose “iTunes” if your library is stored there instead. If not, choose “Other directories” and then use the file picker that appears to choose the primary folder where your music is kept.
Music Manager will search for and automatically upload compatible files (MP3, MP4, AAC, WMA, OGG, FLAAC, or M4A) to the cloud once you’ve decided where to store your music library. Ensure that you keep Music Manager open until the progress bar reaches 100% because the process can take a while.
Use Google Chrome
Google will allow you to upload your music using Google Chrome if you’d want to do so in smaller, more manageable parts. You’ll need to download the extension for Google Play Music Chrome after first signing into Chrome using the Google account you intend to use for music streaming. After doing so, access Google Play Music on the web, then click the hamburger menu in the upper-left corner and choose “Upload music.”
Open your music collection in Windows Explorer or the Finder application on a Mac from there, and then drag & drop files to upload. To pick what you upload by hand, click “Select from your computer” instead. Wait until the upload is complete before quitting Chrome or the Google Play Music tab after selecting any tracks or folders.
Importing Playlists from Apple Music or Spotify
You’re in luck if you want to move your Spotify or Apple Music library. You can very easily import your Apple Music or Spotify playlists into Google Play Music using a fantastic tool called Stamp. Since this feature doesn’t really import any audio files into your library, Google Play Music Unlimited is the best option for using it. Instead, it moves whatever playlists or stations you’ve made on one streaming radio provider to another.
You should keep in mind however that stamp comes with a price. You must pay a one-time cost of $9.99 to use Stamp to move playlists across platforms (such as from Spotify to Google Play Music). You may use Stamp across all platforms for $14.99 if you want to import playlists from multiple services into Google Play Music.
Choose the service you’re importing from, followed by the service you’re importing to, after installing the program on your smartphone, Mac, or PC. Finally, simply select the playlists you wish to import, and Google Play Music will have them ready for you.
Step 3 : Following the upload process via any of the methods we’ve described above, you’ll be able to listen to your collection on your computer or through the Google Play Music app for Android or iOS devices.
The tracks you’ve uploaded will be accessible from within the apps in the Library tab. Simply hit the “Library” button at the bottom to accomplish this on iOS. Select “Library” from the side navigation menu on Android by swiping in from the left or touching the hamburger icon. Similar functionality is provided by the desktop interface, however, you’ll see the menu located further to the left.
Summarily , this guide will help you take advantage of different simple methods to move all your favourite music to Google Play Music. Follow the instructions carefully, and you should be able to get it done easily.
- Don’t miss our mobile phone reviews .
- Follow our news on Google News .
- Join our WhatsApp Group , to be notified of the most important articles and deals,
- Follow us on Instagram , Facebook , Twitter , and YouTube .
