Add MobilityArena as a preferred source on Google
WhatsApp stickers are those graphic items that you can add to any conversation to add a sense of humour. It is interesting to note that you can go a step further an create WhatsApp stickers using your photos, photos from friends, photos from family, or memes.
Creating WhatsApp stickers is a simple process. We explained the steps involved in creating WhatsApp stickers in this guide, and we also recommended some free applications you can use to create these stickers. Fascinated by some funny Whatsapp sticker packs? You too can create yours, read on to learn how.
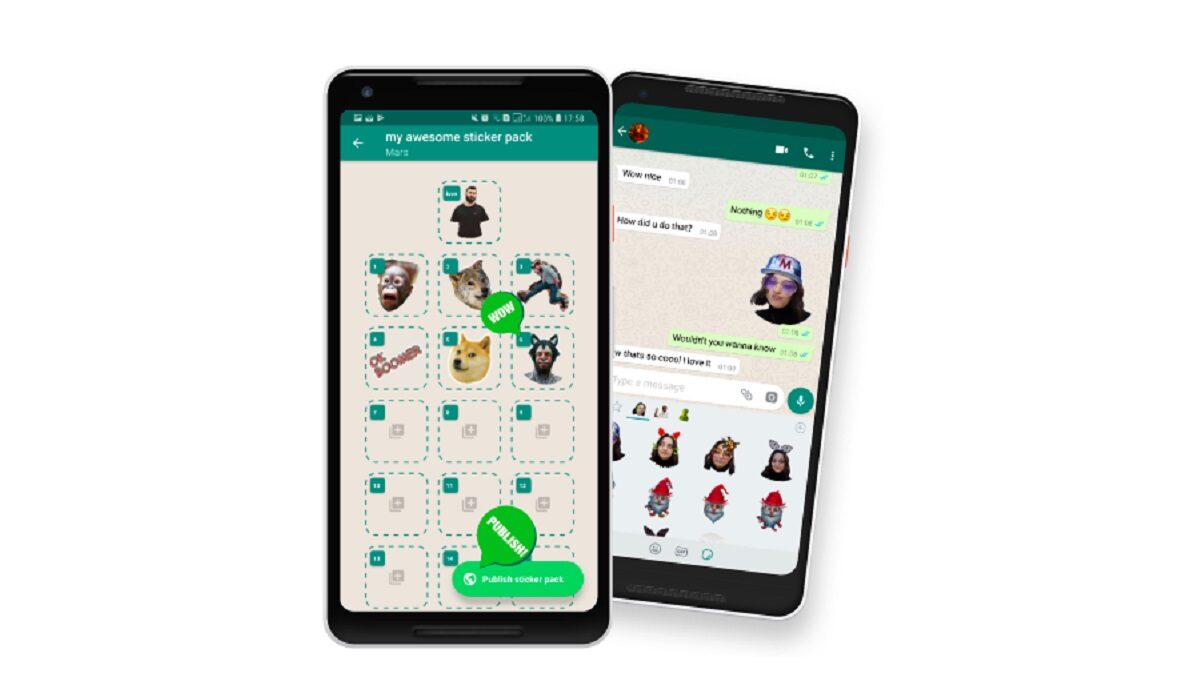
You can create WhatsApp Stickers, for your personal use, or for the public to download and use, too
Simple Steps To Create WhatsApp Stickers
To create the stickers, we need an application that allows us to create packs. We have opted for Sticker Maker. Sticker Maker is a free application and very easy to use. Follow these simple steps to create your stickers with the app:
- Open Sticker Maker.
- Tap on Create a new sticker pack.
- Name and author the package of stickers that you are going to create. Once both fields have been entered, click on Create.
- On the home page of the app, the package you just created will appear. Click on it to start adding your custom designs.
- As you can see, your package is empty. In Sticker Maker, you can create an icon, which appears first, so it’s the sticker that will give the package its image.
- The icon and the rest of the stickers in the package are all created in the same manner. Start the process by tapping on the square icon. To begin, you must decide whether you will use a photo taken at the same time (Take photo), an image previously saved in your gallery (Open gallery), a file from your mobile (Select file), other stickers (Stickers library), or Text Only.
- You will be taken to the sticker editing screen after taking or selecting the photo. First and foremost, decide which part of the image you want to turn into a sticker. You can choose to select the entire photo or a portion of it using smart or manual selection (custom cut -Freehand-, square cut, or circular cut).
- Once you’ve selected the sticker, you can retry the design by clicking Retry or save it to your sticker gallery by clicking Save. Our design isn’t perfect, but it will suffice for our WhatsApp conversations.
- You can also add text and frames to your stickers. You can write on the sticker by clicking Add text in the upper right corner. To change the font and add a background to the text, use the two buttons in the lower left corner.
- If you want to add a frame to your sticker, use the Outline tool. You can customize both the width and color of the frame. When you’re finished with the sticker, click Save to confirm the design and add it to your sticker pack.
- Finally, when you have finished with your personalized package of stickers, click on the Add to WhatsApp button. A new window will open and confirm the action by selecting Add.
Following these steps, you will be able to create any number of WhatsApp packages. You can organize them into topics, people, or whatever categories you want. Keep in mind that each time you add a sticker to the package, you must click “Add to WhatsApp” again to use it in your conversations.
3 Free Apps For Creating WhatsApp Stickers on Android Phone
1. Sticker Maker
Sticker Maker, which we used in the tutorial, is a free Android application. It includes all of the necessary tools for creating stickers as well as some interesting extras like intelligent cropping and the ability to add a colored frame. You can also share your packages with friends via WhatsApp and other social networks.
2. Wemoji
Wemoji, which is also available for free in the Google Play Store, is another good option for creating WhatsApp stickers. We should point out that this tool has a large library of text fonts and that it saves the image cuts you’ve already made so that you can reuse them in future stickers.
3. Sticker.ly
Finally, the last free application we recommend is Sticker.ly, which can also be used to easily create stickers. On this occasion, in addition to creating your stickers and sharing them with other users, you can download thousands of free packages from the app. The creation of WhatsApp stickers with your images and pictures is simple and quick. It’s a great way to have even more fun with the app!
- Don’t miss our mobile phone reviews .
- Follow our news on Google News .
- Join our WhatsApp Group , to be notified of the most important articles and deals,
- Follow us on Instagram , Facebook , Twitter , and YouTube .
Author:Moses Udah
Creative, teacher, web content writer, copywriter, and student.
Add MobilityArena as a preferred source on Google
If you want to maximize your Mac’s potential, a Mac RAM boost may be beneficial. Your Mac will be better equipped to handle all the daily tasks you typically throw at it if it has more RAM. As such, if you haven’t already considered this, you should start doing so now.
This simple guide will teach you how to upgrade the RAM on your Mac device if you are unsure how to do so. You can use the instructions in this guide to upgrade the RAM on your MacBook Pro, MacBook, or iMac, so keep reading if you own any of these devices.

To Upgrade the RAM on Macbook Pro and MacBook
Before you begin, you should note that some MacBooks and MacBook Pros do not allow RAM upgrades. You must take off the computer’s back cover in order to reach the memory module and carry out a MacBook RAM upgrade if your model permits RAM upgrades. Unfortunately, RAM upgrades are not available for MacBook Air models.
Adding more RAM to your MacBook Pro or MacBook device is as follows:
● Your MacBook or MacBook Pro should be turned off and left alone to cool. All cables, wires, and accessories should also be unplugged.
● Turn the laptop so that it is facing down.
● Unscrew the bottom case to take it out. In order to avoid confusion, make a note of which screws originate from which ports.
● If you have any static electricity on your body, let it go by touching a metal surface within the computer.
● Use the ejection levers to locate the RAM module and eject it.
● To avoid damaging the gold connectors, pull the RAM module out.
● Repetition is required for any additional RAM modules.
● Put in the new RAM for your MacBook or MacBook Pro, keep in mind as before that you shouldn’t touch the gold connectors.
● Insert the second module after pushing the new one down until it clicks.
● Screw back the bottom case after replacing it.
Only a few older models and all 17″ MacBook Pro models allow for MacBook Pro RAM and MacBook RAM upgrades. Any MacBook Air cannot have RAM added to it.
You can perform DIY RAM upgrades on the following MacBooks at home:
● MacBook: 2008 to 2011 models.
● MacBook Pro: all 13″ and 15″ models from 2009 to 2012, as well as all 17″ models.
ToUpgrade the RAM on iMacs
Every iMac save the most recent 21.5″ models can have memory added to it. For the most part, Apple has made it relatively simple for iMac owners to independently replace Mac RAM at home.
RAM is hidden behind a small door on the back of 27″ iMac models made after late 2012; previous 27″ versions and smaller models store RAM in slots along the bottom edge.
Here’s how to do this on these devices:
● Turn off your iMac and give it time to cool entirely.
● Remove all wires and cords.
● Lay the computer down gently on your work surface after placing a soft towel or piece of cloth there.
● Open the memory storage door by pressing the button underneath it, then take the door off and set it somewhere nearby.
● The memory cage levers and the proper alignment of the RAM modules are shown in a graphic on the bottom of the door.
● To release the memory cage, pull up the two levers after they have been pushed outward. Each module can now be eliminated.
● By pushing a module straight up, you can remove it and then replace it. Make sure to position it correctly for your specific iMac model before pushing it into the slot until it snaps into place.
● Push the memory levers back down until they click once you have done swapping out your old DIMMs (dual in-line memory modules, or RAM sticks) with new ones.
● Reinstall and seal the door of the memory section.
● Reposition your computer so that it is upright, then reattach all of your wires and cables.
● Activate your iMac. It might be dark for at least 30 seconds as its new memory is initialized. It’s natural, so don’t be alarmed.
Upgrading RAM on other eligible iMacs
RAM is kept in slots along the bottom of older 20″ and 15″ and 27″ iMacs, eligible 21.5″ iMacs, and 27″ iMacs from before 2012. While the RAM slots’ precise configuration and alignment vary between models, all of them can be replaced in a similar way.
● Turn off your iMac and give it time to cool entirely.
● Remove all wires and cords.
● Lay the computer down gently on your work surface making sure to place a soft towel or piece of cloth underneath.
● Using a Phillips screwdriver, pry open the memory access door and set it nearby.
● You’ll see either a set of ejector clips or pull tabs, depending on the model of your iMac. Open the clips, untuck the tabs, and pull them out. The existing RAM module will be ejected as a result.
● Insert your new RAM module after removing the old one. It will “click” into place as you wait.
● Pull tabs on your iMac should be tucked back just above the new RAM module. Close any ejector clips if it has any.
● With your Phillips screwdriver, reinstall the memory access door.
● Reposition your computer so that it is upright, then reattach all of your wires and cables.
● Activate your iMac. Some iMacs from before 2017 will make a beep if they find RAM difficulties. Check to see if the new RAM unit is suitable for your iMac if this happens, then try reinstalling it.
Any iMac can have memory added to it, although the following 21.5″ models cannot:
● Retina 4K, 2017 and 2019
● 2017
● Mid-2014
● Late 2013
● Late 2012
In summary , your computer can do more tasks at once or more demanding jobs with less performance lag if you upgrade your RAM. One of the most effective ways to speed up your Mac is with a RAM upgrade, and we’ve shown you how to do this on your MacBook, MacBook Pro, or iMac device.
- Don’t miss our mobile phone reviews .
- Follow our news on Google News .
- Join our WhatsApp Group , to be notified of the most important articles and deals,
- Follow us on Instagram , Facebook , Twitter , and YouTube .
