Add MobilityArena as a preferred source on Google
Most of us use WhatsApp to communicate with our friends, family, and coworkers. It is accessible on all popular mobile platforms, and there is also a web version. However, there’s no direct way to get WhatsApp on your iPad. Currently, WhatsApp does not have a native iPad client. And, while reports indicate that the company is working on one, there is no official word on when it will be available.
In this article, I’ll show you how to get WhatsApp on your iPad. This service allows you to share and receive messages, pictures, and videos by connecting your iPhone (or Android device’s) WhatsApp account and forwarding messages to your iPad.

How to Get WhatsApp on Your iPad Through WhatsApp Web
With the help of WhatsApp Web, you can use a web browser on any device to access your WhatsApp account. It allows you to connect up to four devices (aside from your primary phone) and use them to send and receive messages from your WhatsApp account even when the primary device isn’t connected to the internet.
Linking a device through WhatsApp Web requires a one-time setup. Here’s how you can get WhatsApp on your iPad through WhatsApp Web.
Step 1: Link your iPad to your WhatsApp account.
First, connect your iPad to your WhatsApp account. So, on your iPad, launch Safari and navigate to WhatsApp Web. Any other browser would suffice, but we prefer Safari because it allows us to add a shortcut to a website to the Home Screen for quick access, which we’ll need later.
On your primary phone, launch WhatsApp. It could be either an Android or an iPhone. Go to the Settings app, select Linked Devices , and then tap on Link a Device .
If you’re using an Android phone, tap the ellipsis button in the top-right corner, then select Linked Devices and then Link a device .
Authenticate your identity using a PIN or biometrics depending on the device you’re using and the authentication method you have in place.
Finally, using your primary device, scan the QR code that appears on the WhatsApp Web page. Wait for WhatsApp to download your messages; your iPad should now be linked to your WhatsApp account.
Step 2: Use the WhatsApp Web page on your iPad
You can get WhatsApp on your iPad immediately after connecting the device to your WhatsApp account. All you have to do is launch Safari (or your preferred browser) and navigate to the WhatsApp Web page. Allow it to finish loading your conversations, and you should see all of your old and new messages.
Step 3: Create a WhatsApp Web Shortcut on Your iPad’s Home Screen
Although it requires a few steps, launching Safari and going to the WhatsApp website works perfectly. Another option is to create a quick-access shortcut on one of your iPad’s Home Screen pages to access WhatsApp Web. Though this is optional, we strongly advise you to do so because it will make it easier to access WhatsApp on your iPad, and it will save you time.
On your iPad, open WhatsApp Web in Safari, tap the Share icon in the toolbar at the top, and then choose Add to Home Screen from the context menu to add the shortcut.
When you click Add in the Add to Home Screen pop-up, the shortcut will appear on your Home Screen with an app-like icon.
When you want to use WhatsApp on your iPad, just tap the shortcut on whichever Home Screen page you find most convenient. You can view new messages and respond to them from there, among other things.
What Limitations Will You Face If You Get WhatsApp on Your iPad?
Once your iPad and WhatsApp account are connected, WhatsApp will import all of your messages to your iPad using E2E encryption.
From here, you can see a list of all your conversations, start new chats, groups, or communities, send messages, see new messages, and see people’s statuses. However, there are a few limitations to consider if you get WhatsApp on your iPad.
- There are some operations you can’t carry out on WhatsApp Web on your iPad such as accepting or making voice or video calls, adding a status, and permanently deleting a message or conversation.
- Similarly, you can’t look for a message older than a few months.
- Furthermore, WhatsApp does not currently support browser notifications. As a result, to see if there are any new messages, you must return to the tab.
Summarily, hope this guide helped you understand how to get WhatsApp on your iPad. Follow the instructions to enjoy added communication options on your iPad device.
Author:Joan Agie
Add MobilityArena as a preferred source on Google
Nobody is safe from plagiarism in this day and age, and it’s almost impossible to protect your photos and videos when you share them on social media. The risk of having your images claimed by others can never be eliminated, and it can be disheartening to see others take the credit after putting a lot of time and effort into taking professional photos.
Luckily, you can add a watermark to photos on Android, making it harder for your photos to be used without permission. Furthermore, using your initials, company or website name, or logo as a watermark allows you to gain online recognition. It’s easy to add a watermark to photos on Android, and I’ll show you how to do so in this guide.
How Do I Add a Watermark to Photos on Android?
There are different ways to add a watermark to your photos on Android, and each method is equally effective. Here’s how to watermark your photos on your Android device.
Method 1: Create a Watermark With the Add Watermark on Photos App
Add Watermark on Photos is a great app option to add a watermark to photos on Android. It’s completely free and includes all of the necessary watermarking features. You can also use it for batch processing, so you can watermark several images from your gallery at a time. You can even use it to add a watermark to your videos.
How to Use the Add a Watermark App to Watermark Photos on Android
Open the app after you’ve installed it. Allow it access to the camera and storage when it asks for permission.
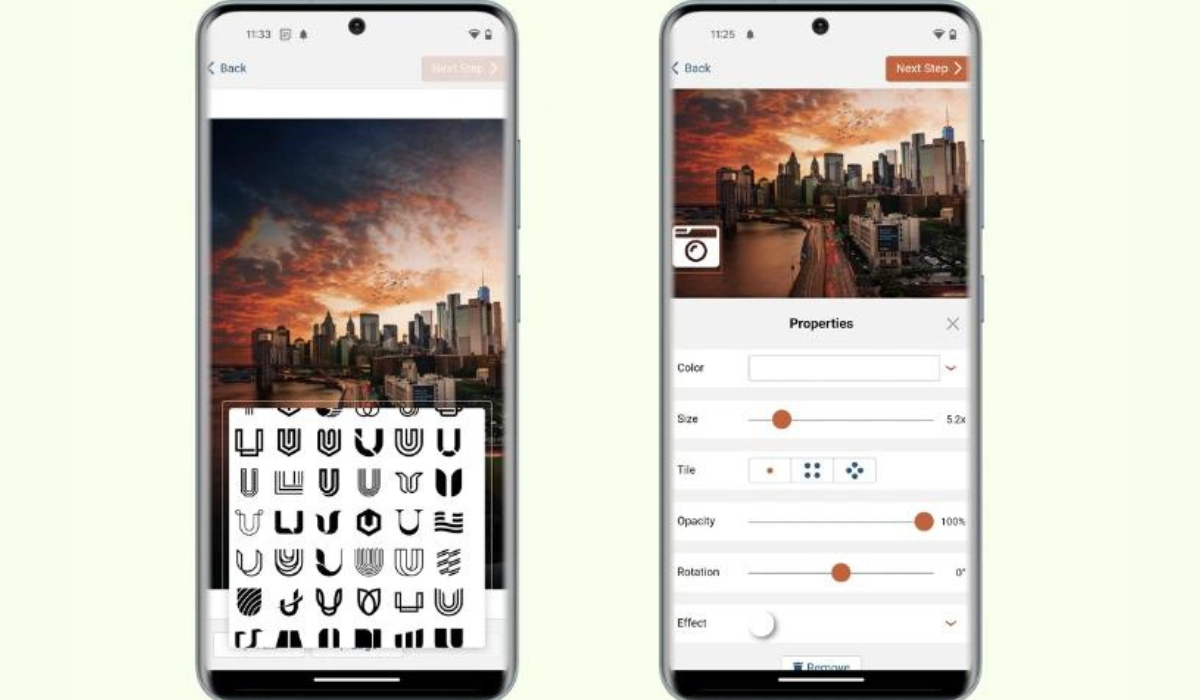
Choose the photo(s) you want to watermark and then select Apply on Images . You can choose from a few different watermark options on the following screen. Choose your favorite.
As an alternative, you can use a watermark you’ve already created or make your own in the app.
You can design a watermark using a variety of tools, including Art , Text , Background , and Effects , if you choose the Create Watermark option. Use these to create your own personalized watermark, then check the box to add the watermark to your chosen image(s).
The watermark can now be resized by pressing the resize icon, and you can then drag it to the precise area of the picture you want it to be on. To download the photos to the gallery app on your phone once you’re done, tap the Download button in the top-right corner.
The Add Watermark folder in your phone gallery will contain all of your stored pictures. Also, you can locate them in the app’s Your Creation section.
Method 2: Add a Watermark to Photos on Android With the “Shot On” Watermark
The Add Watermark on Photos app is great as a watermarking tool. However, when you want the “Shot on” watermark to appear automatically on smartphone camera pictures so that it identifies the camera you used, the Shot On Stamp software is a good alternative.
How to Set Up and Use the Shot On App
Here’s how to use the Shot On App to add a watermark to photos on Android once it’s been installed:
- On your smartphone, launch the Shot On Stamp app.
- Tap the Logo button from the home page, then pick your device’s logo and check the box to use it as your watermark.
- Select Shot On , and then input your device name in the Device Name field on the following screen. This is optional, and you can deactivate it by turning off the Shot On button.
- In the same manner, you can add your name to the stamp. Simply enter your name in the Your Name box under the Shot By option.
- Shot On Stamp by default contains the date and time of capture, but you can change these details by navigating to the Date & Time option. You can also deactivate it if there’s no need for it.
- Go to Advance , and from there, you can adjust the values of various watermark properties, such as location, size, font style, and color, to make your watermark look however you like.
- To see how your watermark appears on an image, press the Preview button (indicated by the eye icon), which is the last step.
This procedure only needs to be completed once. The next time you open your phone’s Camera app, you’ll be able to capture a picture with a “ Shot on ” watermark.
Now, you don’t need to know how to edit a photo before you can watermark it. You can add a watermark to photos on Android without any hassles, just try the simple options I’ve described above.
