Add MobilityArena as a preferred source on Google
Every messaging service, including WhatsApp and Instagram, allows you to create a profile image and display your name. This was not possible with iMessage in the past, but since iOS 13 was introduced, any iOS 13 user can now set an iMessage photo and name on their iPhones.
This article will show you how to enable the iMessage feature on iOS 13 or a later version that lets you share your name and picture with contacts. So, keep reading to find out how to set an iMessage photo and name on your Apple iPhone.
- How Can I Set an iMessage Photo and Name on my iPhone?
- Set Up Group Name and Profile Photo for iMessage Group Chats
How Can I Set an iMessage Photo and Name on my iPhone?
Anyone can find the first setup of their iMessage profile to be a little difficult and time-consuming. However, it’ll be pretty easy for you to set an iMessage photo and name on your profile.
The most recent version of iOS also gives you the option to employ personalized Memojis and Animojis for more variation in addition to letting you choose photos as profile images. To set an iMessage photo and name, simply follow these steps:
- Navigate to Settings on your iPhone running iOS 13 or later.
- From the main list, select Messages .
- Select the option Share Name and Photo , then toggle it on to enable the feature. Alternatively, you can open the Messages application, press Edit in the top-left corner, and then choose the Edit Name and Photo option from the pop-up menu
- Select the recommended photo you want to use from the list, or press the three dots to explore the following other choices. Take a picture : To take a selfie or a shot with the rear camera to serve as your iMessage photo, tap the Camera icon. Pick a picture : To select a photo from your Photos app, tap the photos icon. Use an emoji : If you’d like an emoji as your profile photo, click the smiling icon and use any emoji on a colored background. Use your initials : To add a monogram and use it as your iMessage profile photo, use the pencil button. You can also select a headshot suggested by Siri
- Next, click Done > Continue . You can select Use to use the same image everywhere from the Use This Photo Everywhere popup or Not Now to limit its use to iMessage.
- Type your first and last names.
- If you want this information to be automatically shared with people you know, select Contacts Only or Always Ask.
As long as you follow the above steps correctly, you’ll find it easy to set an iMessage photo and name on your profile.
Set Up Group Name and Profile Photo for iMessage Group Chats
Apart from the option to set an iMessage photo and name on your iPhone, Apple has also made it possible for you to personalize the group chat information if you use iMessage for several group chats and wish to have more fun.
This means you can change the group’s name in addition to the profile picture, which can be one of your own photos or an emoji.
Follow these steps to set it up:
- On your iPhone, open the Messages app.
- Find and pick the group chat that you want to edit settings for.
- At the top of the page, in the menu bar, click on the contact bubbles.
- Click on Change Name and Photo .
- Enter a name for your group. Afterwards, choose one of the following options for the profile photo: Take a picture by clicking the camera icon. Choose a photo from your gallery clicking on the gallery icon. Use an emoji with a colored background as a group image. Enter two letters and choose a style with the pencil icon.
When you’re done editing the settings to your preference on the iMessage group chat, press the Done button in the top right corner.
In summary , it is quite simple to set an iMessage photo and name on an iPhone. All you need to do is follow the simple instructions we’ve provided for you in this article.
Author:Joan Agie
Add MobilityArena as a preferred source on Google
The autocorrect typing function has two sides – the convenience it brings when it suggests words and makes typing faster, and the annoyance it arouses when it gives the wrong words and causes typos and grammatical errors.
Perhaps you’ve also experienced autocorrect errors that entirely distorted the sense of a message you were trying to send. This can get frustrating, but luckily, there’s a fix. It’s easy to change the autocorrect settings on Android and iOS devices, or entirely turn the function off.
This article will walk you through the steps required to change the autocorrect settings on Android and iOS devices. So take advantage of these instructions to prevent spelling and grammatical errors typically brought on by autocorrect.
How Can I Change Autocorrect Settings on an Android device?
Let’s take a look at some of the ways to change the autocorrect settings if you’re using an Android smartphone:
Option One: Change the autocorrect Settings on Android using the settings menu
Almost all recent Android smartphones allow you to customize the autocorrect settings for each keyboard. If you have multiple keyboard apps installed, you can customize settings for each one separately.
Follow these steps:
- To activate or turn off autocorrect on your Android phone, go to System > Languages & Input . Languages and Input may be referred to by a different name on your device, such as Language and keyboard .
- Under Languages and Input , look for the Virtual Keyboard (or On-screen keyboard/Manage keyboards ) option. Android will typically list all the keyboard apps installed on your phone under the Virtual keyboard .
- Select the keyboard you wish to change the autocorrect settings for by tapping on it, whether it’s your normal keyboard or another one.
- Tap on the Text correction option to get the Auto-correction setting. Some keyboard programs may lack the Text correction option and instead display the Auto-correction setting. In any case, enable or disable it as desired, and you’re good to go.
Note : The auto-correction feature for Samsung phones is called Auto replace (for older generation Samsung devices) which can be found under Smart Typing . Newer ones call the Autocorrect feature “ Predictive text .”
Option Two: Change the Autocorrect settings on Android using the Keyboard
You can also access the keyboard settings to change the autocorrect settings on Android without having to navigate all the way through the Settings menu.
To open the keyboard settings, look for the gear icon on top of the keyboard and click on it. After entering the keyboard settings, select the option to enable or disable autocorrect.
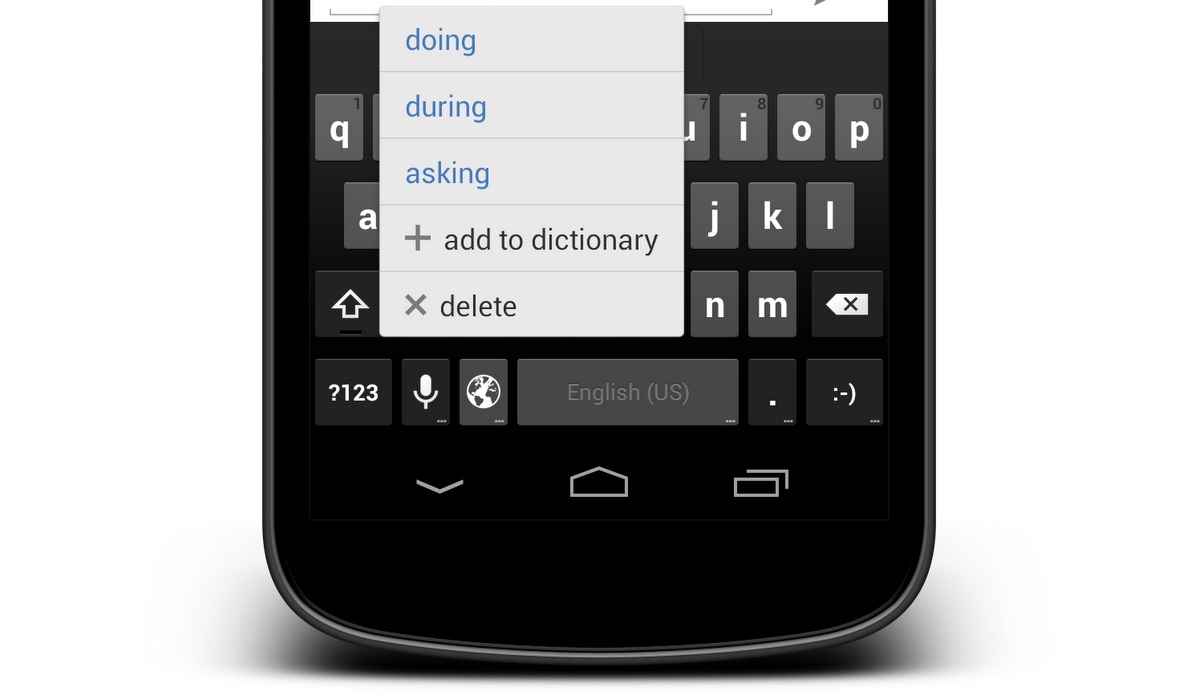
You can also manually add new words for your keyboard to recognize under Dictionary , including any word that is not in a normal dictionary, such as your unique pet names or any of the many acronyms you may want to use.
Other alternatives are also available in the Text Correction section. For instance you can select the option to Block offensive words to avoid mistakenly sending anything you shouldn’t. The aesthetics of how auto-correction works are controlled by the Show suggestion strip and Next-word suggestions options. To make typing easier, you can also enable Auto-space after punctuation, Auto-capitalization , and Double-space full stop .
How to Change the Autocorrect Settings on iPhone and iPad
Autocorrect on iPhone
In Apple’s iOS settings, you can enable or disable autocorrect for the built-in keyboard. Third-party keyboards, on the other hand, require you to change the autocorrect settings by launching their app. For example, if you use Gboard as your primary keyboard, you’ll need to visit the Gboard app to change the autocorrect settings.
Option one: Change the Autocorrect settings on the iOS keyboard
- Navigate to the Settings menu.
- Select General > Keyboard .
- You may now toggle auto-correction on or off, but note that it’s usually on by default
Option two: Change the Autocorrect settings in Gboard or a Third-Party Keyboard.
- Launch Gboard or another keyboard application.
- Select Keyboard settings .
- Turn the auto-correction feature on or off
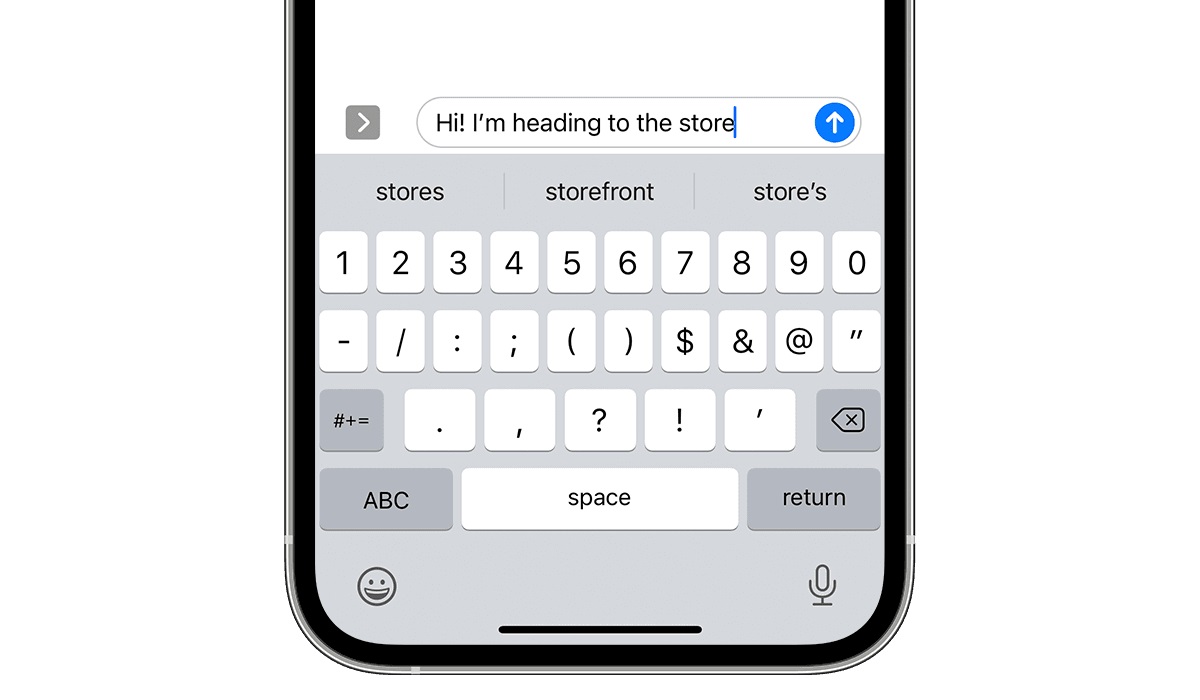
Improve the Dictionary by Adding Words or Phrases
If you don’t want to disable autocorrect on your iPhone, you can add words or phrases to the built-in dictionary instead.
- Navigate to Settings > General > Keyboard .
- Select Text Replacement
- Click the + (plus) icon and enter the desired words or phrases in the Phrase box.
- Click save. Once saved, the words or phrases will no longer be marked as inappropriate.
In summary, it’s pretty easy to change the autocorrect settings whether you’re using an Android or iOS device. Simply follow the above step-by-step guide carefully to get the best results.
- Don’t miss our mobile phone reviews .
- Join our WhatsApp Group , to be notified of the most important articles and deals,
- Follow us on Instagram , Facebook , Twitter , and YouTube .
