Add MobilityArena as a preferred source on Google
Your computer may start running low on memory if you have too many tabs open. To avoid this, Chrome constantly refreshes those tabs automatically. However, it can be rather unpleasant to have to wait for tabs to reload constantly, especially when you’re working or need to find a specific piece of information quickly.
In this guide, we’ll show you different ways to keep Chrome tabs from constantly auto-refreshing. Take note of these instructions to enjoy better productivity when using Chrome.
- How Can I Stop Chrome Tabs Auto-Refreshing? Restart Google Chrome Close All Unnecessary Chrome Tabs Perform an SFC Scan Disable Chrome’s Memory Saver Use a Tab Auto-Refresh Extension
How Can I Stop Chrome Tabs Auto-Refreshing?
Even if it’s possible to wait for auto-reloads to finish, the wait can be annoying, especially if auto-reloading tabs delay your work. Try one or more of the following fixes to stop Chrome tabs from constantly auto-refreshing.
Restart Google Chrome
Restarting any problematic program is always the first step to try in debugging it. However, simply closing the window and restarting Google Chrome might not be enough to stop Chrome tabs from auto-refreshing constantly.
Instead, open the Activity Monitor or Task Manager on your Windows or Mac device respectively. From there, end any background processes that Chrome is still using.
Close All Unnecessary Chrome Tabs
Chrome typically uses a lot of your system’s resources especially if you have a lot of tabs open. As a result, Chrome will keep refreshing tabs because it is concentrating on the tabs you’re using rather than keeping all of them open.
So, closing any tabs you’re not currently using is an obvious way to keep Chrome tabs from constantly auto-refreshing. This will reduce the workload on Chrome.
If you believe you will need certain tabs in the future, you can bookmark them. Use a bookmark organizer plugin to keep your Chrome bookmarks organized.
Perform an SFC Scan
On a Windows PC, Chrome might continue to auto-refresh tabs due to a damaged system file. The System File Checker should resolve the issue in this situation and keep Chrome tabs from constantly auto-refreshing.
Launch Command Prompt as an administrator, enter “ sfc/scannow ,” and then click OK . When the scan is finished, see if Chrome can be used without auto-refreshing.
You should also employ more Windows in-built features to fix corrupt files if this fix didn’t work and you have reason to believe that the problem is related to corrupt system files.
Disable Chrome’s Memory Saver
The purpose of Chrome’s Memory Saver feature is to sleep tabs that aren’t currently in use. It does this to free up system resources and guarantee a smooth surfing experience. However, it’s advisable to disable this Memory Saver feature to keep Chrome tabs from constantly auto-refreshing or snoozing.
Access Chrome’s menu, then select Settings to disable it. On the left pane, select Performance and deactivate the toggle beside Memory saver . Chrome will do this regardless of the magnitude of system resources in use to keep all open tabs active.
Touch the Add button beside the option to Always keep these sites active . This will generate a list of websites that should always remain active on Chrome.
Use a Tab Auto-Refresh Extension
You could also try installing the Tab Auto Refresh extension to provide you with more control over your Chrome tabs if your system has the necessary resources.
You can specify the time that Tab Auto Refresh should automatically refresh your tabs. This way, you’ll be able to keep Chrome tabs from auto-refreshing constantly. If you’re waiting for a significant update or announcement, you can stop some tabs from auto-refreshing for a while or set them to reload every few seconds.
Enter the Chrome tab and tap the extension symbol to set the refresh timer. Now, input the time period to auto-refresh the tab or completely stop the auto-refresh function.
In summary , you no longer have to experience frustrating delays when working on Chrome. Learn from our suggestions in this guide to keep Chrome tabs from constantly auto-refreshing and enjoy an optimal workflow.
Author:Joan Agie
Add MobilityArena as a preferred source on Google
Because we have individual tastes and preferences, thanks to our unique nature, being able to customize our smartphones is a big deal. One of the ways you can customize your iPhone is to change the name that appears when your hotspot is activated and other devices search for it. We walk you through the steps to change your iPhone’s personal hotspot name, so it can be easily found and connected to.
Every iPhone has the personal hotspot name listed as “iPhone” by default. This makes it difficult to differentiate yours when other hotspots are active around you, say in a public, crowded environment. The cool factor aside, customizing your iPhone’s personal hotspot name is a practical and sensible thing to do. Here is how to change the personal hotspot name of your Apple iPhone or iPad.
To change the hotspot name of your Apple iPhone is as simple as changing the name of your iPhone in general. The name change will reflect on your personal hotspot.
- To change your iPhone’s personal hotspot name
- How to change your iPhone’s personal hotspot password
- Choose a secure password for your personal hotspot
To change your iPhone’s personal hotspot name
- Open your iPhone Settings menu.
- Scroll down and select the General option.
- Tap the About button at the top of the screen.
- Tap the Name button at the top of the screen.
- Tap the small x button to the right of the current name, enter a new name, then tap the blue Done button on the keyboard.
Done. This new name you entered is now your iPhone’s personal hotspot name, and will make it easy for others to identify it when sharing your cellular data or Internet with others.
If you also need to set or change your iPhone’s personal hotspot password, that is easy to do as well. It is a great idea to secure your mobile hotspot so anyone cannot just connect to it when it is active and use your data subscription. Giving it a password that you can remember is also a convenience that you can enjoy. Have a look below for quick instructions on how to do it.
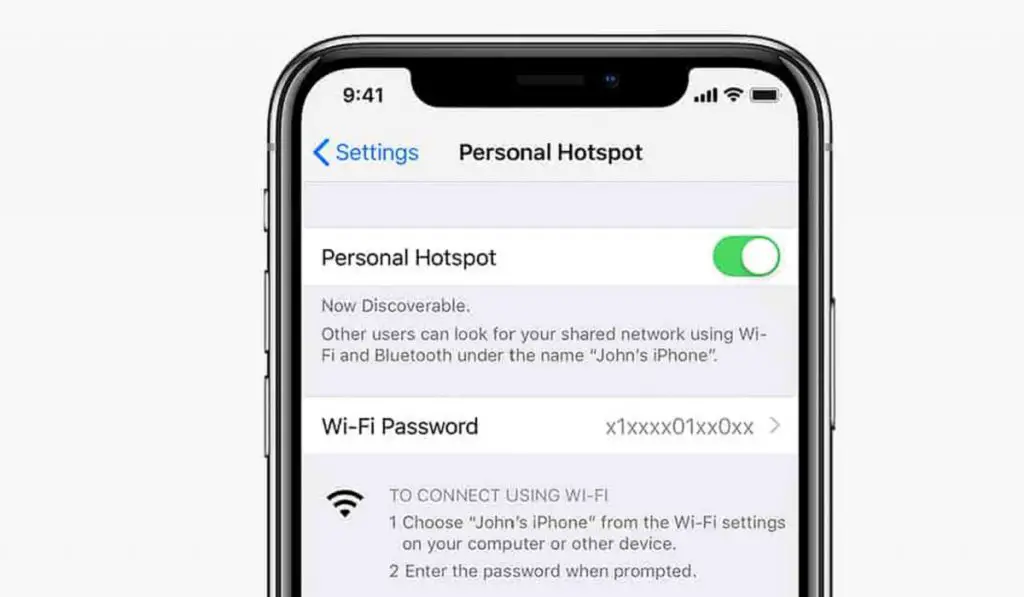
How to change your iPhone’s personal hotspot password
- Open your iPhone Settings menu.
- Tap Personal Hotspot .
- Tap the toggle switch to turn on Personal Hotspot.
- Tap Wi-Fi Password to change the Wi-Fi Password.
- Be sure to enter something that you can rememeber but that isn’t easy for others to guess.
That’s it. Your wifi hotspot is now properly secured. Again, it is important to spell it out that it is a good idea to have a strong password on your iPhone’s hotspot. If your password is easy to guess, if you have children, for example, they will likely figure it out and can easily exhaust your data subscription, if you are not on an unlimited data plan.
Choose a secure password for your personal hotspot
Secure your iPhone hotspot with a strong password. Also, make it a password that you don’t mind sharing with others on occasion. Which means, it is a bad idea to use a password that secures your bank account as your hotspot password. Get the idea?
Now you know how to change your iPhone’s personal hotspot name and password. Even if you upgrade your device to a newer model, the above instructions are valid unless Apple changes how it is done somewhere along the line. your iPhone’s hotspot has a unique name and a password you can remember.
Being able to share your mobile Internet for use on your PC or other devices can come in handy during trips and when you are out and about for work or relaxation. You will not always find a public hotspot, and even when you do, you have to be wary of most of them, for security reasons. Where you can, you should use the personal hotspot on your mobile phone to connect your laptop and tablet for urgent work.
Author:MobileChic
That motivated, gadget-loving geeky chic who tries to stay on top of things. Unapologetic iFan.
