Add MobilityArena as a preferred source on Google
Facebook’s 2.4 billion+ active users constitute an attractive target for hackers. While the big, more successful hacks come up in the news, individual accounts get hacked every day and do not make the headlines.
And it isn’t harmless, either. Hackers use a breached Facebook account in many ways. Automatic sign-ins via the network enable cyber-criminals to gain access to a lot of different website accounts as soon as they have got control of your Facebook.
A hacker can collect a lot of personal information about you from your profile, which they can use for stealing your identity. A successful hack also gives spammers access to your followership.
When your Facebook account has been hacked, there are some telltale signs you will notice. Immediately you detect such an unusual activity, you must act immediately to protect your account. Here is how to tell if your Facebook has been hacked and what to do to regain it.
Please Note : Some of these tips work for Twitter as well.
Tell-Tale Signs Showing Your Facebook Account Has Been Hacked

Ways to know your Facebook account is hacked
There’s a simple way to confirm your suspicion. Navigate to the arrow in the upper right corner of your FB page. Then, press it. Click on Settings in the menu. You will now see a new menu, and from there, select Security & Login > Where You’re Logged In .
You should see a list of all the devices your account is signed in to, as well as their locations. Going through the list, if you notice a login you can’t recognize, it is quite possible that you’ve been hacked.
If you come across anything that looks strange, scroll to the right side of the log and press Not You? The next thing is to click Secure Account, and Facebook will run a diagnostic on your account and will now show you how to secure it. Press Get Started .
Are There Any Other Signs to Know You’ve Been Hacked?
Yes, here are some other ways you can tell if your Facebook account has been hacked:
- You notice that someone sent out friend requests to other members you do not know
- You observe that your personal details such as your name, email, date of birth, or password have been changed
- You see posts showing up on your timeline that you did not post
- You observe that messages have been sent from your account, but they were not composed by you
Now that you’ve confirmed your account has been hacked and taken steps to regain control of your Facebook, it is time you considered ways to avoid a reoccurrence of such an incident in the future.
How to Keep Your Facebook Account Safe from Hackers

Here are the steps to keep out hackers from your Facebook
Change Your Password & Setup 2-Factor Authentication
Some of the most effective ways to combat hacking are to create a unique & strong password and activate two-factor authentication on your FB account. It is very easy for an intruder to gain access to your account once they’ve laid their hands on leaked credentials.
As soon as they have acquired such sensitive data, they will now try the email as well as password combinations across other services. You can quash that threat by using different passwords across all your social media accounts. A password manager can be of help here.
Another method to keep your account safe is to enable two-factor authentication, where a second code (or factor) is requested to sign in to your account. With this technique in place, if an attacker manages to get your password, they would equally have to gain control of another device, which is often your smartphone, to access your account.
You can add 2-factor authentication on your Facebook by heading to Settings -> Security & Login -> Two-Factor Authentication . Now, supply your password to confirm you intend making changes. Switch two-factor authentication to “On”.
In this section, you can enable a setting to receive 2nd-factor codes through SMS or via a code-generating app, such as Google Authenticator.
To add two-factor on your Twitter , scroll to Settings & Privacy -> Account . When you see the Security subsection, select Review your login verification methods .
Once you enter your password, you will be taken to a Login verification screen. From there, you can also choose how & where to receive codes, as you did on FB above.
Though using a combination of strong and unique passwords and 2-factor authentication is not 100% safe, for the majority of people, it helps to drastically cut down on the likelihood that their social media accounts will ever get compromised security-wise.

Use Your Device Lockscreen Judiciously
Consider setting every one of your devices (including your smartphone, laptop, etc.) to lock quickly immediately you stop making use of them to safeguard them from physical attacks.
While this tip is mostly suitable to reduce pranks and keep out rogue toddlers, it could also come handy in defending against more extreme targeting.
Additionally, use a strong passcode/biometric for guarding your devices. If you have chosen your date of birth as the unlock code for your smartphone, you will only make it easier for hackers to break in.
Use Remote Control
Facebook has put in place a couple of features to help you keep tabs on anyone that is accessing your account. To use them, start by navigating to Settings -> Security & Login . Here, you will view all the devices on which your FB account is signed in, in addition to their location.
If you notice anything you do not recognize or a device you do not identify, you can check the right-hand icon to access the option to log out remotely. You can take a step further by reporting it as an imposter.
Still on that section, navigate down to Get alerts about unrecognized logins , and set it to “ON”. By doing so, you will be notified through Facebook, Messenger, or email when someone has signed into your account from an unidentified browser.
Since Twitter does not provide a similar feature, this is why it is important to ensure that you add two-factor on your account.
Go through Device Permissions
Another step you can take to prevent getting hacked again is to check the permissions that social services, such as Facebook and Twitter, have on all your computing devices.
It is possible you’ve blocked Facebook from getting information on your location via your phone; however, you might have inadvertently enabled it on your tab due to loss of attention. This data needs to be kept safe on accounts protected by a powerful password as well as 2-factor authentication.
However, if you would not like a service to collect it, you could switch it off.
Here is how to access device permissions for FB and Twitter on your Android: Scroll to Settings -> Apps and hit the menu icon in the upper-right section, and then press App Permissions .
If your phone runs iOS, head to Settings -> Privacy to perform a similar action. Under Settings, navigate down to double-check the permissions that are listed for all the services you’re using.
Be Careful with Allowing Third-Party Permissions
While an attacker would find it difficult taking over one of your social media accounts by using a 3rd-party service with some access, it is still important to check the apps you have granted approval to in a bid to make sure no threat is on the list.
Also, consider getting rid of old plugins that you are not using any longer.
You might have given those plugins permission to collect more data than you expect. Though that is not technically a hack, it is still an invasive action.
On your Facebook, scroll to Settings -> Apps & Websites to take a look at and manage the outside services with some access to your FB.
On your Twitter account, navigate to Settings & Privacy -> Apps to view and edit a similar list.
Wrapping up, Going through the tips above, you will be armed with information on how to tell if your account has been hacked and what to do to regain control of it.
Author:Tijani Mustapha
Deji is a web content developer and tech writer, who is passionate about tech-related topics and issues. A graduate of Physics from the University of Ibadan, he loves writing, conducting research, playing football, and meeting people of diverse backgrounds and interests.
Add MobilityArena as a preferred source on Google
In case you see this error message “Unfortunately Google Play Services Has Stopped” on your Android device, you do not need to fear. We have the easiest and quickest ways of fixing the problem.
What makes you see the error “Unfortunately, Google Play Services Has Stopped”? Just about every stoppage of the Play Store is as a result of your network issue or bad software. Nevertheless, there’s an exception. There are specific devices that the Play Store is hard-wired for, so there’s sometimes an accidental roll out of the wrong version of Google Play by Google to your device.
Fixes for Unfortunately Google Play Service Has Stopped Issue
Let us begin with the methods which are easiest and most common for fixing this issue before we go over to steps that are more complicated.
1. Restart your Android Device

This is actually an obvious step, although we aren’t attempting to insult you. Switching your phone or tablet off and then back on again can solve almost all Play Store issues.
To restart your device:
- Press and hold down the power button until you see the shutdown menu.
- Touch the restart button.
- Then tap the button again to restart your device.
- If your phone doesn’t have the restart button, you can simply switch it off and turn it back on manually.
- After you’ve turned it on, just open the Play Store them check if the problem has been resolved.
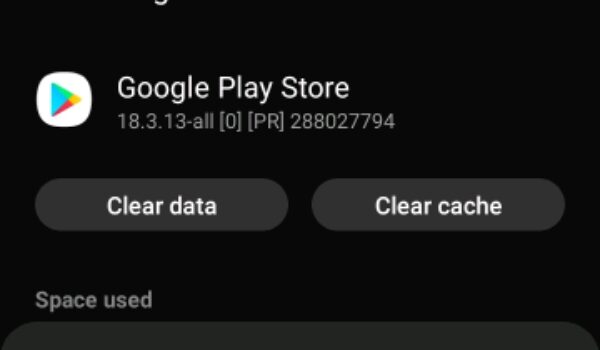
2. Update the Google Services and Play Store
An outdated version of the Google Service Framework or Google Play can sometimes result in issues. Anytime you run into an issue; you can simply check for updates for these two.
- Launch your Google Play Store.
- Click on the Menu button that can be seen at the top left corner of the Play Store. It is displayed as an icon which has three horizontal lines.
- Click on My apps & games, and you will see a number of updates that are pending.
- Search and download the most recent version of the Google Services Framework if it’s available.
- Open the left menu again, then tap on Settings. Scroll down to the last of the page then tap on the Play Store version to check for any updates to the Google Play Store application.
- After doing these, restart your phone or tablet and relaunch the Play Store.
3. Change from Wi-Fi to Mobile Data (or Vice-Versa)
If you have a poor internet connection, you will likely see the error “Unfortunately, the Play Store has stopped working.” In a number of instances, you’d not see this error message. Some other times, your Play Store can just fall in the middle while downloading an app or refuse to start the apps altogether.
Irrespective of the case, it’s quite easy to fix these. If you are presently online via your Mobile Data, change to Wi-Fi, or try any other wireless network. If you’re on Wi-Fi, try to change to your Mobile Data, then check if it solves the issue.
4. Change the Date and Time of your Device
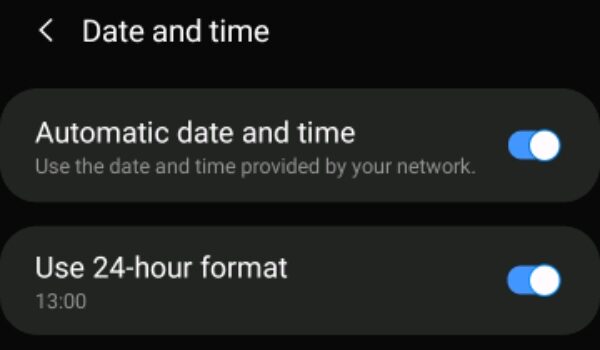
If you have an incorrect date and time, your Google Play Services would most likely not work. It is effortless to correct these:
- Launch Settings, then click on general management.
- Click on date and time from the displayed menu.
- If you haven’t enabled Automatic date and time, click on it. Ensure your phone or tablet picks the correct time.
- If you’re still having trouble, you can just update the date and time manually by unchecking the auto function then tapping the “set time” option.
- After doing these, just restart your phone or tablet then retry the Google Play Store.
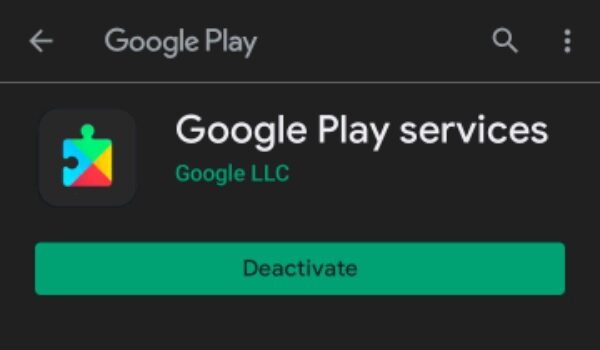
5. Clear the Cache and Data of Google Play Services
Google Play Services and Google Play Store application both support the apps of Google. If there is an issue with Google Play, we recommend you wipe off the data and cache on the two services then restart your device.
Be aware that the Clear Data option also clears the cache. Follow the steps below to do this:
- Launch the Settings
- Click on Apps
- Look for the Google Play Services then click on it
- On the page of the application, click on storage then Clear Data or Clear Storage Also, follow this process for the Google Play Store.
- After doing these, restart your device.
6. Roll Back to an Older Google Play Store Version
Rolling back or reverting to an older Google Play Store version that arrived with your device can solve issues you get when you use another version. Follow the steps below to do this:
- Navigate to Settings then click on Apps.
- Look for the Google Play Store App then click on it.
- From the menu that follows, click on Disable. When you disable a system app, it doesn’t uninstall it but rather replaces these apps with the version which came with your device.
- After doing these, restart your phone or tablet.
7. Sign Out of Your Google Account
Sometimes, phone or tablet would not correctly add the account of a user. If this is the issue, signing out then signing in to the account will likely resolve your Google Play Problem. Follow these steps:
- Launch the Settings
- Click on Accounts
- Click on the Google account that you’d like to remove, then click on remove account. Ensure you have backed-up all things you synchronized to the account so that you won’t lose it.
- Sign in to that account again, then check if the Play Store has started working again.
8. Install a 3rd Party Copy of the Play Store
If none of the steps stated above seems to have worked for you, it is worth it if you download the Play Store app from 3rd party apk sites. This can give you the chance to update the Google Play Store if several methods don’t work.
You’re required to have a file manager installed on your device for easy installation of the downloaded apk. Es File Explorer is a great option if you don’t have a file manager yet.
You will also be required to enable sideloading of applications on your phone or tablet, which is slightly different on Android 8 Oreo and newer versions. Go to the internet on your phone, then download the apks on your phone. Open the apps from the download section from your browser, or search for them in your file manager application. They will be installed like other apps on Android, and this includes updating them if they are stuck.
9. Factory Reset Your Device
When you do a factory reset on your device, it would be restored to its original state. This denotes that it’ll roll back to the original version of Google Play Store and other applications, which will almost definitely resolve this problem.
It is quite unfortunate that a factory reset on your device will make you lose every data on your phone, and this includes texts, photos, applications, and other things on your phone. If you opt for this option, we’d advise you initially back up everything on your device.
To factory reset your device, follow these steps below:
- Navigate to Settings
- Click on System > Advanced > Reset options.
- Click on reset on the next menu.
- After doing these, all data from your phone will be wiped, and your phone will restart itself.
Does the Play Store seem not to be working?
If the methods here do not work, then it is very difficult to fix the “Unfortunately Google Play Service has stopped” error message.
A number of individuals have successfully fixed this issue by rooting their phones and sideloading their Play Store. But for most individuals (especially those who don’t want to root their devices), it is better to install a Google Play Store alternative simply.
