Add MobilityArena as a preferred source on Google
Apple has been known to provide frequent upgrades for iPhone devices. There are often a few incremental updates made to the OS during the year in addition to at least one major upgrade, which is typically used to resolve problems and enhance security.
You can make sure that your iPhone device benefits from Apple’s regular upgrades by updating its software whenever there’s a new one available. If this is a process you’re not so familiar with, we’ve provided this guide to instruct you on the process of upgrading your iPhone’s software to iOS 15, and to subsequent versions.
Updating your iPhone’s Software Automatically
Allowing your device to handle iPhone upgrades is the simplest (and safest) solution.
Here’s how to check if your iPhone is prepared for an automated update:
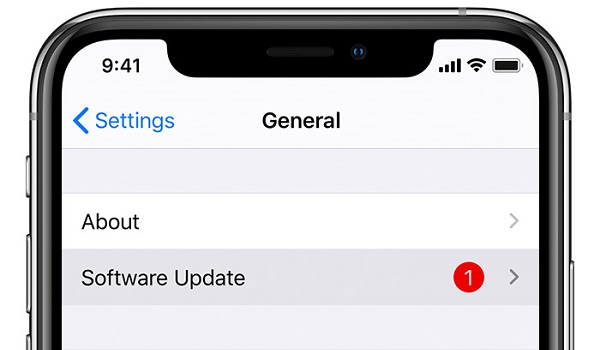
- Open Settings and select General .
- Tap Software Update on the General page.
- Tap Automatic Updates on the Software Update page.
- Make sure the Download iOS Updates and Install iOS Updates buttons are both activated by swiping them to the right, making them green, in order to have the iPhone carry everything out automatically.
When you turn both settings on, your iPhone will download the update files to the device and then automatically install them while it is charging and locked throughout the course of the next night.
You can also choose to disable Install iOS Updates while keeping Download iOS Updates enabled. The update will download to the phone if you do this and wait for you to manually install it.
Update your iPhone’s Software Manually
You can manage updates yourself if you like, or if the phone isn’t updating automatically for whatever reason.
- Tap General after opening the Settings app.
- Tap Software Update on the General page. Your phone will confirm if there’s an update available.
- Click on the Download and Install option to install any updates that are available. Accept the terms and conditions, then wait for your phone to download the update.
- To finish the update, press Install at the end.
What to Do if your iPhone’s Software Does Not Update
Under normal circumstances, you should be able to update your device’s software following the instructions we’ve provided above. However, you should try these troubleshooting techniques if your iPhone won’t update, whether manually or automatically.
Verify your Device’s Compatibility
For the iPhone 6S and later devices, the iPhone SE (first and second generation), and the iPod Touch 7th generation, the most recent iOS software upgrade, iOS 15, should typically be accessible.
You’re out of luck if you’re still utilizing an iPhone 5S or an earlier model, so if the software update to iOS 15 hasn’t been working, now you know the reason.
Create sufficient storage space on your device
Approximately 3.24 GB of storage space will be required for iOS 15, but you’ll need more to install it. In order to download and install the update, your phone must have a total of around 5GB of free space.
Launch the Settings app, touch General , then choose iPhone Storage to find out how much free space is currently available on your phone. On the iPhone Capacity page, the top of the page will display your available storage.
You will need to make room on your iPhone if you don’t have enough free space. You won’t be able to update it successfully otherwise.
Charge your battery and connect to stable internet
The smallest issues can occasionally prevent an iOS upgrade. A strong, dependable WiFi connection is required, and your iPhone must have at least 50% battery life left.
Update your device at home or at work, where you are sure to have consistent WiFi, for the best possible results. Additionally, before beginning the update, make sure to dock or charge your phone.
Update your iPhone with a PC or Mac
Rarely, you may encounter a bug and discover that your iPhone is unable to install an update, either manual or automatically. You can install it from a PC or a Mac if that occurs.
- Connect your iPhone to your PC.
- Launch iTunes on your PC. Open Finder on your Mac (if that’s what you’re using) and choose the name of your phone from the sidebar.
- Click Continue if a message appears on the computer requesting permission to access your iPhone. On your iPhone, click on Trust .
- In iTunes, select Library , and then, on the left side of the toolbar, select the iPhone icon. Click General in the Finder.
- Select Check for Updat e by clicking on it.
- Click Download and Update if an update is available. For however long it takes for an update, make sure to keep your phone connected to the computer.
In summary , your iPhone device can benefit a lot from regular software updates. This guide will put you through the different ways to successfully update your software, and what to do in case the update is not successful.
We hope this guide has been helpful so don’t forget to recommend it to your friends and loved ones.
- Don’t miss our mobile phone reviews .
- Follow our news on Google News .
- Join our WhatsApp Group , to be notified of the most important articles and deals,
- Follow us on Instagram , Facebook , Twitter , and YouTube .
Author:Joan Agie
Add MobilityArena as a preferred source on Google
Why should you delete your iPhone browser cache? One of the most used apps on modern smartphones, including your Apple iPhone, is the Web browser. Whether you choose to use Safari or a 3rd party browser, Web browsing is likely a top activity for you. Which means that it’s cache (a temporary storage that makes browsing faster) gets clogged up easily, and then results in lower performance. Your phone slows down. This is one key reason why you should clear your iPhone browser cache regularly.
How to clear the iPhone browser cache (Safari)
To clear your history and cookies, on your iPhone, go to Settings > Safari, and tap Clear History and Website Data . Then tap Remove Now .
Doing this will clear not just the cache, but also your history and cookies. However, your saved website passwords and AutoFill data will not be deleted.
How to clear your iPhone browser cache (Chrome)
- Open the Chrome app.
- Select the three dots in the bottom right to open more options.
- Scroll down and select Settings .
- Select Privacy in the next menu.
- Then select Clear Browsing Data to open up one last menu.
- Select the intended time period you want to clear data from at the top of the menu.
Does clearing my iPhone browser cache delete passwords?
Not at all. Clearing your iPhone browser cache does not delete your saved passwords.
What happens when you clear your iPhone browser cache?
Clearing your Web browser cache deletes junk files and frees up the memory of your iPhone. This can improve performance when using the browser.
How often should I clear my browser cache on my iPhone?
It depends on your usage, but we will recommend that you do it at least once a month. If you use your web browser very heavily, feel free to clear the cache bi-weekly or weekly.
What are the downsides to clearing browser cache?
If you delete the browser cache, the next time you visit a previously cached website, the site will be forced to load a fresh copy of the content of the page(s) you are visiting. This refreshing will cost you a small amount of time, but it will also create a new cache, so the page loads faster the next time you visit it. That’s all there is to it.
Does clearing my iPhone browser cache delete AutoFill data?
Not at all. When you delete your browser cache, your AutoFill data will not be deleted when you clear your iPhone browser cache.
- Don’t miss our mobile phone reviews .
- Follow our news on Google News .
- Join our WhatsApp Group , to be notified of the most important articles and deals,
- Follow us on Instagram , Facebook , Twitter , and YouTube .
Author:MobileChic
That motivated, gadget-loving geeky chic who tries to stay on top of things. Unapologetic iFan.
