Add MobilityArena as a preferred source on Google
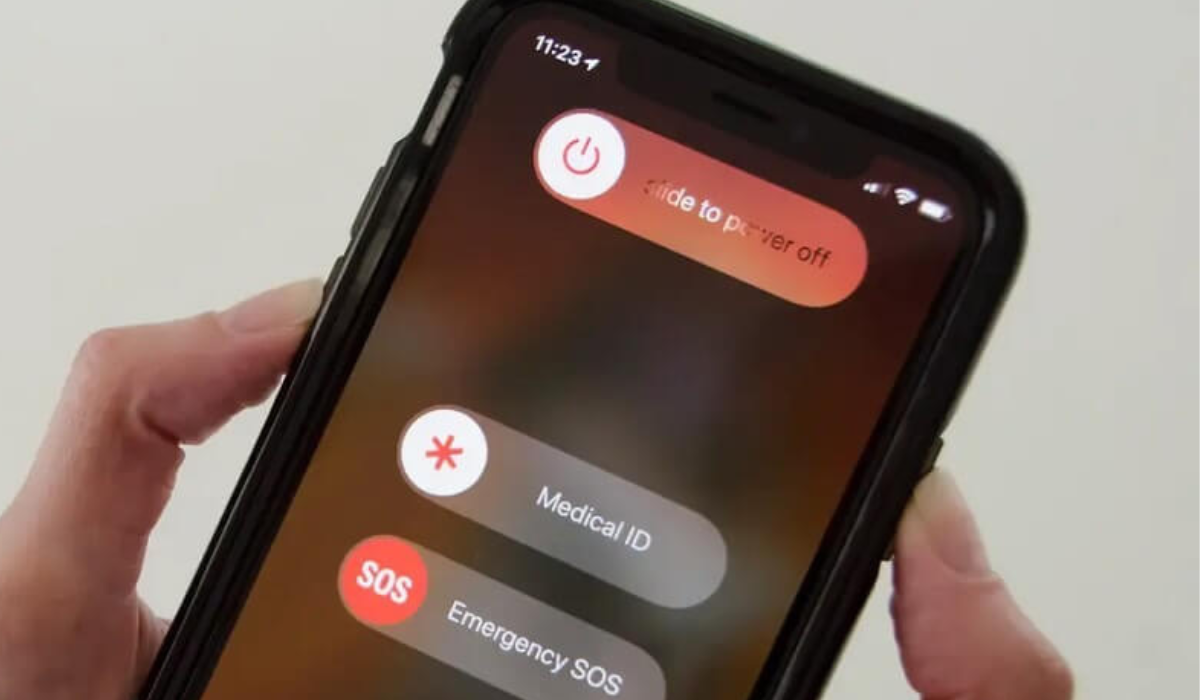
Not many issues are as annoying as an iPhone being stuck. The Emergency SOS feature is useful for communicating with relevant emergency service providers. However, if your device gets stuck on this Emergency SOS page after such a call, it can make an already bad day even worse.
In this guide, I’ll share several useful tips to fix an iPhone stuck on Emergency SOS. If you’re ever caught in this situation, these suggestions can help you resolve the error and return your phone to a proper functioning state. So, here’s what you need to know…
- How Can You Fix An iPhone Stuck on Emergency SOS? Clean your Phone’s Screen Turn Off and Turn on Your iPhone Update Your iPhone With A Mac or PC Force Reset Your iPhone Restore Your iPhone from Recovery Mode
How Can You Fix An iPhone Stuck on Emergency SOS?
There are several tricks you could try to fix an iPhone stuck on Emergency SOS, all tested and proven to work in different capacities. Try one or more of the fixes I’ve recommended below.
Clean your Phone’s Screen
You may be dealing with an unresponsive display if you are unable to turn off the Emergency SOS event by clicking the Stop ( X ) button at the bottom of the screen. Splashes of water or oily smudges on the iPhone touchscreen can cause it to stop responding.
In this situation, you must use a clean, soft cotton cloth to clean the display, and this could help you fix an iPhone stuck on Emergency SOS mode. Try pressing the Stop ( X ) button again once you’re done, and see if you’re able to do so successfully.
Turn Off and Turn on Your iPhone
You can switch off your iPhone device, leave it to rest for about 30 seconds, then turn it back on to fix an iPhone stuck on Emergency SOS mode. If you’re willing to try this fix and see if it helps, follow these steps:
- Launch the iOS Settings app, then select General .
- On the General settings screen, scroll to the bottom and tap the Shut Down button.
- You could also just press the Sleep / Wake and Volume Down buttons at the same time until the Slide to Power Down slider appears.
- To turn off the device, swivel the aforementioned button from left to right.
Update Your iPhone With A Mac or PC
You could also attempt an iPhone update using a PC or Mac with the iTunes or Finder software. This could help you fix an iPhone stuck on Emergency SOS mode, especially if the problem is brought on by a faulty iOS update. Here are the steps you need to follow:
- Using the included USB cable, connect your iPhone to a Mac running macOS Mojave or an earlier version of Windows.
- Open the iTunes program.
- On the Apple smartphone, click on Authenticate , Allow , or Trust if requested.
- Open the iTunes app and go to the area containing details of the connected iPhone
- If you’d like to update your iPhone using iTunes, look for the Update button.
After connecting the iPhone to the Mac with a USB cord, you can simply launch the Finder software on an iMac or MacBook running macOS Catalina or later. The name of the iPhone should be visible on the left-side navigation panel of the Finder application.
You need to locate the iPhone update option on the app’s interface by clicking your iPhone on the Finder software. The choices could differ, as seen below:
- If you have never used the Finder app to check for updates on your iPhone, the “ Check for Update ” option will show up. You’ll notice the Download and Update pop-up if an update is available when you click on “ Check for Update “
- If Finder detects an update for the synced iPhone automatically, a message that reads “ Update ” will display instead
After the update is complete, it should help fix an iPhone stuck on Emergency SOS mode. If it doesn’t, proceed to the next fix below.
Force Reset Your iPhone
Usually, you can force a reset to fix an iPhone stuck on Emergency SOS mode using a few different methods. The approach differs depending on the iOS version and iPhone model. Normally, to force a reboot, you must press the volume up, down, and side buttons in a specific sequence. Below are instructions to force restart for some of the most recent iPhones.
On iPhones running iOS 16,
- Quickly press and release the volume up button.
- Likewise, press the volume down button.
- Until you see the Apple logo with a loading bar, press and hold the Power , Sleep / Wake , Side button, or top Touch ID button.
- Wait after releasing the button.
On iPhone 7,
- For at least ten seconds, press and hold the Sleep / Wake and Volume Down buttons
- Release all of the buttons once you see the Apple logo and a loading screen.
- Wait until the Home Screen appears when the device reboots.
On iPhone 6 and earlier devices,
- Find your iPhone’s Sleep / Wake button on the device’s top or right side.
- Press and hold the Home and Sleep / Wake buttons at the same time.
- Let go of these buttons when the screen starts up, or you see the Apple logo or a white progress bar.
- Watch for the Home Screen to appear on the smartphone.
Once you’re done with the force resetting procedure, see if it works to fix an iPhone stuck on Emergency SOS mode.
Restore Your iPhone from Recovery Mode
This is yet another option to fix an iPhone stuck on Emergency SOS mode. You’ll also need a Windows PC or Mac for this procedure. However, since this procedure erases all data on the iPhone, make sure to back up the device before you start the procedure.
- Connect your iPhone to a Mac (iTunes requires macOS Mojave or earlier, Finder requires macOS Catalina or later), or a Windows PC (you’ll need the iTunes program for this)
- Open the Finder or iTunes program depending on the device you’re using
- To enter Recovery mode on your iPhone, follow the instructions for your particular iPhone model listed in the preceding section (forcing a reset on your iPhone).
- When you notice the iPhone’s USB port and computer graphics, you need to release the buttons
- A pop-up to restore the device will display on Finder or iTunes after the iPhone is in recovery mode.
- To start the procedure, click the Restore option.
- Reset the iPhone to factory settings and then use iCloud to recover data.
To summarize , try as many of these options as you need to fix an iPhone stuck on Emergency SOS mode. To prevent your phone from getting stuck in this mode again, consider disabling the Emergency SOS mode from the Settings app and manually disabling location sharing. Also, contact Apple Support if necessary to provide you with any extra help.
Author:Joan Agie
Add MobilityArena as a preferred source on Google
It’s getting pretty common for users— I’d say especially from developing countries—to buy iPhones from third-party sellers, rather than directly from Apple. Granted, this might be a cheaper option that is not illegal, but at the same time, it’s not safe or advisable. And while I can’t entirely stop you from buying iPhones from a source other than Apple, I can help you avoid getting scammed.
So, in this guide, I’ve provided tips to check iPhone authenticity during purchase. With these useful tips, you can tell if the iPhone you’re buying is actually genuine and unused as the seller may claim. So, here goes…
- How Can You Check iPhone Authenticity During Purchase? Check the Serial Number Check Apple Support Website Compare Coverage Check Data With Purchase Date
How Can You Check iPhone Authenticity During Purchase?
There’s an increased demand for Apple products that has caused more fake iPhones to circulate in the smartphone market. However, you don’t have to fall victim to such scams, there are ways to determine if your iPhone is indeed genuine and brand-new. Here’s how to check iPhone authenticity during purchase.
Check the Serial Number
An original iPhone has a special serial number that serves as a code for storing details such as the date and location of the device’s manufacture. In essence, this serial number can help you check iPhone authenticity during purchase, so you’ll be able to tell if the iPhone is brand-new or refurbished. Apple consumers can also use this serial number to verify the status of their phone’s warranty and see if they qualify for additional AppleCare coverage.
If there isn’t a serial number, the iPhone model in question is probably a fake. Go to Settings on your smartphone, select General , and then click on the About section to view the serial number of your device. Scroll down afterward to locate the serial number, then long-press on the serial number when you see it, and finally, select Copy . You’ll need this serial number in the next tip in this guide.
Check Apple Support Website
Remember the serial number you copied in the previous section? Here’s where it comes in handy. You can check to see if Apple’s database contains any information on the iPhone you’re purchasing with this serial number. This can in turn help determine the device’s validity. Using this method to check iPhone authenticity during purchase is more trustworthy because the output comes directly from Apple.
Follow these steps:
- Visit Apple’s device coverage website and paste the serial number into the serial number search box after copying it as instructed in the previous section.
- Enter the verification code after that, then press the Submit button.
- Apple will retrieve the record for the iPhone you’re purchasing from its database after a while. Afterward, check the model and purchase date that will display on the screen against your own.
Your device is authentic if both of your credentials are true. But if Apple claims to be unaware of a device with the serial number you’ve inputted, it’s probably a fake. This is a good way to check iPhone authenticity during purchase, so you can safely avoid paying for a counterfeit product.
Compare Coverage Check Data With Purchase Date
Even after confirming that your purchased device is not fake, there’s still the matter of confirming if it’s new and unused like the seller may have claimed. You can find out if the iPhone device you’ve purchased is pre-owned or brand-new using the coverage check data collected in the previous section.
To check iPhone authenticity during purchase in this regard, pay particular attention to the phone’s purchase date from the coverage check data. Your device is brand new if the date of purchase there coincides with the day you actually purchased and activated it.
Check the expiration date of your device’s limited warranty if the dates differ or if you can’t recall when you activated your phone. You’ll also be able to tell how old your phone is by looking at the Apple warranty, which is typically valid for one year from the date of purchase.
Even though you should be able to check the warranty details from the same coverage report, if it doesn’t show any information about the warranty, you can check directly through the iPhone. Follow these steps:
- Navigate to the General section in Settings .
- Next, select About .
- You’ll see either of these options here: Limited Warranty or Coverage Expired .
Your iPhone is still covered by warranty if you see the Limited Warranty option. To find out when the warranty expires, click the option. The warranty should not be close to expiry if the iPhone is indeed brand new. Instead, this shows that the iPhone has been activated long before you even bought it.
On the other hand, if the option you see says Coverage Expired , the iPhone in question is probably more than a year old and definitely not brand-new. This is a neat way to check iPhone authenticity during purchase, so you don’t pay more than the phone is worth.
Ultimately , you can save yourself from getting scammed by taking note of the tips I’ve provided in this guide to check iPhone authenticity during purchase. If the device turns out to be fake or older than you were made to believe, request a refund or a newer, more original device. If these seem impossible, you can help others to prevent similar scams by reporting the seller’s listing to Apple or marketplace support.
