Add MobilityArena as a preferred source on Google
A Nokia G60 vs Nokia X30 comparison was inevitable from the moment I read the news of their launch and scanned through the specs of both phones. Why? At their core, Nokia G60 and Nokia X30 are the same phone. They are both powered by the same Snapdragon 695 5G processor and were both released with Android 12. The differences appear when you move outwards from that core.
This comparison will pit the main features and specs of the G60 5G and X30 5G against one another. The G60 5G is the more affordable of the two, but are there areas in which it has better specs or features, or is the X30 5G ahead of it in every way?
- Nokia G60 vs Nokia X30: The Comparison Where Nokia G60 5G has the edge Where Nokia X30 5G has the edge
- Nokia G60 vs Nokia X30 comparison: Verdict
Nokia G60 vs Nokia X30: The Comparison
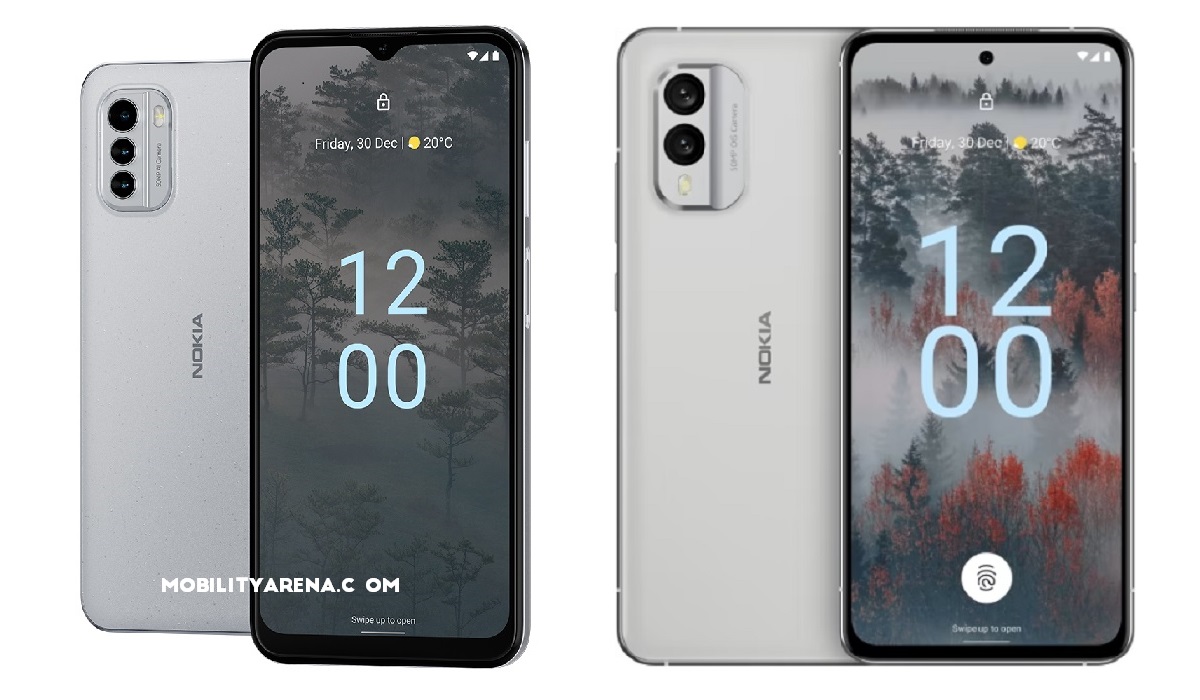
Nokia G60 vs Nokia X30 comparison
| Nokia G60 5G | Nokia X30 5G |
|---|---|
| 6.58 inches, 1080×2400 pixels, 120Hz, IPS LCD, waterdrop notch, Gorilla Glass 5 | 6.43 inches, 1080×2400 pixels, 90Hz, AMOLED, centred punch hole, Gorilla Glass Victus |
| Plastic frame, plastic back; IP52 splash resistant | Aluminum frame, plastic back; IP67 dust/water resistant (up to 1m for 30 mins) |
| Android 12, upgradable to Android 15 | Android 12, upgradable to Android 15 |
| Qualcomm SM6375 Snapdragon 695 5G | Qualcomm SM6375 Snapdragon 695 5G |
| 4 GB / 6 GB RAM | 6 GB / 8 GB RAM |
| 64 GB / 128 GB storage | 128 GB / 256 GB storage |
| 50 MP + 5 MP + 2 MP rear camera | 50 MP + 13 MP rear camera |
| 8 MP selfie camera | 16 MP selfie camera |
| 2G, 3G, 4G, 5G | 2G, 3G, 4G, 5G |
| Fingerprint scanner in side Power button | Fingerprint scanner under-display (optical) |
| 4500 mAh, non-removable battery | 4200 mAh, non-removable battery |
| 20W fast charging | 33W fast charging |
| Price: from $389 | Price: from $540 |
Where Nokia G60 5G has the edge
- Has a bigger screen size (6.58 inches, against the X30’s 6.43 inches)
- Has a higher refresh rate (120Hz, against the X30’s 90Hz)
- The rear camera has 3 lenses (the X30’s rear camera has only two and so lacks a depth sensor)
- Has a larger battery capacity (4500 mAh, against the x30 5G’s 4200 mAh)
- It is more affordable
Where Nokia X30 5G has the edge
- It is more compact and lighter
- More premium build with an aluminium frame (against the G60’s plastic frame)
- IP67 water/dust resistance (against, the G60’s IP52 splash resistance)
- AMOLED panel with Gorilla Glass Victus
- Optical, in-display fingerprint scanner (against the G60’s side-mounted scanner located in the Power button)
- More RAM and storage
- Better camera specs for both front and rear cameras
- Faster battery charging (33W, against the G60 5G’s 20W)
Nokia G60 vs Nokia X30 comparison: Verdict
This comparison between these two 2022 Nokia smartphones is not about picking which one is better overall. It is more to highlight the similarities and differences between the two. Of course, the X30 5G is the better phone overall, in terms of quality of materials, features, and capabilities. Which is why it is also the more expensive model. For those who are not willing to spend up to $540 on a smartphone, the good news is that to a large extent, you won’t be missing much.
The Nokia G60 5G gives you similar performance to the Nokia X30 5G all round. The only spot where it is better is the 120Hz refresh rate. When you consider that you are paying much less for similar performance, the Nokia G60 5G just might be the better value for money of the two.
Note that the G60 5G has three memory variants – 4GB RAM + 64GB storage, 4GB RAM + 128GB storage, and 6GB RAM + 128GB storage. On the other hand, Nokia X30 5G has two – 6GB RAM + 128GB storage and 8GB RAM + 256GB storage. Meanwhile, you will be interested in our detailed Nokia G60 5G review .
Author:Mister Mobility
Digital Skills and Communication Coach | Mobile Phone Connoisseur since 2001 | Tech Blogging since 2004
Add MobilityArena as a preferred source on Google
Did you know that recent applications of Android smartphones allow you to cast content onto a projector screen through a wireless connection? You can project different types of content this way, including PNG/JPEG photos, PDF documents, saved screenshots, and movie clips. When there’s no desktop computer to project content, this method can prove really useful.
If you’re curious as to how this works, or you’d like to learn how to connect your phone to a projector wirelessly, we’ve created this guide for you. Keep reading and follow the detailed instructions we’ve provided in this guide.

How Do I Connect My Phone to a Projector Wirelessly?
It’s possible to wirelessly link your smartphone to a projector. Depending on the sort of projector you have, there are multiple methods to achieve this. If your projector is a more recent model and enables wireless streaming, you can use Wi-Fi to connect your smartphone to the projector.
You need to purchase a cheap display dongle box before you can make this connection. Users can link their phones to other devices like speakers or televisions with the help of this device. These devices can be connected in a number of ways, but WiFi is still the most common one.
Furthermore, you won’t need to download or install any third-party programs to connect an Android to a projector. However, WiFi transmission must be supported by your projector. Therefore, before proceeding to the steps involved in the process, make sure your projector’s capabilities are confirmed in the user handbook.
Follow these steps to connect your phone wirelessly to a projector:
- Prepare your WiFi receiver wire and Dongle for use. A USB and power cord should be included with the WiFi receiver.
- Carefully insert your Dongle into the projector’s HDMI connector.
- Connect the power wire for your WiFi receiver to the dongle.
- Connect the projector to the receiver using the USB wire. Your Dongle will be powered up by this action.
- Next, turn the projector on.
- At this level, the Anycast dashboard should be detectable. This routing technique is appropriate for sending digital content quickly over IP addresses. Depending on variables like server capacity or the distance between site visitors, the system distributes user requests to certain nodes. Here, activate the WiFi on your phone and join AnyCast directly.
- A password is required to connect to an Anycast device. On the AnyCast Dashboard, enter the secret code.
- On your phone, go to the screencast settings and select Connect . At this point, the projector and your phone should be connected.
You can also connect your smartphone to a projector via Bluetooth. The only problem with this approach is that you may experience some delay in the audio output.
We’ve outlined the steps involved below. Verify that the speaker or headphones on your device are prepared for Bluetooth pairing. You can get more pairing guidance from the manual instructions that come with new projectors.
- To see your projector menu, select the jog lever tab and hit ENTER .
- Turn on the Bluetooth feature by choosing it from the menu. The Bluetooth mark immediately becomes gray, signaling that the process is active.
- Next, choose the device from the list of “paired devices” or “Available devices” that you want to connect to the projector. Next, click Connect .
- Overall, make sure the Bluetooth icon on the screen changes to blue. A weaker connection is indicated by the gray tint. To rejoin, you need to repeat the previous steps.
How Do I Connect an iPhone Wirelessly to a Projector?
The projector’s app and Airplay are the two connection mechanisms to employ here. The simple procedures described below make the set up process simple regardless of the method.
The Airplay Method
Users can directly mirror the projector screen to their iOS device via AirPlay. Carry out the following actions:
- Go to the control center and turn on AirPlay.
- Select Screen Mirroring by clicking the option. Use the sharing icon to then replicate your films or other content.
- Start your mirroring adventure by clicking the name of your projector.
Using the iProjection App
With the Projector app, users can wirelessly link an iPhone to almost every projector on the market. The biggest benefit of this strategy is that you won’t have to shell out more cash for cables. You’ll only need to check whether both devices are connected to the same WiFi network.
Follow the instructions we’ve provided below:
- Choose WiFi by clicking the option in Setting .
- Select your projector’s name from a list of available devices.
- Go to the projector network menu by pressing the LAN button.
- On your phone, launch the iProjection app.
- Tap the projector icon at the top of your phone’s screen. If you have trouble finding the word “projector” in your phone’s menu, select “Other” to get the projector’s IP address. When you press the LAN button on your remote or look in the projector connection menu, you may locate the IP address.
With either of these easy methods, you can connect an iPhone wirelessly to a projector.
In summary , if you’ve been looking for a way to connect your smartphone to a projector, you’ll find this guide really helpful. Follow the instructions we’ve provided carefully and enjoy easy accessibility to content on larger screens.
