Add MobilityArena as a preferred source on Google
If you often get paranoid about unauthorized access to your SIM card’s important data, I recommend a SIM card lock. SIM cards hold your phone number, billing information, and all your important contact details. Of course, your phone’s lock screen password offers some protection for your data, but it’s not enough to safeguard the SIM card loaded on your device.
That’s why in this guide, I’ll show you how to set up a SIM card lock on different smartphone devices. This way, you can lock the SIM card if someone tries to remove it after you’ve set it up on your iPhone, Android, or Samsung to protect and guard against unauthorized use of the data on your SIM card.
- How Can I Set Up A SIM Card Lock on iPhone, Android, and Samsung Devices? How to Set Up a SIM Card Lock on an iPhone How to Set Up a SIM Card Lock on an Android Device How to Set Up a SIM Card Lock on a Samsung Phone
How Can I Set Up A SIM Card Lock on iPhone, Android, and Samsung Devices?
Besides your lock screen password, you can set up a SIM card lock on your iPhone, Android, or Samsung phone to prevent anyone from using your SIM card on another device.
Note that you have to know your existing SIM PIN if you must set up a SIM card lock on your device. This information is normally available in the booklet that comes with your SIM card as well as on the carriers’ websites.
The default SIM PIN for most carriers is 1111, 1234, or 0000. However, before attempting to set up a SIM card lock on an iPhone, first look for the exact PIN for your SIM card. Avoid blind guesses because your SIM card will be disabled if you don’t get it properly in three attempts. Try using Google.com to look for your carrier’s website for confirmation.
How to Set Up a SIM Card Lock on an iPhone
You can use a SIM PIN to prevent others from using your SIM card for phone calls or cellular data. Your SIM card will automatically lock when you restart your device or take out the SIM card, and a notification that reads “ Locked SIM ” will appear in the status bar. Here’s how to set up a SIM card lock on your iPhone device.
- Choose Settings > Mobile Data/Cellular > SIM PIN . On the next screen, flip the toggle next to SIM PIN to the ON position (green).
- When you enable the SIM PIN option, you will get a pop-up prompting you to enter your current or default SIM PIN. Enter your default SIM PIN and press “ Done .”
- Your SIM PIN will now be activated once you enter the right default PIN. You must still change it to your personal PIN because you do not want it to remain as the default.
- Tap the “ Change PIN ” button.
- First, input the current PIN, which should still be the default.
- You must then enter and confirm your new PIN.
- After that, restart your phone. You should receive a notification indicating that you’ve successfully set up a SIM card lock.
Be aware that you only have three attempts to enter the right SIM PIN before your SIM is disabled and you must contact your carrier to get a new one. Make sure to create a PIN that is both easy to remember for you and challenging to decipher for unauthorized access.
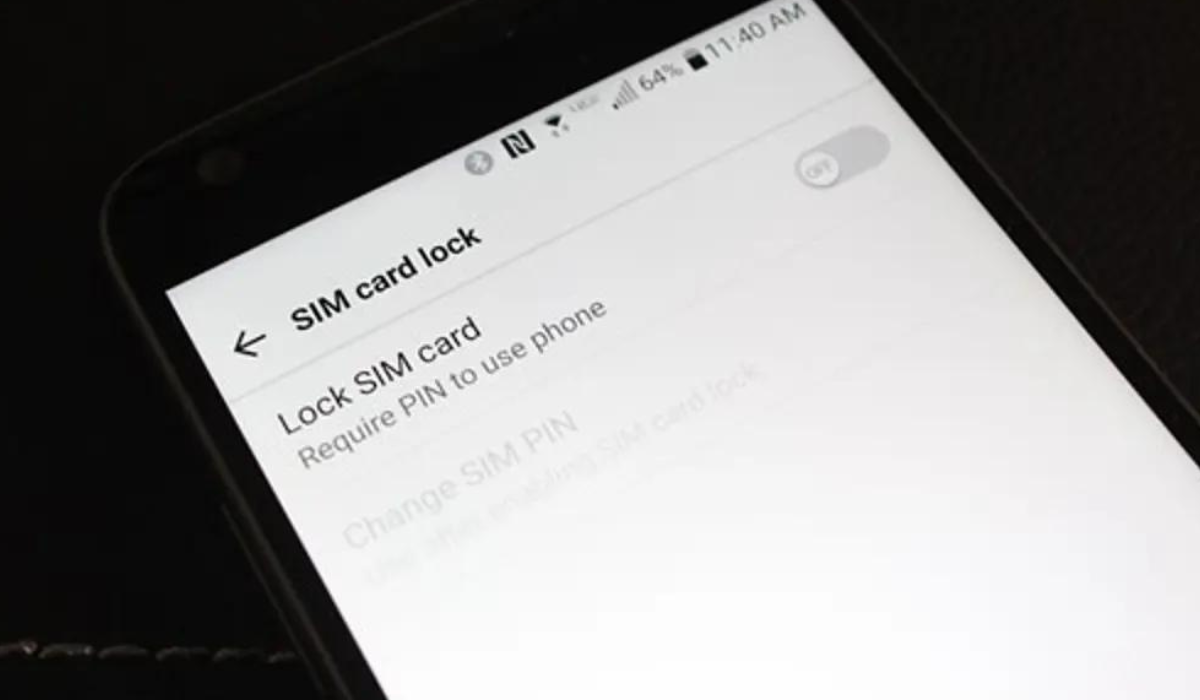
How to Set Up a SIM Card Lock on an Android Device
You’ll also have to input the default passcode set by your operator when you want to set up a SIM card lock on Android. The default number should be printed on the back of your SIM card.
I’d therefore advise that you keep the SIM package in case you ever get locked out of your account, say after using a wrong SIM card PIN. To set up a SIM card lock on your Android phone, follow these steps.
- Select Settings > Security > More Security Settings from the menu.
- Select SIM card lock .
- If you’re using it for the first time, enable Lock SIM Card and enter the default PIN.
- When this option is enabled, press “ Change SIM PIN ” to modify the default PIN.
- Input your old PIN , then your new PIN , and then press OK . When entering your previous PIN, be careful not to enter the wrong PIN three times, else your SIM card will be disabled.
- Restart your phone to test the feature.
Keep in mind that the method required to set up a SIM card lock on Android phones may vary across models. So, to set up a SIM lock on a phone where you can’t find the option, use the search bar in the Settings app.
How to Set Up a SIM Card Lock on a Samsung Phone
On the top Samsung Galaxy models, Samsung employs the One UI Android skin. The software therefore has a different Settings app than standard Android devices. As such, you can set up a SIM card lock on your Samsung Galaxy phone by following the steps below:
- Navigate to Settings on your Samsung phone.
- Navigate to Biometrics and Security .
- Choose Other security settings .
- Select the option to Set up a SIM card lock .
- Turn on the Lock SIM card toggle.
- Enter your current SIM card PIN (as seen on your SIM card package). Choose OK afterward.
- To protect your SIM, select Change SIM card PIN and enter a new passcode.
Additionally, your phone will ask you to enter a Personal Unlock Key (PUK), an eight-digit number, if you unintentionally locked your SIM card after three unsuccessful tries. This number can be found on the box of your SIM card. If you don’t have the box, call your operator and verify your identity to obtain the PUK.
I should also warn you that when you set up a SIM card lock, it’s not going to stop your SIM card from getting stolen. However, you can be sure that your contact data will be safe from theft or any unauthorized access.
All in all, the SIM card lock on mobile phones is largely ignored, even though it has great importance. Using the tips I’ve suggested above, you can easily set up a SIM card lock as an added layer of security for your phone number and relevant contact details.
Author:Joan Agie
Add MobilityArena as a preferred source on Google
Whenever I use a Mac for my daily tasks, Spotlight is my go-to tool to quickly locate any apps and files I need. Spotlight makes the search much easier, and I almost always find exactly what I’m looking for. However, there are times that Spotlight fails to provide the desired search results. So if you’re facing this issue, I have some tips for you.
In this article, I’ll show you how to get the desired Spotlight search results on Macs. You can do this with just a bit of troubleshooting, so pay attention to these tips to see the results of your selected search in no time.

How Can You Get the Desired Spotlight Search Results on Macs?
Spotlight Search is a valuable Mac utility that allows you to quickly locate a specific file, folder, app, or other item. However, if you just can’t get the desired Spotlight search results on Macs, here’s what you can do.
Make Sure You Entered the Right Search Term
When we type items in search forms or text boxes on our Mac, we sometimes make mistakes in a hurry or simply not paying enough attention. In either case, you’ll most likely get the wrong search results because the search term is wrong.
To make sure you always get the desired Spotlight search results on Macs, double-check what you type into the search bar during the search. Spotlight might be returning irrelevant search results because you inaccurately spelt out your search term. A single incorrect character can mean the difference between an accurate or undesired search result.
Also, double-check that you’ve entered the correct term. If you type a phrase, be sure it’s correct and that you put it in quotes; putting a phrase in quotes ensures that you obtain results that contain exactly that phrase.
Search for a File by Type
When looking for a specific sort of file, such as an app, PDF, or image, being specific can help you get the desired Spotlight search results on Macs. This means you should try searching by file type. It’s a useful approach to optimizing your Spotlight searches in macOS.
To do this, type “ kind: ” followed by the exact file type to see only files of that type. If you’re looking for JPG documents, for example, put “ kind:JPG ” to limit your search results to this file format.
Check Your Spotlight Settings
When you’re finding it hard to get the desired Spotlight search results on Macs, it’s possible that you’ve blocked specific files from appearing in Spotlight searches. You can easily confirm this through your Mac’s System Preferences . If some files are indeed blocked from appearing in Spotlight search results, proceed as follows:
- Navigate to the Apple menu > System Settings from the menu bar, and then choose Siri and Spotlight from the options in the sidebar.
- Check the categories you want to appear in Spotlight searches under Search results .
- Scroll down to the bottom of the menu and select “ Spotlight Privacy .”
- Select the folder you want to unhide from the Privacy popup menu, then click the minus ( – ) button to remove it from the list.
Now, when you search for previously hidden categories and Finder locations in Spotlight, you should see them easily.
Check the Archive Files
You won’t see a file in Spotlight if you haven’t extracted it from an archive, such as a ZIP or RAR file. So, to get the desired Spotlight search results on Macs, first extract the file, then restart your search.
On a Mac, extracting a ZIP file is rather simple — just locate the ZIP file in question and double-click on it to find the extract option.Try searching Spotlight again when you’ve extracted the archive files.
Check Your Backups
We sometimes delete files by accident or because we no longer believe they are useful. We may need these files again and look for them, forgetting we erased them.
This could be the case if you can’t get the desired Spotlight search results on Macs. Fortunately, if you’ve backed up your Mac with Time Machine, you might be able to restore the deleted file and see it again in your Spotlight search results.
So, the next time you can’t locate something in Spotlight or elsewhere on your Mac, it’s possible that it’s on a backup of your Mac rather than your Mac itself.
Recreate Your Spotlight Index
You can also rebuild your Spotlight index as a final resort to get the desired Spotlight search results on Macs. This will restore Spotlight to regular operation on your Mac. Here’s how to go about it:
- On your Mac, go to System Settings , choose Siri and Spotlight from the sidebar, and then choose Spotlight Privacy at the bottom.
- To add a folder or disk to the list of sites excluded from Spotlight searches, click the Add button. Alternatively, you can drag and drop the folder or disk you want to reinstall into the list.
- Choose the item you just added to the list, then press the minus ( – ) button.
- Close System Settings after clicking “ Done .”
Spotlight will start to reindex the contents of the folder or disk, although the time it takes will depend on its size.
To conclude, Spotlight is a powerful search tool that can search your whole Mac and find exactly what you’re looking for in seconds. It eliminates the need to search through folders for files. So, try one of the solutions listed above if you somehow can’t get the desired Spotlight search results on Macs. Also consider reaching out to Apple Support if the problem persists.
