Add MobilityArena as a preferred source on Google
When saving a file that has the same name as the existing one on your Mac, you will see a pop-up message prompting if you want to replace the original file with the new one. But sometimes, maybe you are moving a file in a hurry without paying attention to this warning, only to find that you have mistakenly replaced the file, causing your file to be overwritten.
So, is it possible to get the replaced file back? Yes, of course! As a matter of fact, the replaced or overwritten file is still stored on your Mac. When clicking the Replace button to overwrite the original file, you just get the file name, icon, or thumbnails deleted. Instead, the actual content remains on your Mac internal hard drive until another piece of data takes its place. Given this, you have time to recover replaced files on Mac but you need to take help from some tools, namely, Time Machine, Cloud backups, thirty-party data recovery software, and AutoSave.
Recover Replaced or Overwritten Files on Mac with Different Tools
- Time Machine
As a versatile data backup and restoration tool, Time Machine enables you to make hourly, daily, or weekly backups as well as local snapshots on your Mac to prevent unexpected data loss. However, Time Machine can take effect only if this built-in tool is turned on before you mistakenly replaced the original file with the same name. If you have already had a Time Machine backup before the data overwrite occurs, Time Machine always comes in handy.
Step 1: Connect the external drive storing your Time Machine backup to your Mac computer.
Step 2: Open Finder to locate the folder that stores your overwritten file.
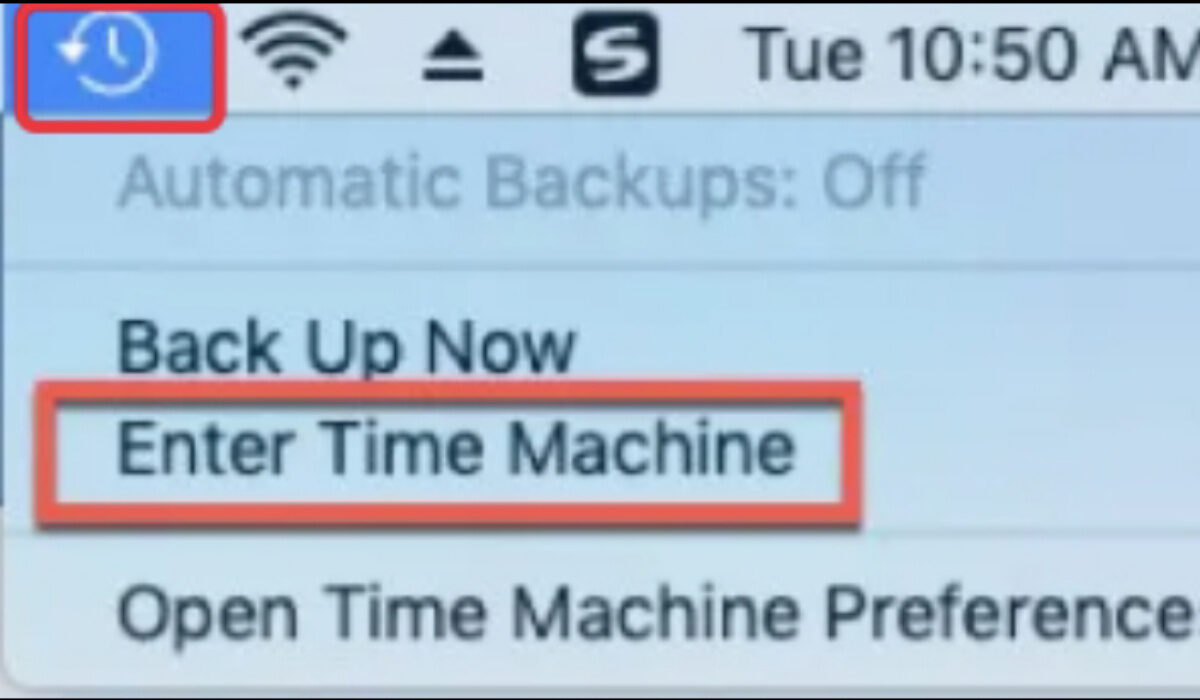
Step 3: Hit the Time Machine icon from the top menu, and then select Enter Time Machine from the drop-down list.
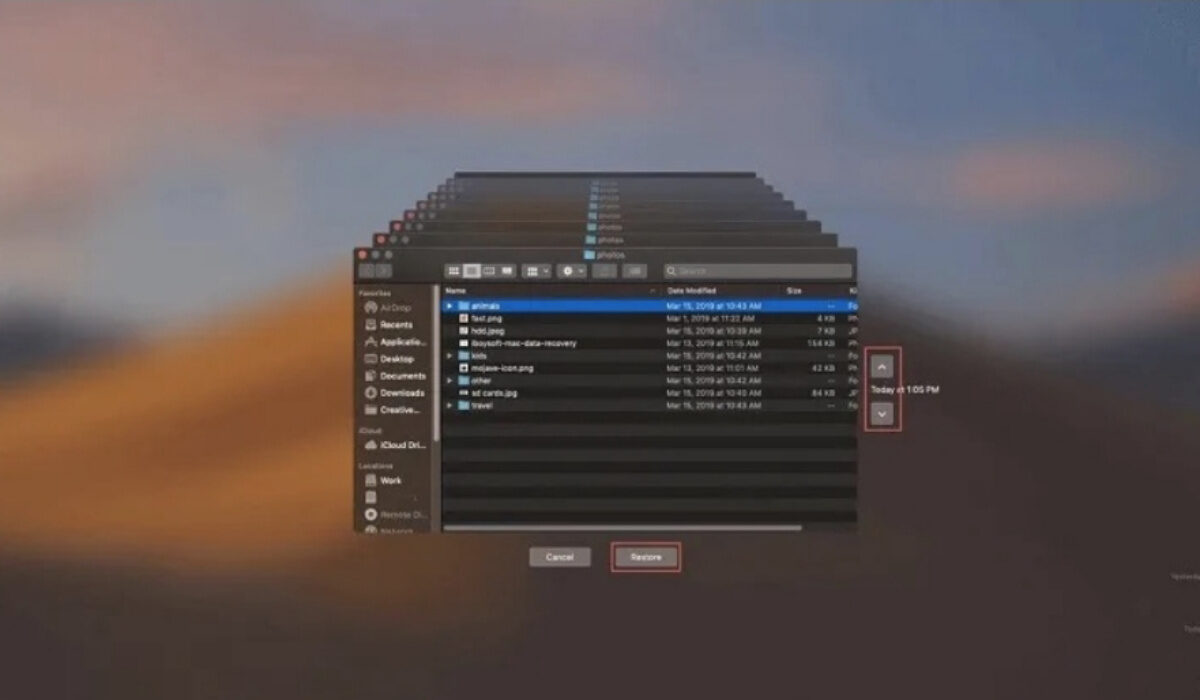
Step 4: Click the up arrow, the timeline to the right, or the previous version windows to go back to the time before the file was replaced and find the needed file.
Step 5: Select the file and click the Restore button to complete file restoration.
- Cloud Backups
Most Cloud backup tools can maintain history changes to files, allowing you to recover mistakenly replaced files from the history files, so such Cloud backup tools like iCloud, Dropbox, or Google Drive can be taken as a helpful alternative to Time Machine. Here, we will guide you on how to perform replaced file recovery on Mac using two different Cloud backups. One is iCloud and the other one is Dropbox. As long as you turned iCloud or Dropbox on to make a backup copy of your files regularly, you are able to restore the overwritten or replaced file to its original version.
To retrieve an overwritten file or a replaced file with iCloud:
Step 1: Open icloud.com using Google or other browsers and input your Apple ID to sign in to your iCloud account.
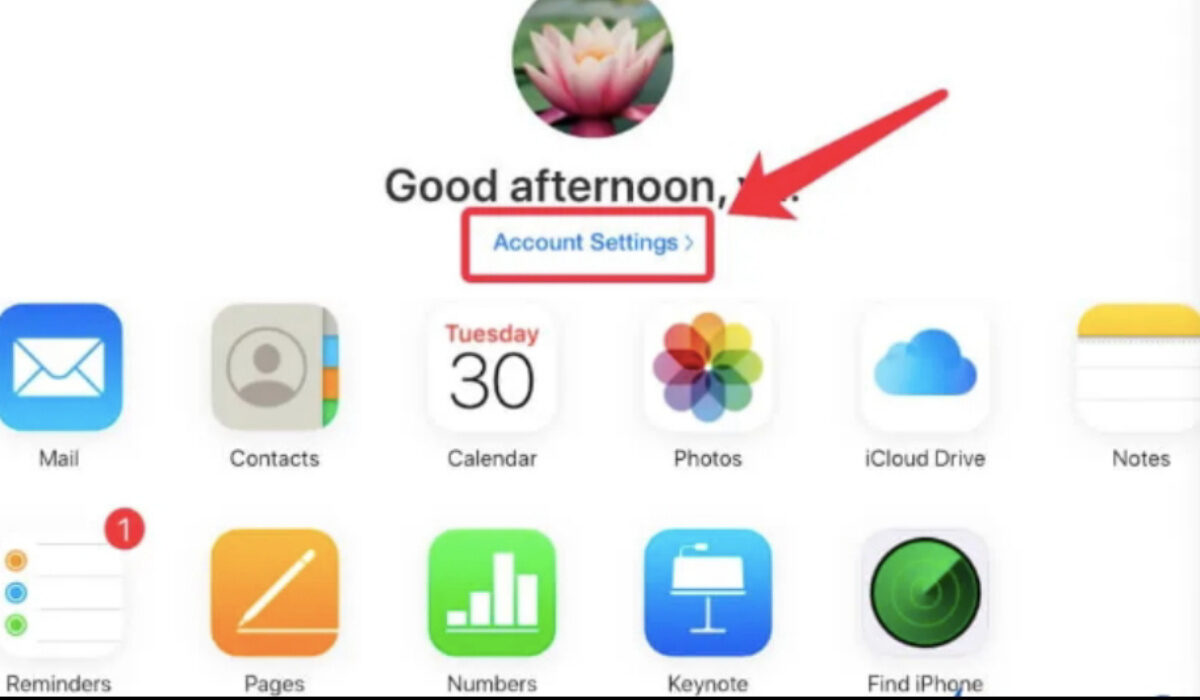
Step 2: Click Account Settings after a successful login.
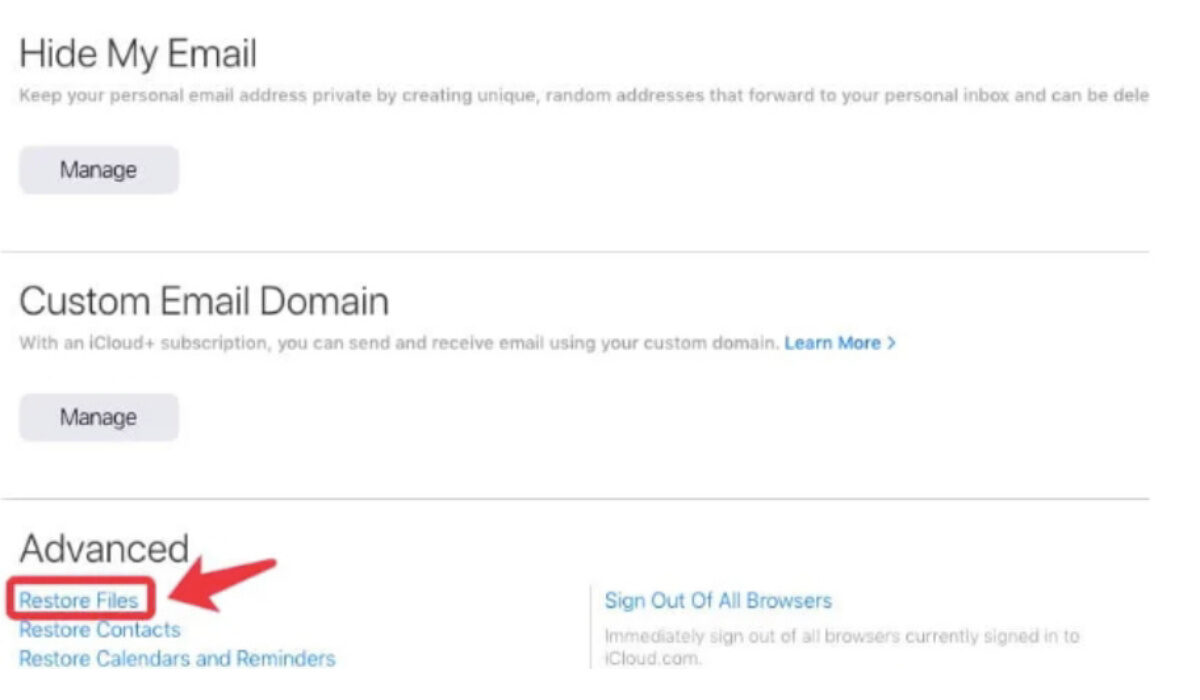
Step 3: Move to the bottom of the iCloud settings page, find and click Restore Files .
Step 4 Locate and tick the files you want to get back, and then hit the Restore button.
To retrieve an overwritten file or a replaced file with Dropbox:
Step 1: Go to dropbox.com to sign in to your Dropbox account.
Step 2: Select the folder that stored the replaced file. Alternatively, you can click All files to locate your target file.
Step 3: Tick the file you’d like to get back and then head to the three dots button > Version history to the right.
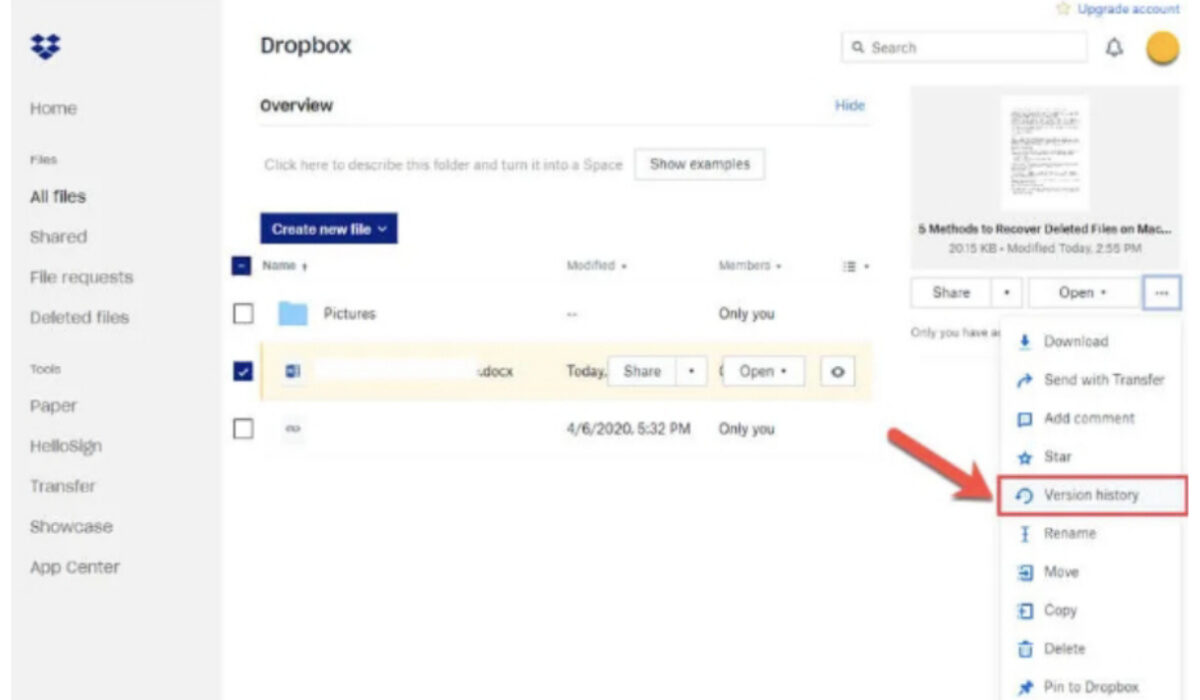
Step 4: Find the original file version you need and hit Restore .
- Third-party Data Recovery Software
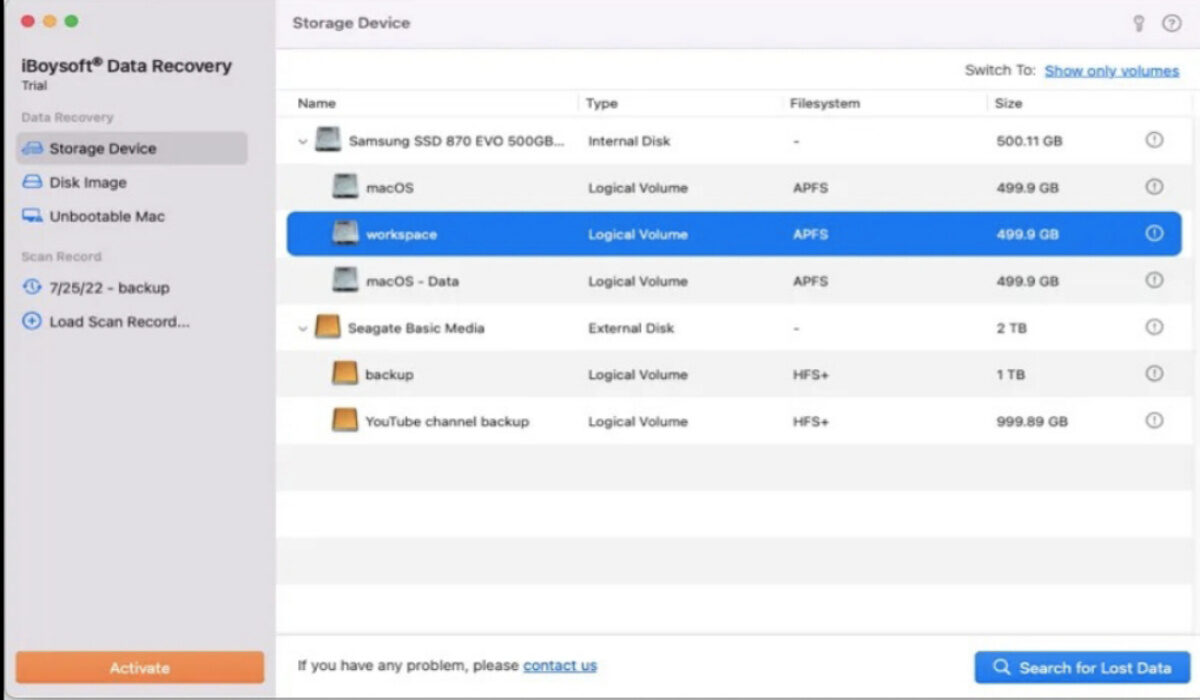
Apart from Time Machine and Cloud backups, data recovery software can also be used as a workable utility to recover overwritten files. If you don’t develop a good habit of backing up files or never do so, data recovery software like iBoysoft Data Recovery for Mac will be a necessity.
Step 1: Go to the official website of this data recovery application to free download and install it on your Mac. If you are a new user that never installed this program before, you have to allow system extensions and enable Full Disk Access.
Step 2: Select the storage device where the overwritten files are situated after launching this software, and click the Search for Lost Data button to initiate disk scanning.
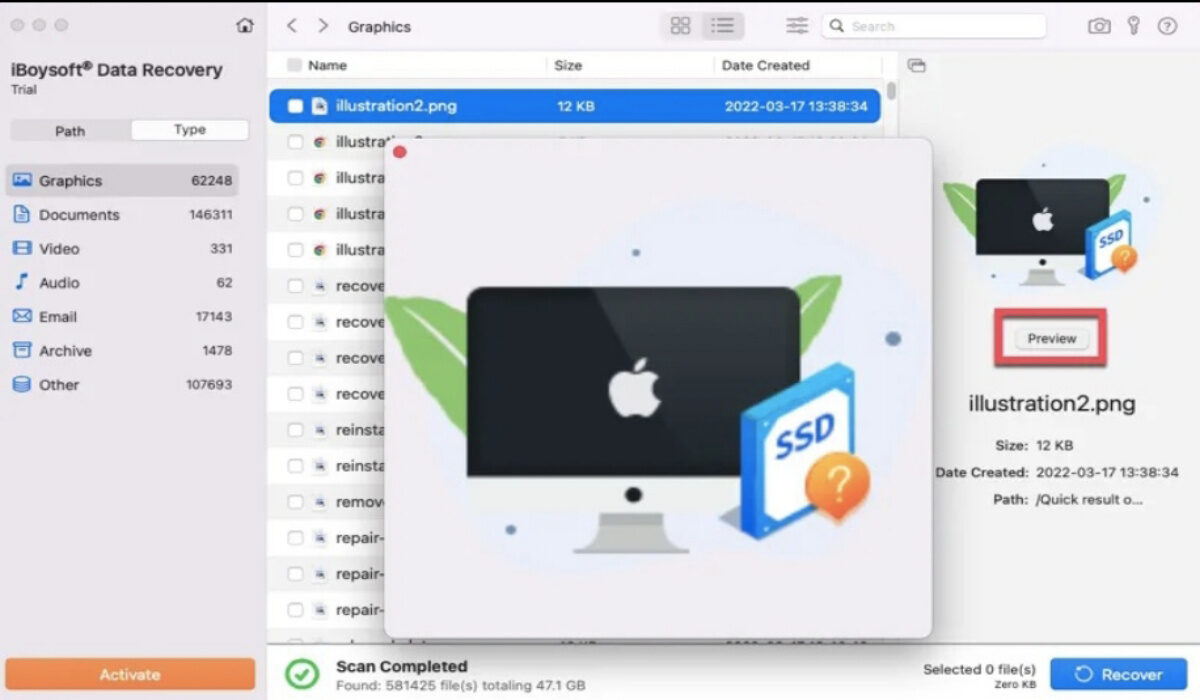
Step 3: Filter the scanning results to locate the replaced files you want, preview and tick them, and then click Recover to restore the overwritten files.
- AutoSave
Whether you are using a Windows PC or a Mac, you should know that there is a helpful feature called AutoSave available on both systems, helping you save your file automatically every few seconds when you do operations on the file, including opening, renaming, editing, saving a file, and more every time. Thus, you can try AutoSave to recover the files that are replaced.
Step 1: Open the new document that has taken the place of the existing one.
Step 2: Click the File menu from the top navigation bar and then go to Revert To > Browse All Versions .
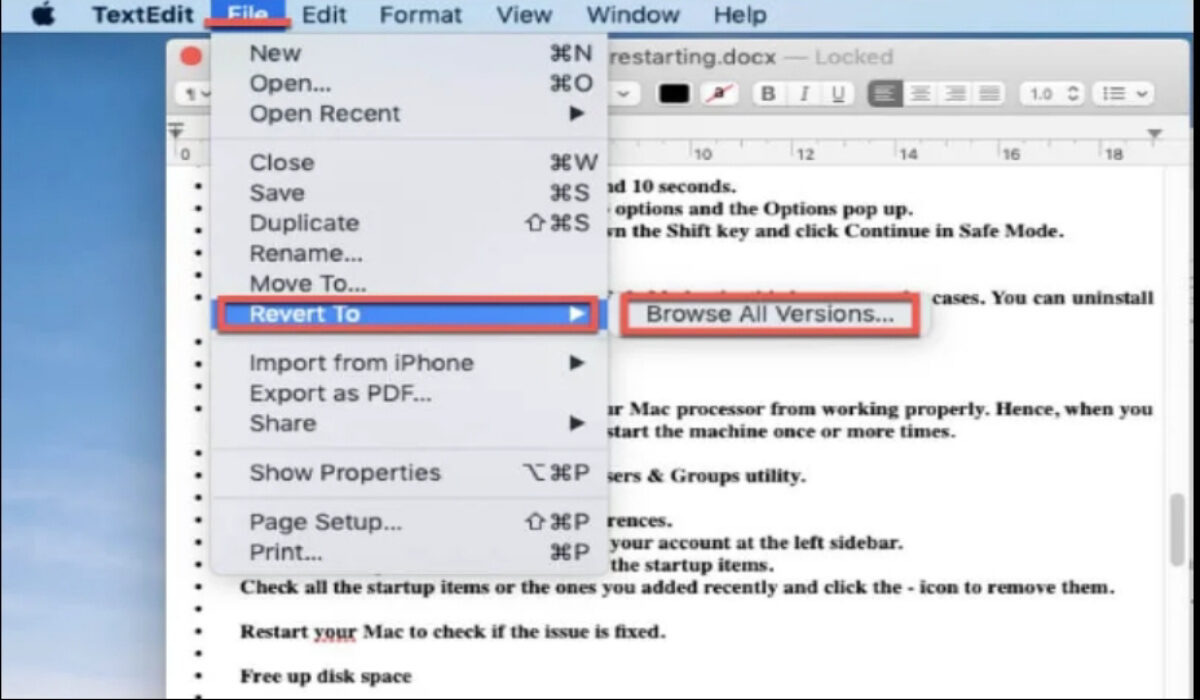
Step 3: Check the version history to select the original file version and click Recover to retrieve the overwritten files.
Final Words
In this article, we introduced four different ways to recover overwritten or replaced data on Mac. If you have Time Machine backups or Cloud backups, then you can get your overwritten files back with the help of Time Machine or the corresponding backup storage services. If not, third-party data recovery software iBoysoft Data Recovery for Mac should be your first choice.
- Don’t miss our mobile phone reviews .
- Follow our news on Google News .
- Join our WhatsApp Group , to be notified of the most important articles and deals,
- Follow us on Instagram , Facebook , Twitter , and YouTube .
Author:Content Partner
Add MobilityArena as a preferred source on Google
One of the easiest things that can ruin your mood on a regular day is getting a message notification that reads “You have 0.8 GB remaining!” Perhaps you’re already racking your head for answers and asking rhetorical questions – “What did I download?”, “Didn’t I just buy this data yesterday?” – just to understand why your data is draining so quickly.
On days like this, you could wonder if there’s any way to actually cut down or reduce your mobile data usage to make your data last longer. Thankfully, such useful measures exist, and so we’ve created this guide to help you figure out ways to reduce your mobile data usage on your Android phone.
- Reduce mobile data usage by limiting app background data
- Reduce mobile data usage by restricting data usage in Settings
- Reduce mobile data usage by only updating apps with Wi-Fi
- Reduce mobile data usage by reducing streaming
Reduce mobile data usage by limiting app background data
Even when your device is not in use, there are still certain apps that continue to use mobile data. Typically, you can monitor and update your programs when you’re multitasking or when the display panel is off thanks to background data. However, not every app needs to constantly consume background data.
You can view the statistics for which apps are using how much data by going to Settings > Data Usage . You’ll be able to view the foreground and background data use for any given app by tapping on it. When an app is open and being actively used by you, it uses what is known as “ Foreground data ”
Conversely, when an app is operating in the background when you aren’t using it, “ Background data ” is being used. It happens automatically and with no effort on your part. This can include sync or automated app updates.
Select “ Restrict app background data ” if you discover that a particular app’s background data usage is too high and you don’t require the app to run continuously in the background. This makes sure that the app only uses data when it is opened and this way, it’ll use up less data overall.
Reduce mobile data usage by restricting data usage in Settings
The simplest thing you can do to prevent excessive amounts of data from being used up without your knowledge is to set a restriction on your monthly data consumption. The Settings app on your Android device should typically let you set a data consumption limit for your mobile device.
Select Data Usage > Billing Cycle > Data Limit and Billing Cycle from the Settings menu on your Android device. The maximum quantity of data you plan to consume per month can be set there. Additionally, you have the option to choose automatic network disconnection as soon as you meet the maximum data limit.
Reduce mobile data usage by only updating apps with Wi-Fi
You can turn off Google Play Store’s automatic app updates on your Android device, and this is one of the most beneficial ways to lower mobile data usage. Click Menu > Settings > Auto-update apps in the Play Store.
You’ll need to click on “ Auto-update apps over Wi-Fi only “. Alternatively, you can select “ Do not auto-update apps “, however, this is not advisable as you will need to remember to update your apps manually, as opposed to the update being automatic. As a matter of fact, you can switch to using Wi-Fi only and turn off mobile data completely, except for when you are outside of Wi-Fi coverage.
Reduce mobile data usage by reducing streaming
One activity that consumes so much data on mobile phones is streaming audio and video, along with high-resolution photos. If possible, stay away from these when you’re using mobile data. You can choose to download music and movies/videos only while you are connected to Wi-Fi or keep them locally in your storage.
You can also reduce the stream’s quality while streaming over mobile connection to save your data. When using your mobile data on your Android device to stream videos on YouTube, make sure to reduce the video resolution because YouTube uses a lot of bandwidth.
Numerous Android streaming apps, including Netflix and YouTube Go, provide data saver modes for mobile devices that significantly reduce data usage, so you can also take advantage of this to cut down on mobile data usage.
Monitor your Apps
Using bandwidth-hungry apps can significantly impact how much data you consume while connected to a mobile network. You might not be aware that every time you click a photo, the Google Photos app syncs it in the background. Data usage for social media apps like Instagram and Facebook is also quite high. You should thus avoid using those apps for online activities such as watching movies and GIFs.
You could also consider using alternative programs that can still do the necessary tasks while using less data. One such alternative option to the Facebook app is Facebook Lite. It reduces data consumption as well as saves battery life. A comparable choice for the Twitter app is TweetCaster. In essence, you get the same functions and expend way less mobile data!
The truth is, if you know where to look, you’ll be able to identify the activities and features on your device that suck up your data and make you feel like you’re subscribing every day. We’ve provided an insight into various ways to do this and cut down considerably on your data usage.
So, with the tips you’ve gotten from this article, you can say goodbye to quick data drain and enjoy longer-lasting data. We’re sure you’ll appreciate the insight in this article (you’re welcome!), so make sure to recommend it to your friends and loved ones so they can benefit from it too.
- Don’t miss our mobile phone reviews .
- Follow our news on Google News .
- Join our WhatsApp Group , to be notified of the most important articles and deals,
- Follow us on Instagram , Facebook , Twitter , and YouTube .
