Add MobilityArena as a preferred source on Google
Whether you’re watching a movie or taking an important business call, it can be really frustrating when your AirPods won’t connect to your device. Normally, they are supposed to connect to your phone, iPad, and other devices without difficulty.
In this article, I’ll walk you through various ways to fix when AirPods won’t connect. So if you’re wondering why your AirPods aren’t connecting, read on to learn how to fix it.
- How Can You Fix When AirPods Won’t Connect? Charge Your AirPods Update Your Software Turn your Bluetooth on and off Clean Your AirPods Try a single AirPod Restart Your Device Connect the AirPods to Another Apple Device Reset and Re-Pair AirPods With Device
How Can You Fix When AirPods Won’t Connect?
There are numerous causes for why your AirPods may not be able to connect with your Bluetooth devices. A low battery charge, Bluetooth troubles, software update issues, hardware damage, debris on the AirPods or charging case, and other factors are some of the potential causes.
Here are several techniques you can try to fix when AirPods won’t connect to your device.
Charge Your AirPods
When your AirPods aren’t connecting or even functioning properly, this is the simplest thing to try. Put your AirPods back in the charging case and use a Lightning cable, wireless charger, or MagSafe charger to power everything. Wait until the case’s light turns green. That indicates that your AirPods and case are fully charged. Check afterward to confirm that this tip has helped to fix when AirPods won’t connect.
Update Your Software
Updating your iOS or iPadOS software is also a good idea for troubleshooting any AirPods issues. So, apply any pending updates to see if it helps to fix when AirPods won’t connect.
You can do this on your iPhone or iPad by navigating to Settings > General > Software Update . If you need to update your software, simply follow the on-screen instructions. You can rule out any problems with your device by using the most recent software.
Turn your Bluetooth on and off
Bluetooth connections fail sometimes. Toggle your Bluetooth connection on and off to quickly determine if that is the root of your AirPods connectivity troubles. There are several ways to do this and fix when AirPods won’t connect, the simplest one is to access the Control Center and toggle Bluetooth on and off.
On your device, go to Settings > Bluetooth to switch Bluetooth on or off. Fans of Apple’s virtual assistant Siri can also turn Bluetooth on and off with a simple voice command.
Clean Your AirPods
Through regular use, debris like dirt and grime and even worse can gather on the AirPods and even the charging case. You may need to thoroughly clean everything if you’re having trouble getting the earbuds to connect to your device.
Any dirt or debris, no matter how small, could be interfering with charging or doing other things.
Clean your AirPods with a gentle microfiber cloth. Do the same for the charging case. You can use a wet towel, but ensure no liquid enters the AirPods’ openings or the case’s charging port.
Reconnect after making sure everything is dry, clean, and fully charged, and check to see if you’ve been able to fix when AirPods won’t connect.
Try a single AirPod
You may not know, but each AirPod may function separately from the other one. Remove one AirPod at a time from the charging case and check to see whether they connect individually to your device. This can help you determine if the problem is isolated to a particular AirPod. If only one of them connects to your device while the other does not, you’ll have a better notion of where the problem is and how to fix when AirPods won’t connect.
Restart Your Device
Next, it’s time to restart your smartphone if, at this point, you’re still unable to fix when AirPods won’t connect. Depending on how old your iPhone or iPad is, there are many ways to accomplish this.
- Press the volume up button on a modern iPhone, then immediately press the volume down button. Press the Side button after that.
- To turn off the iPhone, swipe across the screen. Press the side button again to restart. The start-up process starts as soon as the Apple logo appears.
When using an iPad without a home button, the procedure is the same. After restarting the device, check to see if the AirPods connect and you may resume your music session.
Connect the AirPods to Another Apple Device
There’s always the possibility that your AirPods are fine but the device you’re attempting to connect to is having a problem.
You’ll need to get a different iPhone, iPad, Mac, or even an Apple Watch and try pairing the AirPods to rule the possibility out. If it works to fix when AirPods won’t connect, you’ll know that the issue is with your main device and not the AirPods.
Reset and Re-Pair AirPods With Device
If the problems persist, it is time to take more serious actions to fix when AirPods won’t connect. A factory reset will totally erase the memory of the AirPods and return them to their original state.
- Place the AirPods in the charging case and close the lid to begin the process. Wait for another 30 seconds.
- The charging case’s lid should then be opened and kept open.
- Next, go to Settings > Bluetooth on your iPhone or iPad.
- Locate the name of your AirPods and press the More Info ( I ) button next to it.
- Choose Forget This Device , then click Confirm .
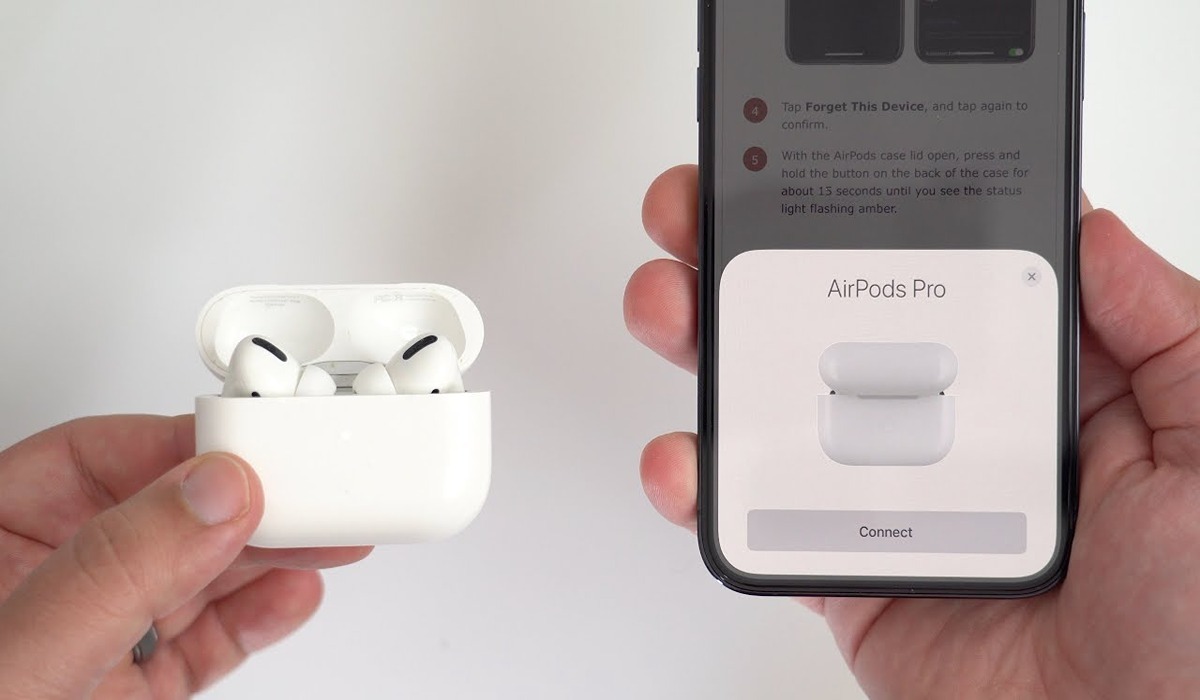
- Press the setup button on the back of your AirPods case for about 15 seconds with the lid open. Wait for the status light to first flash amber and then white.
It’s time to try to re-pair your iPhone with the AirPods after they have been factory reset.
- Place them close to an iPad or iPhone after opening the lid.
- If successful, the screen will display a pop-up. To connect the AirPods and add them to your iCloud account, by following those instructions.
Please note that the third-generation AirPods and any model of AirPods Pro can only be linked to a single Apple ID. If you want to use AirPods that were previously linked to another Apple ID, the other user must delete them from their account.
To conclude, with the aforementioned fixes, your AirPods should connect to your device without a hitch so you can listen to music and podcasts without interruption.
If you’ve tried these troubleshooting suggestions to fix when AirPods won’t connect and you’re still unable to connect your AirPods to a device, it’s best to contact Apple for assistance. You can check out this guide if your AirPods are not switching automatically between Apple devices.
Author:Joan Agie
Add MobilityArena as a preferred source on Google
The flashlight is one of the most useful phone accessories, it comes in handy in different situations. You can enable or disable the flashlight on your Android and iPhone through different methods, but not all smartphone users are aware of these options.
In this article, I’ll show you different ways to enable or disable your phone’s flashlight whether you use an Android or iPhone. Some are well-known, but you might be surprised by a couple of the tips I’ve suggested in this guide.
- How Can You Enable or Disable Your Phone’s Flashlight? How to Enable or Disable Your Phone’s Flashlight: Android Using Quick Settings Using OEM Shortcuts and Gestures Using Google Assistant How to Enable or Disable Your Phone’s Flashlight: iPhones Through the Lock Screen Using the Control Center Using the Back Tap gesture Using Siri
How Can You Enable or Disable Your Phone’s Flashlight?
You may not always need the flashlight function your phone offers, but it’s a lifesaver when you do. Below are different ways to enable or disable your phone’s flashlight.
How to Enable or Disable Your Phone’s Flashlight: Android
There are various ways to enable or disable your phone’s flashlight, especially if you own an Android device.
Using Quick Settings
- Swipe down from your lock screen or home screen to open the Quick settings panel.
- There will be a flashlight icon there. Click on it.
- Your phone’s flashlight will be enabled. To turn off the flashlight, just tap it again.
You might need to swipe left or right to see more icons if you can’t see the Flashlight toggle. If you want to make the flashlight toggle more visible, hit the Edit (pencil) icon and drag the title to a more handy position.
Depending on your hardware manufacturer and Android version, this menu will vary. But once you figure it out, it’s much easier to enable or disable your phone’s flashlight.
Using OEM Shortcuts and Gestures
A lot of Android OEMs provide quick ways to enable or disable your phone’s flashlight. If you have a Samsung, Motorola, or OnePlus handset, you can use the following flashlight shortcut:
On Samsung phones
On Samsung devices (only One UI and later versions) do the following to enable or disable your phone’s flashlight:
- Navigate to the Settings app.
- Swipe down and select Optional Features .
- Press the Side Key .
- Tap Open App under the Double Press menu.
- Choose Torch .
- You can now turn on your flashlight by pressing the power key twice. To turn it off, press the power key just once.
On OnePlus devices
You can enable off-screen gestures to enable or disable your phone’s flashlight if you use a OnePlus smartphone.
- Click to the Settings app.
- Swipe down to access Buttons and Gestures . The Alert slider, navigation bar & gestures, and quick gestures are all available here.
- Click on quick gestures . System gestures and the screen off gestures section should both be visible. Navigate to screen off gestures .
- Press any of the settings Draw an O, a V, an S, an M, and a W.
- Select the flashlight option.
- Then, set your phone to sleep. Draw any letter when the phone is in sleep mode to turn on the flashlight, which will turn on even with the always-on display. Click the power key to turn it off.
On Motorola phones
Motorola offers a fantastic function called double chop to access the flashlight. It is also referred to as the fast flash. Here’s how it functions:
- Navigate to the Moto app in your app drawer.
- Scroll down to Moto Actions and then click on it.
- You should now be able to see the fast torch , enable it.
- Now, all you have to do to enable the flashlight when your phone is in sleep mode is shake it twice in a chopping motion. To turn it off, repeat the motion.
Using Google Assistant
The following method is perhaps the simplest to enable or disable your phone’s flashlight. All you have to do is use Google Assistant through the steps below:
- Hold down the power key or say the words “ Hey Google ” to activate the Google Assistant.
- Say “ Turn on the flashlight ” as soon as the Assistant pops up.
- Your phone’s flashlight should come on after this command.
- Next, summon Google Assistant once more and say “ Turn the Flashlight off “.
Also, you can turn to using a flashlight app on Android if you don’t like either of the previously described techniques for some reason. It’s also a good option if you’re using an outdated Android phone. On the Google Play Store , there are many of them, but you must be careful when choosing one.
How to Enable or Disable Your Phone’s Flashlight: iPhones
It’s easy to enable or disable your phone’s flashlight if you’re in the Apple ecosystem. The iPhone’s flashlight is accessible with ease through iOS, as you might expect.
Through the Lock Screen
This is the simplest method to enable or disable your phone’s flashlight. Long-press the flash icon on the bottom left side of your lock screen until you feel the phone vibrate, and the flash will turn on as soon as you let go. To turn off the flashlight on your iPhone, long-press and release the icon once more.
Using the Control Center
To open the control center when on the home screen, slide down from the top right corner. To turn on the flashlight, tap the torch icon (tap once again to turn it off). If you press and hold the icon for a few seconds, you’ll see a slider that allows you to adjust the brightness of the flashlight.
Using the Back Tap gesture
You can also enable or disable your phone’s flashlight using the back touch gesture on iPhones running iOS 15. Here is how it works:
- Launch the Settings app.
- Select Accessibility .
- Press Touch .
- At the bottom of the page, tap Back Tap .
- Click on Double tap .
- In the Options menu, select Flashlight or Torch .
- You can now turn on your flashlight by double-tapping the back of your iPhone, and turn it off by double-tapping it again.
This shortcut allows you to easily enable or disable your phone’s flashlight without waking up the screen.
Using Siri
This is another simple way to enable or disable your phone’s flashlight if you use an iPhone.
- Summon Siri on your iPhone by tapping the power/home button or just saying “Hey Siri”
- Then say “ Turn on the flashlight “.
- Afterward, say “Turn off the flashlight” to Siri once more to turn off the flashlight.
To conclude, using the aforementioned tips, you should be able to easily enable or disable your phone’s flashlight. Just be careful not to leave the light on for too long because doing so may severely drain your battery. You can try some useful tips to preserve your iPhone and Android battery, if necessary.
